Capturing and Using Flat Frames
Introduction to Flat Frames
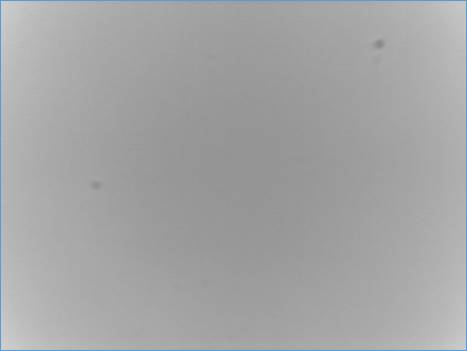
Flat frames are used to correct images for unwanted brightness variations across the frame. This brightness variation might be caused by the optical configuration of a lens or telescope meaning that less light reaches the edges and corners of the frame, making them darker (known as vignetting), or by the presence of dust or dirt specks on the sensor, sensor glass or filters. Dust specks cause dark patches on the image which may be simple spots (as seen in the image below) or small dark donut shapes when using telescopes with a central obstruction.

Dust spots and vignetting need to be corrected before images are stacked as the differing alignment of frames during stacking will spread them out in an unknown manner, making them impossible to fully correct after stacking.
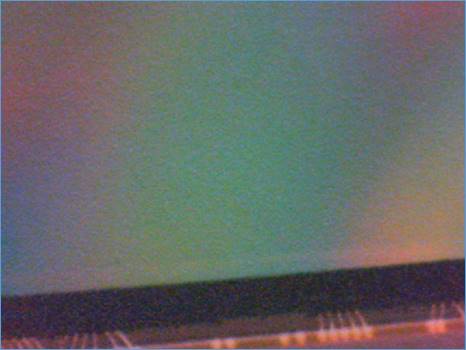
In order to correct for these types of defects in the image, a flat frame is captured – that is an image of a perfectly uniformly illuminated surface, meaning that the only variations in brightness of the flat frame are due to the effects of vignetting and/or dust. The image below shows a flat frame taken with the same (rather dirty) camera sensor used above – the dust specks are clearly visible in the flat frame.
It is actually good practice to capture many flat frames and then to average them to produce a ‘master flat’ which will have less noise that any individual flat frame. The flat frame image shown above is actually a master flat created from 30 individual flat frames and is noticeably less noisy than the light frames shown.
Flat frame correction itself involves brightening the captured image in areas where the flat frame is dimmer than average to correct for the reduction in light reaching the camera sensor in that area. Taking the image and flat frame shown above, the corrected image can be seen below – it is basically impossible to see the effects of the dust spots in the corrected image.
Note: Flat frame correction can also help remove the effects of optical interference patterns from images, such as the ‘Netwon’s Rings’ which may cause issues in solar imaging.
Creating Flat Frames
Select Capture Flat from the Capture menu. This will automatically enable the histogram and show the Capture Flat Frame window.
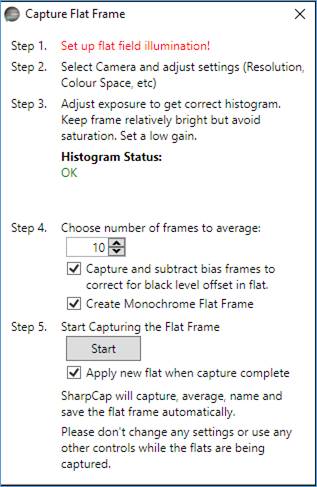
The steps required for creating the flat frame can now be followed
Setup Flat Field Illumination
This involves arranging for the objective or primary mirror of the telescope or camera to be illuminated evenly, ensuring that the only variations in brightness of the captured image will be due to dust specks, vignetting etc.
This is perhaps the trickiest part of using flat frames. Many discussions of different ways to achieve this can be found online, but to give a brief summary, some options are
· Covering the end of the telescope with a white t-shirt and using any light source
· Pointing the telescope at clear blue sky
· Pointing the telescope at uniform, overcast sky
· Using an electroluminescent panel
Note that you should ensure that orientation and arrangement of the imaging system is not changed between capturing flat frames and capturing the actual target images – this means that you should not
· Rotate the camera
· Remove and re-insert the camera
· Add/remove or change filters, reducers, barlows, etc
· Adjust focus more than absolutely necessary (small tweaks are OK)
Setup Camera Settings
Ensure that the camera is set to the correct settings at this stage. If you intend to image at 1600x1200, bin 1, RAW12 then set the camera to those settings before capturing flat frames. There is no need to use the same exposure or gain for flat frames (in fact this would not normally work). Since flat frames should have as little noise as possible, it is usually a good idea to set a low gain value.
Adjust Exposure to get correct Histogram Shape
Correct exposure is critical for creating good flat frames. The text under in the Histogram Status area of the Capture Flat Frame window will provide guidance on how to achieve this.
An ideal flat frame histogram would have a peak at about the 50-60% level and have all the histogram between the 20% and 80% levels. This is shown below for monochrome and colour cameras
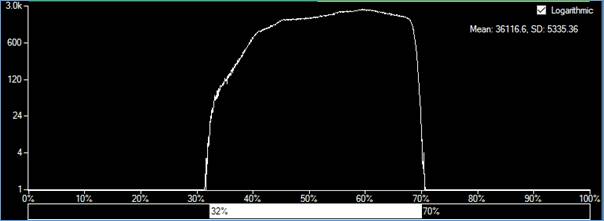
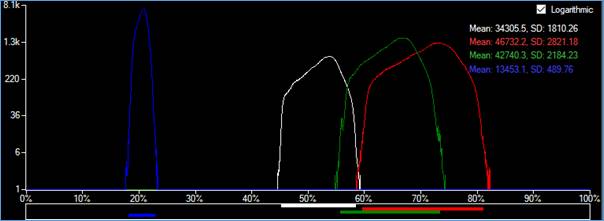
Note the use of the Logarithmic histogram style in both cases which makes it easier to see the extent of the histogram. Also note that for the colour camera the difference in brightness between the blue and red pixels means that it proved impossible to keep all the histogram for both of those colours in the 20-80% range, but the white channel histogram is well confined to the 45-60% region.
Choose Options
The Capture Flat Frame window allows you to customize the flat frame creation procedure by changing the following options
· Number of Frames to Average - SharpCap will capture this number of frames and then create a master flat frame by averaging the captured frames. The higher the number chosen here, the less noise will be apparent in the final master flat frame, which ensure help final image quality.
· Capture and Subtract Bias Frames – If selected, SharpCap will set the camera exposure to minimum after capturing the flat frames and then capture an equal number of bias frames. The master flat frame will then be made up of the average of all the bias frames subtracted from the average of all the flat frames. Selecting this option should give better flat correction across a wide range of image brightness, but requires that the Black Level/Offset/Brightness controls of the camera are not modified between capturing the flat frame and capturing the target image frames.
· Create Monochrome Flat Frame – Selected by default and only relevant for colour cameras, this option will make the created flat frame monochrome even on a colour camera. Monochrome flat frames will only affect the brightness of the image when used. When unselected, a colour flat frame will be created which will have the effect of altering the white-balance of captured images when used.
Start Capturing Flat Frames
Press the Start button to begin capturing flat frames (and bias frames if that option is selected). If the Apply New Flat when capture complete option is checked then the newly created master flat frame will be automatically selected when it is ready.
Using Flat Frame Correction
Flat frames can be selected by using the Apply Flat control in the Pre-processing group.

Press the Browse button to select a flat frame that has already been saved to disk or use the drop down to select a recently used flat frame. To disable flat frame correction, select None from the drop down.
Note: Flat frames must match the resolution of the camera currently in use.
Note: Flat frames created by other software can be used by SharpCap providing they are saved in a compatible format (PNG, FITS, TIFF)
Applying flat frame correction will affect both the image shown on screen and the image data saved to any capture file, so there is no need to apply flat frame correction in later processing if you have used flat frame correction in SharpCap.
Flat frame correction in SharpCap is possible even with high speed cameras – with the LifeCam Cinema running at 1280x720x30fps, applying a flat frame only increases the CPU usage by 1% – SharpCap uses the special video processing instructions in modern CPUs to apply flat frames incredibly efficiently. With a fast CPU you can apply a flat frame to a USB3 camera running at 1920x1080x150fps!