Trouble Shooting
This section is inspired by problems encountered.
Hardware
A common source of hardware problems relating to image capture can be attributed to a lack of understanding of the USB standards. See https://en.wikipedia.org/wiki/USB for further information and maximum cable lengths.
Some definitions:
· The USB 2.0 standard defines a High Speed (HS) of 480 Mbits/s.
· The USB 3.0 standard defines a SuperSpeed (SS) of 5 Gbits/s, although because of timing overheads, a data throughput of 3.2 Gbits/s is deemed reasonable.
· A passive USB extension cable is a simple cable without electronics.
· An active USB extension cable contains electronics to regenerate the USB signal. It is basically a hub and cable combined.
· An unpowered USB hub draws its power from the computer’s USB port.
· A powered USB hub has its own external power supply.
· Black USB ports on a PC/laptop indicate a USB2 connection is available.
· Blue USB ports on a PC/laptop indicate a USB3 connection is available.
Things to consider:
· A camera will draw its power from the computer’s USB port.
· A camera with a cooling fan will draw even more power from the computer’s USB port.
· Lack of power can cause a USB3 device to fall back to USB2 speeds.
· A low quality (or damaged) USB cable can cause problems.
· A copper clad aluminium (CCA) USB cable can cause problems.
· Not all USB ports are equal; think here of front USB ports on micro/mini PCs or laptops running off battery. In case of unexplained difficulty, try different ports on the same computer.
· If an internal PCI USB card has a power connector, ensure an internal power lead is connected.
USBTreeView is a useful utility for discovering the speed at which a USB connected device is performing. The utility will show speeds as HS (High Speed = USB2) or SS (SuperSpeed = USB3).
For trouble free running, consider the following:
· Use the camera manufacturer’s supplied USB cable. If problems arise always test with at least two different short USB cables to rule out USB cable/hub issues.
· If extra length is required, good-quality passive extension cables are usually sufficient up to 3.5m total length for USB3 speeds and 4.5m for USB2 speeds.
· Beyond these lengths, the use of hubs or active cables are required.
· If running two or more devices from a USB hub consider a powered hub rather than an unpowered hub.
Software
· Ensure correct hardware drivers are installed and are up-to-date. Not having the correct drivers for the installed graphics card installed can lead to the card running in low performance ‘compatibility mode’ and to slow frame rates or crashes.
· Windows ‘N’ variants (which do not have media features installed by default) may require the ‘Windows Media Feature Pack’ to be installed before SharpCap will work correctly for certain cameras.
Imaging
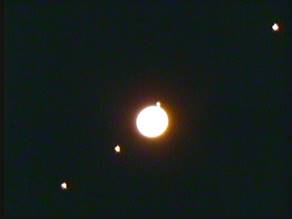
Image Too Bright
Problem – some moons of Jupiter are in my image but the planet has no features.
Solution – the exposure setting on the camera is too high. Reduce the value of Exposure in the Camera Control Panel until the features of the planet can be seen (the moons might not be visible).
Capture a video of say 1,000 frames. Stack this, for example with AutoStakkert, so hopefully the moons re-appear on the stacked final image. This is also an argument against cropping too early in the process as the moons, although not visible in the video, will appear in the processed image.
Jumpy AVI Will Not Stack
Follow these instructions to attempt to rescue a jumpy video created during windy conditions.
The problem – a jumpy surface video (lunar/solar) will not stack.
The solution – have a look at the image stabilisation process at the PIPP website.
Grainy Image
The problem – a very grainy image.
The solution – turn down the Gain in the Camera Control Panel.
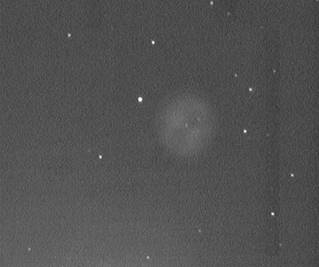
This image is of M92, the Owl Nebula, a faint planetary nebula in the constellation of Ursa Major. Lower the gain and use Live Stack to build a better image.
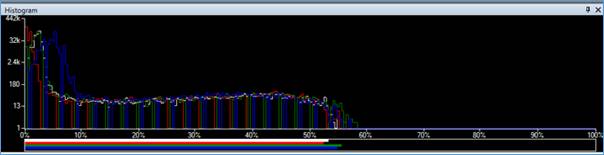
Histogram with Gaps
Below is an example of a histogram with gaps.
The problem – vertical bars and gaps appear in the histogram.
The solution – it is best to set the white balance back to default (remove the gaps in the histogram) and to correct the colour balance after stacking. This will avoid the data loss caused by applying digital white balance correction in SharpCap.
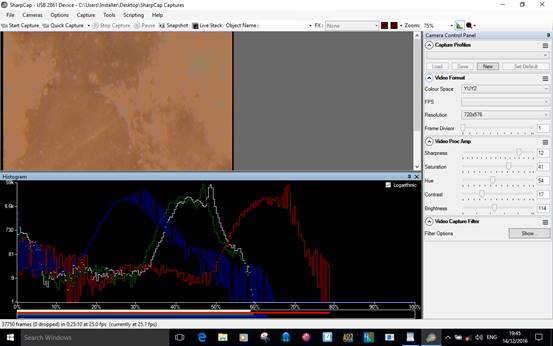
Colours are Wrong
Below is an example of a real world broken histogram and what needs to be done to improve it.
The problem – the colour looks wrong.
The solution – run up the Image Histogram from the Tool Bar. The LRGB histograms should be reasonably aligned but they are not. In the Camera Control Panel look for White Balance or Colour Balance and adjust as necessary until the four histograms are roughly aligned – achieved when the horizontal bars line up at each end.
This capture was taken using an AVS DSO-1 analogue video camera with USB2 video capture device. The video grabber is classed as a DirectShow device – no camera controls are exposed in SharpCap – so adjustments are made using the camera’s internal menu. In this type of camera, green would be adjusted by changing Red and Blue.