Camera Basics
Live Mode and Still Mode
SharpCap up to and including version 3.2 always ran cameras in a ‘Video Camera’ mode – that is the camera was always taking images to be displayed on screen, but images are only saved when you use one of the Start Capture, Quick Capture or Snapshot buttons. This has worked well for most modern CMOS based cameras, but is less suitable for cameras that have a physical shutter (such as DSLR cameras) or those that take a long time to download a frame to the PC (such as high resolution CCD cameras).
SharpCap 4.0 introduces the ability to choose between running the camera in ‘Live Mode’ and ‘Still Mode’.
Live Mode is equivalent to the way that older versions of SharpCap worked and is the default – the camera will continuously take images for display on the screen. All cameras support Live Mode.
Still Mode is available for most types of cameras that SharpCap supports. In still mode, SharpCap will only ask the camera to take an image when requested – otherwise the camera will sit idle.
You can switch between Live Mode and Still Mode by toggling the Live View button in the tool bar – when the button is selected (highlighted) the camera will be in Live Mode, when the button is not highlighted, the camera will be in Still Mode. If the button is not enabled, it means that the current camera does not support Still Mode, so there is no ability to switch between the modes. The following types of cameras do not support Still Mode:
· Basler cameras
· Celestron/Imaging Source cameras
· iNova cameras
· Point Grey/Flir cameras
· Webcams and frame grabbers
· The folder monitor camera – this has its own controls that allow it to only process frames on request, a bit like still mode.
You can also select/deselect the Live View button when a camera is not open. This controls which mode will be used when the next camera is opened, allowing you to ensure that a camera is opened directly into the correct mode if required.
Some functions in SharpCap currently require Live Mode and will automatically switch the camera into Live Mode if they are selected :
· Polar Alignment
· Live Stacking
· ADC Alignment
· Some of the options in the Display Effects (FX) dropdown.
Some functions are only available in Still Mode – for instance dithering when using the Sequencer or Sequence Planner to capture images.
Advantages of Still Mode
· Reduced shutter activations on cameras with physical shutters
· SharpCap may be more responsive when using cameras that take a long time to download the frame to the PC
· You can choose exactly when an image exposure starts
· The camera image will usually respond to camera setting changes with the next still frame – in Live Mode it may take several frames before the camera setting change has an effect
Disadvantages of Still Mode
· Reduced frame rates caused by gaps between capturing frames – for instance with a 0.5s exposure, a camera will obtain 2fps in Live Mode, but may have a lower frame rate in Still Mode.
· Not supported by all camera types
· Not supported by all SharpCap features.
Capturing Images in Still Mode
There are a number of ways to capture images when the camera is in Still Mode
· The Snapshot button – this will capture a single image and save it.
· The Start Capture button – this will prompt as usual for how many images to capture or how long to capture for.
· The Quick Capture button – this will capture images for the specified length of time or the specified number of frames.
· The Framing Shot button – this will obtain an image from the camera and display it on screen, but will not save the image.
Certain SharpCap functions may automatically trigger images to be fetched from the camera when the camera is in Still Mode. For instance, Sensor Analysis and the Smart Histogram sky background brightness measurement will do this to perform their measurements.
Colour Spaces Explained
A colour space describes how the image data is stored for each frame captured from a camera. The details of a colour space indicate:
· Whether the image data is colour or monochrome.
· How many levels of brightness are measured.
· Whether the image data is compressed or not.
The number of brightness levels that are available in an image is often described using the term ‘bit depth’. The bit depth is the number of bits needed to store the full range of brightness levels in the image. For instance, an image that has:
· 256 brightness levels will have a bit depth of 8
· 1024 brightness levels will have a bit depth of 10
· 4096 brightness levels will have a bit depth of 12
· 65536 brightness levels will have a bit depth of 16.
Uncompressed Colour Spaces
The colour spaces listed in this section are uncompressed and lossless – meaning that they do not reduce the quality of any images being captured. All specialist astronomy cameras and some webcams will offer the option of uncompressed colour spaces.
RGB24
This is the default colour space for a colour image – 3 bytes are used for each pixel (one for each of the red, green and blue channels). The one byte used for each channel means that there are 256 possible values for each colour (from 0 to 255).
|
Pros: |
· Simple to use and simple post-processing. · Images should look correct when viewed in any application. · Camera based adjustments such as white balance, gamma, brightness and contrast are available (although these are usually performed in software on the PC). |
|
Cons:
|
· Files are large as they are typically 3 bytes per pixel. · Bit depth limited to 8 bits. · Debayering (turning the raw image to full colour) is performed by the camera driver typically using a simple but fast algorithm. · Adjustments like gamma, brightness and contrast lead to data loss when performed as they happen in digital space. |
RGB32
This is an alternative option for a standard colour image. Instead of 3 bytes, 4 bytes of space are used per pixel, although one of the bytes is unused. Files saved in this format will be larger than the same file saved in RGB24, but will have absolutely no difference in image quality.
|
Pros: |
· Simple to use and simple post-processing. · Images should look correct when viewed in any application. · Camera based adjustments such as white balance, gamma, brightness and contrast are available (although these are usually performed in software on the PC). |
|
Cons: |
· Files are large as they are typically 4 bytes per pixel. · Bit depth limited to 8 bits. · Debayering (turning the raw image to full colour) is performed by the camera driver typically using a simple but fast algorithm. · Adjustments like gamma, brightness and contrast lead to data loss when performed as they happen in digital space. |
MONO8 (also Y800 on some Webcams)
This is the basic monochrome colour space, using one byte per pixel, storing a single brightness value between 0 and 255.
|
Pros: |
·
Smaller file size (1 byte per pixel), ideal for monochrome targets
(narrowband filters, moon). |
|
Cons: |
The following cons apply only when capturing in MONO on a colour camera.
· Processing to produce mono on a colour camera involves a debayer process to produce a colour image and then that is made monochrome, so the following cons for RGB apply: o Debayering (turning the raw image to full colour) is performed by the camera driver typically using a simple but fast algorithm.
o
Adjustments like gamma, brightness and contrast lead to data loss
when they are performed as they happen in digital space. It may be
better to capture as RAW8/12 and then make the final processed
image monochrome. |
MONO16
This is a monochrome colour space which uses 2 bytes per pixel, allowing for 65536 different brightness values per pixel. Note that many cameras that offer this colour space do not have the ability to create the full range of 65536 values – for instance some cameras may have the ability to create only 1024 different values (10 bit) or 4096 different values (12 bit). In these cases, the values the camera produces are stretched to fill the entire range.
|
Pros: |
· Larger range of levels in the output, so a bigger range of brightness can be represented in a single image |
|
Cons: |
· Larger file size (2 bytes per pixel) · No gain in actual image quality if the frames being captured are visibly noisy (just recording the noise in more detail)
The following cons apply only when capturing in MONO on a colour camera.
· Processing to produce mono involves a debayer to produce a colour image and then that is made monochrome, so the following cons for RGB apply: o Debayering (turning the raw image to full colour) is performed by the camera driver typically using a simple but fast algorithm.
o
Adjustments like gamma, brightness and contrast lead to data loss
when they are performed as they happen in digital space. It may be
better to capture as RAW8/12 and then make the final processed
image monochrome. |
RAW8
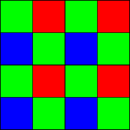
Colour cameras do not detect all three colour channels (red, green and blue) at each pixel – in fact each pixel only detects light of a single colour. The colours are arranged in a grid fashion – usually called a Bayer matrix – which looks like this (the graphic is a GRBG Bayer matrix):
Almost all colour cameras capture their colour data in this way. A technique called ‘debayering’ is used to generate a full set of red, green and blue values at each pixel to give a full colour image. When using an RGB colour space, this debayering process occurs either on the camera or in its driver software.
When capturing in a raw colour space such as RAW8, the original values of the individual red, green and blue pixels are captured by SharpCap. SharpCap has its own debayering code, so the image as seen on the screen will still be in colour, but saved files will appear to be monochrome with a slight grid pattern visible at the pixel level unless they are opened in software that is capable of debayering. Suitable software for this includes PIPP, Registax, AutoStakkert and Deep Sky Stacker.
Saved files captured in RAW8 format will consume only 1 byte per pixel, so they have the great advantage over RGB files of being much smaller. Additionally, a file that is saved in RAW format can be debayered by appropriate processing software using a slower but higher quality algorithm than those typically used in camera drivers.
There are four varieties of the RAW8 colour space, depending on where in the green/red/blue grid the top-left pixel of the camera sensor starts. These variations are named after the top left four pixels on the camera sensor
· RGGB
· BGGR
· GRBG
· GBRG
For instance, RGGB means that the left hand two pixels of the top row are red and green and the left two pixels on the second row are green and blue respectively.
In general, SharpCap knows which pattern a camera uses in RAW mode and will select the correct pattern automatically, however if the wrong pattern is selected automatically then manually choose the correct pattern by adjusting the value of the ‘Debayer Preview’ control. This control can be used to turn off the debayering function if desired. The easiest way to find the correct pattern is to view a red object or light with the camera – only the correct pattern will show a red image.
Note that even when SharpCap is debayering the image being viewed on screen, images saved to any capture files are still in RAW format.
|
Pros: |
· Exact data that comes off the camera sensor with no post-processing. · Post-processing (including debayering) can be done later at a higher quality. · File size is small (1 byte per pixel) |
|
Cons: |
· Smaller range of applications that can work with the output files. · Post-processing is more complex. · Output files may appear to have 'chessboard' effect if opened in applications that don't understand raw formats. · Bit depth limited to 8 bits. |
If your images show colour in SharpCap, but are monochrome with a fine grid pattern when you view the saved files (sample below), then you need to debayer your saved images to recover the colour information. More information can be found here.
RAW16
The RAW16 colour space is a raw colour space for bit depths of up to 16 bits per pixel. On some cameras, this will be labelled as RAW10 or RAW12 to give a more accurate description of the true bit depth available from the camera. Saved files in the RAW 16 colour space use 2 bytes per pixel.
|
Pros: |
· Exact data that comes off the camera sensor with no post-processing. · Post-processing (including debayering) can be done later at a higher quality. · Higher bit depth may give more information and more dynamic range if images are low noise. |
|
Cons: |
· Smaller range of applications that can work with the output files. · Post-processing is more complex. · Output files may appear to have 'chessboard' effect if opened in applications that don't understand raw formats. · Files are larger (2 bytes per pixel). |
Compressed Colour Spaces
Many webcams only offer compressed colour spaces. While these reduce the amount of data that needs to be transferred to the PC, they also mean that some detail of the image is lost. Note that SharpCap no longer saves compressed AVI files from webcams based on their colour space – all AVI files saved from Webcams will be in RGB24, RGB32 or MONO8 format (for mono cameras).
If you wish to reduce video file sizes and are happy to lose some quality to file compression, consider saving the output to WMV file format.
YUY2 / YUV
These are just two names for the same colour space. In these colour spaces, brightness information is stored at every pixel, but colour information is shared between two adjacent horizontal pixels. Since the colour information consists of two bytes of information (hue and saturation), this means that overall 2 bytes are used per pixel in this colour space. (http://www.fourcc.org/yuv.php)
I420
In this colour space, brightness is still stored at every single pixel, but colour information is shared between a block of 4 pixels (2x2). This means a total of 1.5 bytes are used per pixel in this colour space.
MJPEG
In this colour space, each frame is stored as a compressed JPEG image. This leads to a much smaller frame size, but can lead to significant compression artefacts in the images. The level of compression is set by the camera or camera driver and cannot be adjusted.
Choosing the Correct Colour Space
In general, the following guidelines will help choose the correct colour space:
· For a colour camera prefer RAW colour spaces if available to RGB colour spaces.
· If no RAW colour spaces, prefer uncompressed RGB to compressed colour spaces.
If having the option of choosing a higher bit depth (RAW10,12,16 or MONO16), only do so if taking relatively long exposures. Taking high bit depth images at short exposures usually offers no advantage in image quality. See the Smart Histogram for more guidance.
Capture Formats Explained
AVI
The AVI file format is a video file format. While the AVI file format is commonly used, and can be read by many different applications, it is unfortunately a complex file format which can store video data in many ways. This means that sometimes certain applications may have difficulty reading certain AVI files, while the same files work correctly with other applications or on other computers. In general, however, AVI files in either MONO or RGB colour spaces will work correctly on any software on any system.
AVI files can only save video format at a bit depth of up to 8 bits per colour channel, so capture to AVI is not available when using a camera in a higher bit depth mode.
While AVI files can be used to save captures in RAW format, processing software will not recognize this automatically and will generally show a monochrome image with a pixel grid visible if the appropriate Bayer pattern is not specified manually.
PIPP - Planetary Imaging Pre-processor (commonly referred to as PIPP) is useful software for dealing with troublesome AVI files and to stabilise the frames of a video that are too jumpy for stacking software to handle.
Note that SharpCap never records audio to AVI files, even if you are using a webcam that contains a microphone.
|
Pros: |
· Can be viewed in almost any video playback software. |
|
Cons: |
· File format is complex and has many sub formats. · Correct playback may depend on other software and codecs installed on the machine. · Errors may be subtle and difficult to solve. · 8-bit only. · Mono and RAW saved in AVI may appear upside down due to limitations of the file format. |
SER
The SER file format is another video file format that has been designed specifically for astronomy capture. SER files cannot be read, viewed or processed by as many different applications as AVI files but there tend to be far fewer seemingly random issues caused by incompatibilities as the file format is far simpler than the AVI file format.
The SER format can be used to save videos in the RGB, Mono and RAW formats and can be used to capture at both 8 bits per pixel and up to 16 bits per pixel bit depth.
When capturing in a RAW format, the details of the sensor Bayer pattern is stored in the SER file, meaning that most processing and viewing software will automatically read this information and correctly debayer the raw image data to a colour image.
Additionally, a timestamp for each captured frame is stored in the SER file, which is often useful for later image processing.
A SER Player application can be downloaded from the PIPP website.
|
Pros: |
· Simple file format with few variations - applications tend to work correctly with it or not at all. · SER file is written with the Bayer pattern of the camera which simplifies post-processing for RAW captures. · Supports bit depths of 8 bits per pixel and up to 16 bits per pixel. · Each frame in the file is timestamped exactly. · Supports Mono, RAW and RGB captures. |
|
Cons: |
· Less post-processing applications support SER format but the ones which are most used, listed below, all accept SER format: o AutoStakkert AS2 (stacking). o Registax 5 and 6 (stacking and wavelet sharpening). o PIPP (preparing the video files for processing). · Interpretation of the SER standard is somewhat different so sometimes the program needs help to select the correct colour space if not automatically recognized. |
WMV
WMV is a compressed video format that is ideal for capturing long video sequences from webcams, all sky cameras, etc. where perfect image reproduction is not critical and reduced file sizes are required.
WMV videos can be played in video players on most computers and devices, but finding tools to further process WMV videos may be difficult.
|
Pros: |
· Gives much smaller file sizes than other video formats · Supports bit depths of 8 bits per pixel · Supports Mono and RGB captures. · Ideal for recording long videos that you intend to watch or share online, but do not need to post-process |
|
Cons: |
· Image quality is lost due to the compression · Cannot be used to save RAW data or data with a bit depth of more than 8 bits per pixel · Post-processing the image data will require video editing tools, rather than Astrophotography post-processing tools. |
ADV
The ADV format (Astro Digital Video) is designed to allow video capture of astronomical events with a large amount of data stored describing not only the equipment and settings used for the capture but also the exact time of each frame. It is particularly useful for time sensitive observations such as occultations.
Special tools are required to process and view ADV videos – you should familiarise yourself with the ADV format and the tools available before using this format. See http://www.astrodigitalvideoformat.org/
|
Pros: |
· Supports MONO and RAW data in 8 bit or higher bit depths · Rich data saved in the file describing camera settings and frame timestamps · Suitable for specialist imaging such as occultations. |
|
Cons: |
· Requires special processing software · Not suitable for general imaging |
PNG
PNG files are standard image files for capture of single frames. Almost any image processing or viewing software will be able to open a PNG file, making them easy to work with.
Still images in any format (a bit depth of 8 or 16 bits, colour, monochrome or RAW) can be stored in a PNG file. It is worth noting however that many image processing applications do not deal correctly with PNG files with a bit depth of 16 bits – often they will drop the bit depth to 8 bits as they load the file, throwing away detail.
When saving RAW images to a PNG file they are saved as monochrome PNG files and image processing and viewing software will display them as monochrome showing a pixel grid pattern unless correctly set up to debayer the images.
|
Pros: |
· Can be loaded into almost any graphics application · Handles 8-bit to 16-bit depths and mono or colour images. |
|
Cons: |
· Many imaging applications may discard detail from 16 bit PNG files when loading them. · RAW images saved in PNG will appear monochrome with a checkerboard pattern and may need additional manual settings in post-processing to ensure correct debayering. |
FITS
The FITS file format is a highly flexible but specialised format that is often used for storing high bit depth still images. While the FITS format can store images at a bit depth of 8 bits, it is usually better to choose PNG for that case, since some software does not read 8 bit FITS files correctly.
Since FITS is a specialised file format, there are less applications that can process FITS files to choose between – certainly most image viewing and editing applications which can quite happily work with PNG files will not be able to open FITS files. There are however applications such as Deep Sky Stacker or FITS Liberator that can be used to process and view FITS files.
|
Pros: |
· Supports 8 bit and greater bit depths. · Supports mono, colour and raw images. · Image data, such as exposure, is stored in the file and some applications will read this data. · SharpCap can load 16 bits of data from FITS files when loading dark frames. |
|
Cons: |
· Can only be opened by a limited number of applications. · Some applications require additional plugins to open this file type. · File format is very complex and flexible, so files may display incorrectly in some applications and correctly in others. · Slower to save to than other file formats, so not suitable for high frame rates. · Some applications do not correctly handle 8 bit data in FITS files. |
TIFF
The TIFF file format is a widely supported imaging file format that can be opened in most image processing applications. TIFF files are typically large as they are not heavily compressed, although they may be smaller than FITS files for the same image.
|
Pros: |
· Supports 8 bit and greater bit depths. · Supports mono, colour and raw images. · SharpCap can load 16 bits of data from TIFF files when loading dark frames. |
|
Cons: |
· Files may be larger than other file formats such as PNG · Less information stored in the file headers than FITS · Slower to save to than other file formats, so not suitable for high frame rates. |
SharpCap has the ability to compress TIFF files, but this option is disabled by default as many common processing tools cannot read compressed TIFF files correctly. If you wish to enable TIFF compression, check that your image processing software can read the compressed TIFF files that SharpCap creates.
JPEG
The JPEG file format is a very widely used image format for digital images. Almost all imaging applications can load, manipulate and save JPEG files. The JPEG file format can store still images at a bit depth of 8 bits.
It is important to note that the JPEG format uses a type of compression that means that fine image detail is lost in the saving process and cannot be recovered later. The reason that this fine detail in brightness and colour (that would not be easily noticed by the human eye) is discarded is because it allows the file size to be much smaller than for other file types.
Given the limitations of the JPEG file type, it is probably only suitable for certain use cases – such as all sky cameras where a very large number of frames will be captured automatically and having perfect image quality for each frame is less important than having a small file size.
|
Pros: |
· Small file size. · Can be opened by almost all imaging applications |
|
Cons: |
· Image detail lost when saving · Limited depths of 8-bits only |