Telescope Hardware Control
SharpCap can control a wide variety of computer connected focusers, filter wheels and GOTO mounts. Most devices need to be accessed via their ASCOM driver. You will need to install the ASCOM Platform, an appropriate ASCOM driver (probably supplied by the device manufacturer) and configure SharpCap to use your device. See the Hardware Settings for more details.
Once the correct drivers are installed and configured, you will see your devices listed in the Scope Controls section of the Camera Control panel
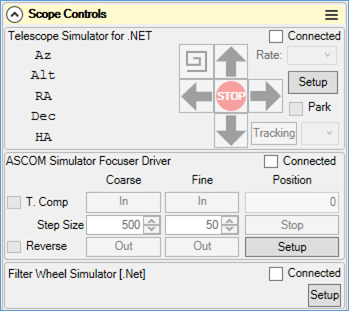
Depending on the choices you have made in the Hardware Settings, the devices may start in the disconnected state (as shown above). If the devices are disconnected then simply check each Connected checkbox to connect that device and make its functionality available.
Focuser Control
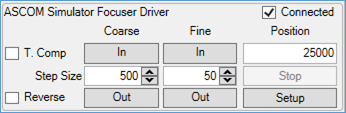
The focuser can be controlled by using the In and Out buttons. Between each pair of buttons (coarse and fine) are the step size adjustment controls which allow the amount of movement per button press to be adjusted. The current position of the focuser is shown and it is also possible to directly type a new position value into this control (after typing a new value press <Tab> or <Enter> to move the focuser to the typed value). The Reverse checkbox swaps the meaning of the In and Out buttons - handy if the focuser moves in when pressing Out.
If your focuser has a temperature compensation function, then the T. Comp checkbox will be available – check that box to turn on the temperature compensation function or uncheck to disable it.
Although you can use the focuser adjustment control shown above to manually change the focus position from within SharpCap, much of the power of using an electronic focuser in SharpCap comes from the integration with the focus assistance tools.
Filter Wheel Control

Filter Wheels are simple to control in SharpCap – the buttons show a list of filters available and all that is necessary is to select the desired filter by pressing the appropriate button. It is best to avoid trying to change the filter again while the wheel is still moving. The names of the filters shown by SharpCap can usually be configured in the ASCOM driver configuration dialog for the filter wheel.
As with all ASCOM hardware in SharpCap it is possible to temporarily disconnect from the device by unchecking the Connected checkbox and the ASCOM driver configuration can be shown by pressing the Setup button.
As for focuser control, while it is convenient to change the filter from within SharpCap, much of the power of using an electronic filter wheel comes from the integration with other parts of SharpCap – for instance configuring the filter name to be used in file names (see Filename Settings) or using the Sequencer or Sequence Planner to automate an imaging session.
SharpCap also contains the option to configure and show controls for a manually operated filter wheel. When using a manually operated wheel you can select the currently chosen filter in SharpCap, allowing the filter name to be used in custom filename templates.
GOTO Mount Control
SharpCap can connect to and control most ASCOM mounts, although the amount of functionality will depend on the capabilities of the ASCOM driver (unfortunately, if the mount does not support the ASCOM MoveAxis functionality SharpCap will offer limited functionality).
If you do not have a GOTO mount that you can connect to your computer, you may still be able to gain limited mount control via SharpCap if
· Your camera and mount both have ST4 (guiding) ports
· SharpCap supports ST4 control for your camera (Altair, PlayerOne, QHY, SVBony and ZWO cameras)
· You connect the camera and mount ST4 ports using an ST4 cable
· You select ‘On Camera ST4’ for the mount in the SharpCap Hardware Settings.
This will give you the ability to nudge the mount at the guiding rate using the direction buttons and also use Dither only Guiding.
Co-ordinate Readout
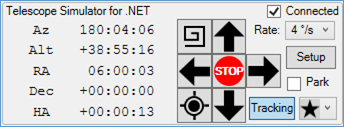
On the left-hand side of the control, the current Azimuth, Altitude, Right Ascension, Declination and Local Hour Angle are shown – these are updated from the mount on a regular basis, so should update if the mount is moved using another application such as a planetarium program.
The Local Hour Angle will range from -12:00:00 (when the mount is pointing just east of due north), through to 00:00:00 (when the mount is at the meridian) and then up to +12:00:00 (approaching due north from the west). A negative Local Hour Angle means that your mount is heading towards the meridian and (for equatorial mounts) may need to flip orientation to continue imaging past the meridian. For instance a Local Hour Angle of -00:25:00 means that your mount will reach the meridian in 25 minutes.
Movement Buttons
The centre section of the control is home to the movement buttons which allow the mount to be moved from within SharpCap. The up, down, left and right buttons will move the mount in the given direction while they are pressed. If the mount is an equatorial mount, Up/Down will move the mount in Declination and Left/Right will move the mount in RA. The mount will be moved at a speed that can be selected using the Rate drop down in the top-right of the control. This lists the movement rates that the mount makes available (this drop down shows slower movement rates in multiples of Sidereal rate – i.e. 1x, 2x, 8x – and faster rates in degrees per second). The STOP button between the direction buttons will stop any current movement of the mount but is not normally needed as movement is stopped when the direction buttons are released.
You can also move the telescope using the following keyboard shortcuts :
|
<CTRL>+J, <CTRL>+NUMPAD 4 |
Move mount left |
|
<CTRL>+L, <CTRL>+NUMPAD 6 |
Move mount right |
|
<CTRL>+I, <CTRL>+NUMPAD 2 |
Move mount up |
|
<CTRL>+K, <CTRL>+NUMPAD 8 |
Move mount down |
Note that the direction that the mount moves in response to the movement buttons and keyboard shortcuts can be reversed (if necessary) by adjusting the Hardware Settings.
The Spiral Search button (top left of the button group) moves the mount in a growing square spiral around the starting point while it is held down. This is useful when trying to locate an object such as a planet that may be just out of frame. Note that like the movement buttons, the speed of movement of the Spiral Search is governed by the Rate dropdown. If the Spiral Search button is released the spiral movement will stop. Pressing it again will begin a new spiral around the current location – it will not resume the previous spiral pattern.
The Plate Solve button (bottom left of the button group) will perform a plate solve on the current image, re-synchronize the mount’s location to the plate solve result and will the GOTO the original target co-ordinates. This has the effect of putting the target into the centre of the field of view even if it is off-centre or out of view entirely. This button only becomes enabled if a compatible plate solver is detected or configured. See Plate Solving Tab for more details. Note that when plate solving is launched from this button, it will restrict its search to sky locations within 15 degrees of the current location as reported by your ASCOM mount. This dramatically improves the speed of plate solving, but does mean that if the current mount location is highly inaccurate, plate solving will fail.
Other Controls
The Park checkbox can be used to park or un-park your mount.
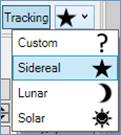
Finally, the Tracking button (bottom right) can be used to turn sidereal rate tracking of the mount on or off. If tracking is turned off, stars and other objects will appear to drift across the field of view. To the right of the Tracking button is a drop down that shows (and allows you to change) the current tracking rate. You can select sidereal, solar or lunar tracking rates. The ‘?’ icon shows when the selected tracking rate is a custom rate.
As with all ASCOM hardware in SharpCap it is possible to temporarily disconnect from the device by unchecking the Connected checkbox and the ASCOM driver configuration can be shown by pressing the Setup button.