Capturing the Image
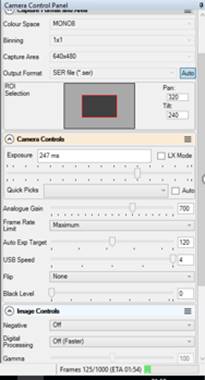
These were the steps to configure SharpCap, steps 1 – 4 being settings in the Camera Control Panel.
1. The Colour Space was set to MONO8 (MONO12 could be selected but would have reduced the frame rate).
2. The Capture Area was set to 640 x 480 (no point having lots of background unless hunting for moons). A smaller Capture Area helps achieve higher frames per second.
3. The Output Format was set to SER.
4. The Analogue Gain was set to 700 (700/1000 is 70%).
5. A suitable Target Name was defined in the tool bar. In this case ‘Jupiter 685 x2’ was set to indicate the equipment used. This became the name of the capture folder.
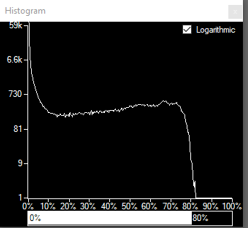
6. SharpCap’s Histogram was started via the tool bar and the Logarithmic checkbox selected.
7. The Exposure was adjusted until the right-hand side of the histogram was around 80%.
8. A 500-frame image was obtained via the Quick Capture button on the tool bar.
Only Analogue Gain and Exposure
were adjusted, no other Camera Controls or Image
Controls were adjusted.
|
|
|
|
SharpCap histogram classic ‘whale’ shape for large disk (logarithmic vertical scale) |
SharpCap’s Camera Control Panel for the Altair GPCAM MONO V1 |
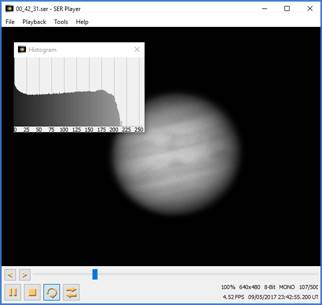
The completed image file was inspected using the SER Player
from the PIP website at https://sites.google.com/site/astropipp/ser-player
. From the SER Player menu, Tools >
Histogram was selected to enable the histogram in the
player. The shape of the histogram was reasonable for a large
disk, giving high confidence that the data captured was suitable
for processing.
These are the contents of the Camerasettings.txt file generated during the capture process:
[GPCAMMT9M034M]
Output Format=SER file (*.ser)
Capture Area=640x480
Binning=1x1
Pan=320
Tilt=240
Colour Space=MONO8
Black Level=0
Flip=None
USB Speed=4
Auto Exp Target=120
Frame Rate Limit=Maximum
Analogue Gain=700
Exposure=221.307
Timestamp Frames=Off
Contrast=10
Gamma=100
Extra Controls=On (Slower)
Negative=Off
Apply Flat=None
Subtract Dark=None
Display Brightness=1
Display Contrast=1
Display Gamma=1