Processing with Registax
Further useful information can be found on Christophe Pellier’s website at http://www.planetary-astronomy-and-imaging.com/en/finalising-processing-registax6/ - many thanks to the author for creating the tutorial material. Here is an outline of the steps taken (the order with the Layers is important):
1. Move the Layer 2 slider over to the right (100%).
2. Increment the Sharpen filter for Layer 2, doing this will bring out detail but also add noise.
3. Increment the Denoise filter for Layer 2, until the noise is just removed.
4. Move the Layer 1 slider over to the right (100%).
5. Increment the Sharpen filter for Layer 1, doing this will bring out detail but also add noise.
6. Increment the Denoise filter for Layer 1, until the noise is just removed.
7. Partially move the Layer 3 slider over to the right until satisfactory detail is brought out.
8. Increment the Sharpen filter for Layer 3, doing this will bring out detail but also add noise.
9. Increment the Denoise filter for Layer 3, until the noise is just removed.
10. Do not adjust Layers 4, 5, 6.
[Note: Layer 3 can be omitted if the image has enough detail after processing Layer 2 and Layer 1.]
There are no hard and fast rules, Registax final output is very much down to user preference. The settings given below are guidelines – learn by experience and experimentation.
1.
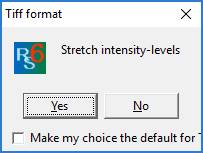
Start Registax and load the TIF file stacked image called
x.tif (not x_conv.tif). Answer Yes to
the Stretch intensity-levels window if it appears.
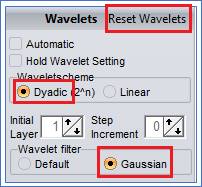
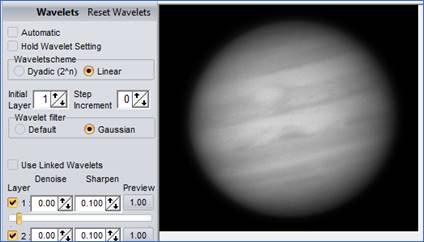
2.
Select Dyadic Wavelets and Gaussian filters as shown
below.
The steps below show how to adjust the Layer sliders plus the Sharpen and Denoise settings to bring out the detail in the image. The layers must be adjusted in the order given. The images for each layer adjustment have been kept on the same page, to allow the reader to see and compare the effects of the adjustments.
[Note: if it all goes wrong use the Reset Wavelets button to reset back to the initial loaded image.]
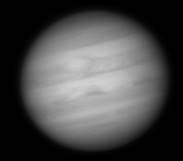
This is the stacked TIF image when first loaded into Registax.
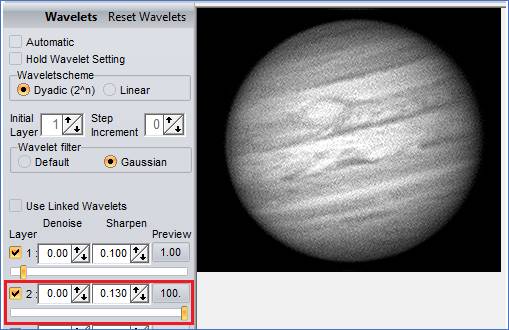
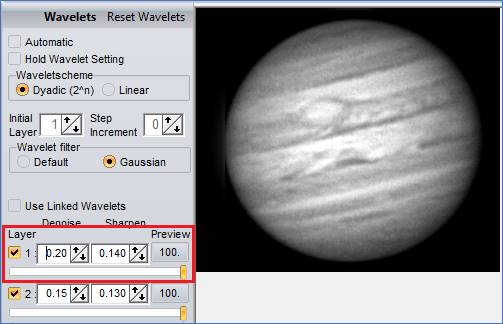
1.
For Layer 2, move the slider to 100% (less if 100% destroys
the image). Increment the Sharpen filter (0.130 in the
example) to bring out detail (this will also increase noise).
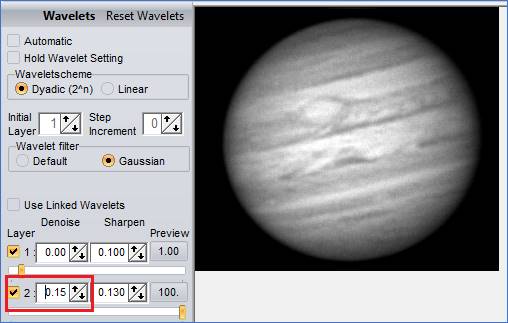
2.
For Layer 2, increment the Denoise filter (0.15 in
the example) until the noise just disappears.
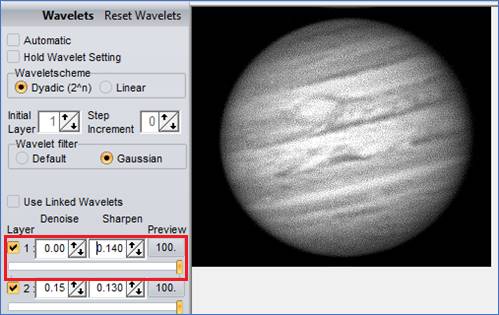
3.
For Layer 1, move the slider to 100% (less if 100% destroys
the image). Increment the Sharpen filter (0.140 in the
example) to bring out detail (this will also increase noise).
4.
For Layer 1, increment the
Denoise filter (0.20 in the example) until the noise just
disappears.
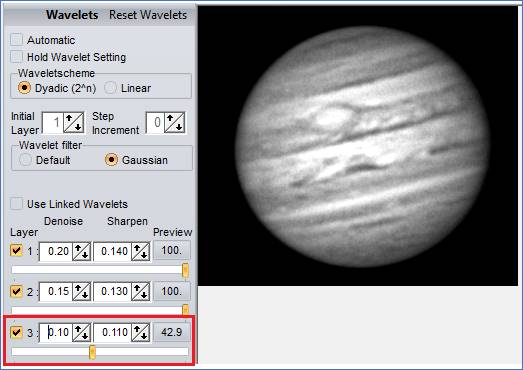
5.
For Layer 3, move the slider to around 50% (less if 50%
destroys the image). Increment the Sharpen filter
(0.110 in the example) to bring out detail (this will also increase
noise). Then, increment the Denoise filter (0.10 in
the example) until the noise just disappears.
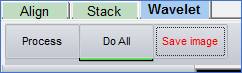
6.
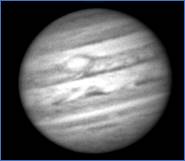
To finish, click the Do All and Save image
buttons.
7. The processed image will be saved in the AS_p25 folder. The image could be further processed using graphics editing software, examples of which are Gimp and Photoshop.
The resultant image is shown below on the
right (with the initial unstacked image on the left).
|
|
|
|
|
Unstacked Image |
Stacked Image |
Processed Image |