Introduction to the SharpCap User Interface
Upon starting SharpCap and dismissing the Tip of the Day message, the following screen appears:
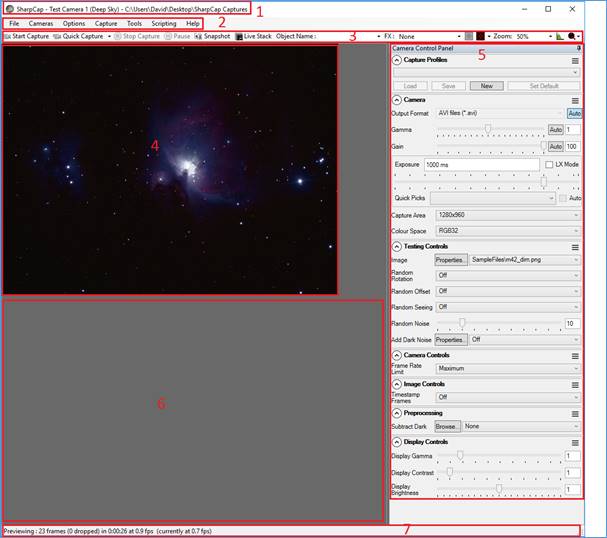
The SharpCap main screen consists of seven permanent areas and one temporary area.
The permanent areas are:
1. Title Bar – shows the selected (active) camera (if any) and the default capture folder.
2. Menu Bar – gives access to SharpCap functions.
3. Tool Bar – gives quick access to tools frequently used for image capture. When an image capture has completed a Notification Bar, giving save details, will appear below the Tool Bar.
4. Capture Display Area – shows the image currently being captured by the selected camera.
5. Camera Control Panel – gives access to all available controls for the selected camera. Items displayed in this panel will vary depending on the type, model and level of support of the connected camera.
6. Work Area – used as a display area by tools such as Image Histogram, Calculate Focus Score and Live Stack.
7. Status Bar – gives ongoing information about frames captured/dropped and frame rate. During a capture, a progress bar will appear at the right-hand end of the status bar.
The temporary area is:
1.
Notification
Bar – appears below the Tool Bar upon
completion of a Capture or
Snapshot and
provides a clickable link to go directly to the appropriate folder
where the file has been stored. The notification bar is also
used to provide other information – a green notification bar
indicates success; a yellow bar indicates a warning and an orange
bar indicates an error has occurred.

Title Bar
The Title Bar shows the selected (active) camera and the default folder for saving image captures.
![]()
If no camera is active, only the default folder for saving image captures is shown.
![]()
Menu Bar
The Menu Bar gives structured access to many aspects of SharpCap functionality.
![]()
Tool Bar
The Tool Bar gives easy access to a collection of facilities commonly used when performing an image capture.

From left to right, these are:
3. Stop Capture
4. Pause
5. Snapshot
6. Live Stack
7. Object Name
11. Zoom
12. Image Histogram
If the SharpCap window is not wide enough to accommodate all the tool icons, the Tool Bar will look like this with a down arrow at the right-hand end:
![]()
Click the down arrow to access the rest of the tool icons:

Capture Display Area
The Capture Display Area shows the view currently being seen by the active camera.

When a camera is selected in SharpCap (or SharpCap automatically selects a camera when it is started), SharpCap starts grabbing and displaying frames straight away. SharpCap isn't saving these frames, just showing them on the screen. Depending on the exposure length being used, the image may update many times per second or only once every few seconds (or even less frequently). SharpCap will only save images after use of the Start Capture or Snapshot buttons.
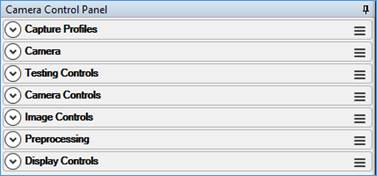
Camera Control Panel
The capabilities and available controls of the active camera are displayed in the Camera Control Panel. These controls are used to adjust camera settings such as exposure, resolution, colour balance and others. The groups and controls displayed can vary depending on:
· The manufacturer of the attached camera.
· The model of camera (even from the same manufacturer)
See Camera
Controls for a full description. The
controls are grouped logically and each group can be
expanded/closed as required.
Work Area
The Work Area is the display area for the following tools:
· Live Stack
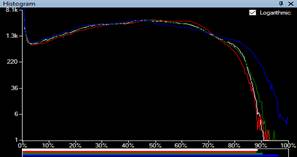
· Histogram
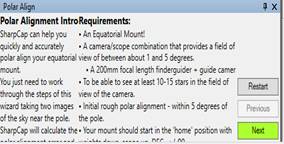
· Polar Align
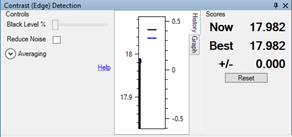
· Focus Score
|
|
|
|
|
|
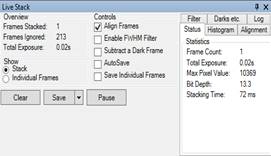
For each tool, the title bar of the panel can be used to drag the panel out of the main SharpCap form, for example to place it on a second monitor.
Status Bar
The Status bar at the bottom of the screen gives a constantly updated report on:
· Frames captured
· Frames dropped
· Duration of capture
· Capture speed, frames per second (fps)
· Memory available and in use
· Cooler Status (for cooled cameras)
· GPS Status (for GPS enabled cameras)
![]()
Frame Progress
When the exposure is set to 1s or longer, a progress bar will show on the right giving the progress of each frame
![]()
The numbers to the right of the progress bar are the time elapsed so far in the frame and the time left to go in the frame (both in MM:SS).
Some cameras take a considerable time to download a completed frame to the computer – while the download is happening, the time remaining in the frame may show a negative value. A negative value may also show if the camera has stopped responding properly and SharpCap is stuck waiting for a frame that has not arrived.
Capture Progress
When an image capture has been initiated, a progress bar is displayed at the right showing:
· Frames completed
· Frames remaining
· Estimated finishing time
![]()