Pixel Position/Click to Recentre
The Pixel Position/Click to Recentre tool provides an easy-to-use way to see the celestial location of any part of the image and also a way to re-centre the image with on any selected point. In order to use this functionality, you must have a GOTO mount configured and connected to SharpCap. and have a plate-solving tool configured for use in SharpCap. If these conditions are not satisfied then the menu item for this tool will not be enabled.
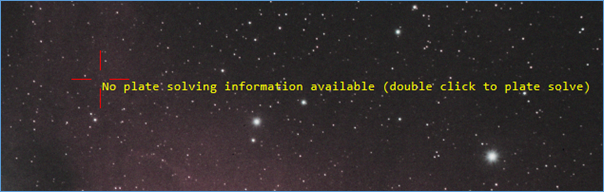
If you have already performed a plate solving operation recently (within a few degrees of the current position) then you will immediately see the direction rose display (see below). Otherwise you will see a crosshair with an information message stating that No Plate Solving information available.
At this point you must perform a plate solving operation to enable the functionality of this tool. You can:
· Double click as prompted anywhere in the image. This will perform a plate solve operation limited to an area within 15 degrees of the current mount pointing co-ordinates.
· Use the Plate Solve and Resync menu item or the GPS button in the mount controls. These options will perform a plate solving operation as above and also resynchronize and recentre the mount around the original target co-ordinates – see Plate Solve and Resync for more information.
· Use the Plate Solve (Solve Only) menu item to perform a plate solving operation. Note that this scans the whole sky for a valid solution and will therefore frequently be a lot slower than the above two options.
One a plate solving operation has been completed successfully, the display will change to show the co-ordinates of the crosshair point and the direction rose overlaid on the camera image:
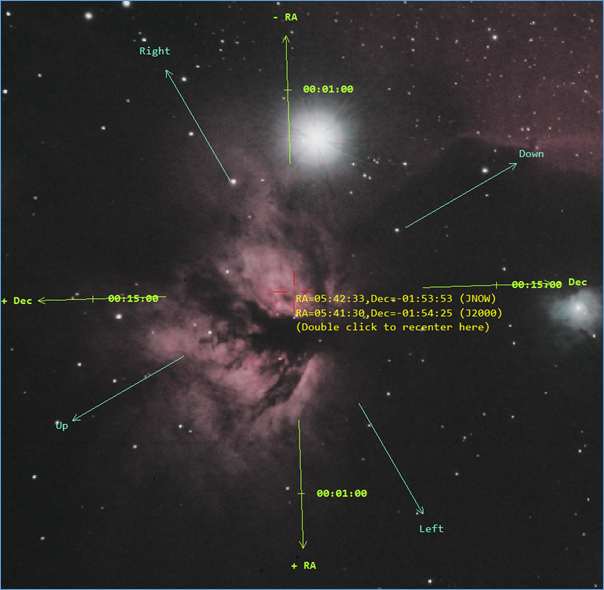
A great deal of information is present in this overlay:
· The red crosshair shows the selected point in the image. You can move this point by clicking anywhere in the image.
· The yellow text shows the RA and Dec co-ordinates of the selected point. Both the JNOW and J2000 values for the co-ordinates are shown. If you are using these co-ordinates to identify a feature against a star atlas, you will most likely need to use the J2000 co-ordinate values.
· The green arrows show the directions of increasing and decreasing RA and Declination within the image. For instance +RA points in the direction of increasing RA and -Dec points in the direction of decreasing declination
· The tick marks on the green arrows show the size of the change in RA and Declination from the reference point (the red crosshair) to the tick marks. For instance, above you can see the tick marks are at 15 minutes of arc in the + and – declination directions and 1 minute of RA.
· The cyan arrows show the orientation of the image in terms of the directions that would apply to a naked eye observer looking at the target – i.e. Down points towards the horizon, Up towards the zenith, left in the direction of reducing Azimuth co-ordinate, right in the direction of increasing Azimuth co-ordinate.
Once the direction rose is visible, you can recentre it on any part of the image by clicking on the target area.
Double clicking on the image activates the recentre functionality – SharpCap will calculate the mount co-ordinates that need to be set to put the point that was selected in the middle of the image – the calculations take account of any inaccuracy in the mount’s pointing that were detected by the plate solving and any movements since the plate solving operation.
When you double-click on a point, SharpCap
will prompt you to confirm the action : 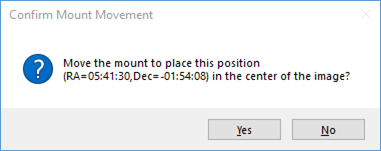
If you click Yes then the movement will take place, otherwise no action will be taken.
Some actions will invalidate the plate solving information – this will cause the direction rose to no longer be shown. If this happens then perform another plate solving operation to re-enable the direction rose. Some of the actions that will cause this to happen include :
· Changing the resolution, binning or pan/tilt (ROI) settings of the camera
· Moving more than 10 degrees away from the mount position where the plate solving occurred.
You can disable the Pixel Position/Click to Recentre tool by selecting it again from the Tools menu.
Note that selecting this tool will disable any reticule that is currently visible and conversely, selecting a reticule will disable this tool.
Note: The RA and Dec arrows may point in incorrect directions and click-to-recentre operation may be inaccurate very close to the celestial pole – particularly if the celestial pole is within the field of view of the camera.
Note: The Up/Down/Left/Right arrows may point in incorrect directions very close to the zenith – particularly if the zenith is within the field of view of the camera.