The Menu Bar
File
The File menu item has the following options.
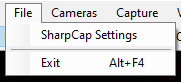
SharpCap Settings
The SharpCap Settings defaults have been chosen to enable ease of use of the application with minimal configuration required after installation, however adjustment to the settings can be made here when necessary.

See Configuring SharpCap for a detailed description of the four tabs General, Hardware, Filenames, and Startup Scripts.
Exit
Selecting Exit or Alt+F4 will perform an orderly shutdown of SharpCap. Note that depending on your choices in the settings, you may be prompted to confirm shutdown if you have a camera open or are capturing.
Cameras
The Cameras menu item allows selection and de-selection of attached imaging devices. These may be cameras or video capture devices (frame grabbers).
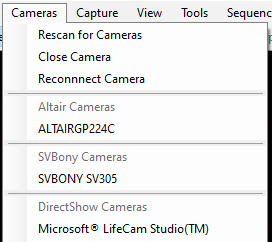
Different types of cameras are grouped into different sections of the menu – each section is headed by the description of the type of camera in that section – i.e. ‘Altair Cameras’, ‘DirectShow Cameras’, ‘ZWO Cameras’, etc.
Normally a new camera will be detected automatically when you plug it into your computer, but in some cases you may need to use the Rescan for Cameras option to detect a newly added camera.
Two ‘built-in’ cameras are provided:
1. Test Camera 1 (Deep Sky), a simulation of a capture of the M42 Nebula in the Constellation of Orion.
2. Test Camera 2 (High Speed), a simulation of a capture of Jupiter (the dark spot to the lower left being the shadow of a moon).
These two test cameras can be used to learn the functionality of SharpCap without requiring a telescope and camera.
The ‘Virtual’ Folder Monitor Camera will also be shown. This camera allows SharpCap to automatically load image files that are already saved (or are being saved) in a folder to allow them to be processed. If you have a camera that SharpCap cannot detect, but have other software that can take images using this camera and save them to a folder, you can use this choice to allow SharpCap to work with those images.
[Note: some cameras (particularly ASCOM and DirectShow cameras) may show in the device list even when they are not connected to the computer – selecting one of these cameras that is not currently connected will give an error message.]
Rescan for Cameras
If a camera connection is lost or a camera plugged in while SharpCap is open, use the Rescan option to find the device.
SharpCap automatically rescans after a USB device is added to or removed from the computer. The rescan button is mainly useful to detect network connected cameras (i.e. Basler or Point Grey Gig-E cameras) as SharpCap cannot detect these being added to the network.
Close Camera
This will close the currently open camera. A camera can also be closed by selecting the active camera a second time in the Cameras menu. Cameras are also closed automatically if a different camera is selected or SharpCap detects that the currently selected camera has been disconnected from the computer.
Reconnect Camera
This will stop then restart the currently connected camera. Under some circumstances this may help recover correct operation if a camera has become stuck or is not responding. If reconnecting the camera does not cure the problem then you may need to close and re-open SharpCap or disconnect and re-connect the camera’s USB cable.
Available Cameras
Select the camera to use from the dropdown list.
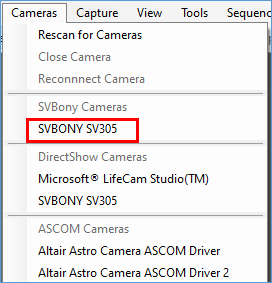
There may be occasion when a camera appears twice in the available cameras list. If in doubt which one to select, use the one highest in the list (because SharpCap tries to put the cameras it has the best control over at the top of the list). See the SVBony SV305 in the graphic below.
Sometimes it is useful to close the camera currently in use without opening a different camera. This can be achieved by returning to the Cameras menu and choosing the selected camera from the menu again or using the Close Camera menu item.
Capture
The Capture menu item has the following options.
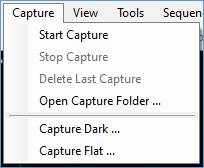
Capture allows control of:
· The capture process.
· The production of dark frames.
· The creation of flat frames.
See Capturing Videos and Images for a detailed description of these menu items.
View
The View menu item has the following items.
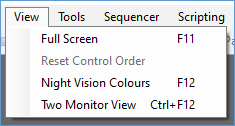
Full Screen
The Full Screen option forces SharpCap to switch to full screen mode. This leaves only the Capture Display Area and Camera Control Panel visible – there are no menu or tool bars available. To reverse this situation, move the mouse pointer to the top of the screen and the menu will appear. The Full Screen option can be unchecked. You can also switch in/out of full-screen view by pressing the F11 key.
Reset Control Order
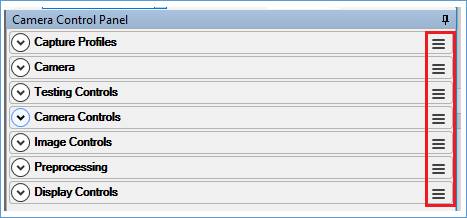
In the Camera Control Panel, each control group has a handle at the top right corner. This handle can be grabbed with a mouse and the control moved elsewhere in the Camera Control Panel to suit individual preferences. By choosing Reset Control Order, the control groups can be returned to their default order.
Night Vision Colours
Selecting this menu option will toggle SharpCap between the standard colour scheme and a night-vision friendly dark colour scheme. You can also use the F12 key to switch between the two colour schemes.
Two Monitor View
Selecting this option will toggle SharpCap between the standard single monitor view and a two monitor view mode which shows the main image from the camera on a second monitor. Note that two monitor mode is a SharpCap Pro feature.
Tools
The Tools menu item provides access to specific functions which can assist in capturing images or ensuring alignment of the telescope.
Note that the tools only become available to select once a camera has been selected. Some tools also require hardware such as a GOTO mount or electronic focuser to be configured before they can be used.
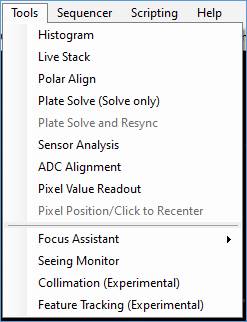
Histogram
This option provides access to the main SharpCap histogram functionality. See The Histogram for a full description of this tool.
Live Stack
This option provides the same functionality as the Live Stack button located on the Tool Bar. See Live Stacking for a full description of the tool.
<ALT> < L> can be used as a hot key combination to initiate Live Stack.
Polar Align
Selecting Polar Align will produce a set of screens to manage the alignment process. See Polar Alignment for a detailed description.
Plate Solve (Solve Only)
This tool initiates a “blind” plate solving search to determine the celestial co-ordinates of the current image. The option will only be enabled if a compatible plate solving tool has been auto-detected or configured in the SharpCap settings. The progress and result of the plate solve operation will be shown in the notification bar. See Plate Solving Tab for more details on compatible plate solving tools and configuration. Note that if an ASCOM mount is connected, SharpCap will use the current co-ordinates from the mount as the search starting point, potentially speeding up the operation.
Plate Solve and Resync
This tool will perform a plate solve on the current image, re-synchronize the mount’s location to the plate solve result and will then re-GOTO the original target co-ordinates. This has the effect of putting the target into the centre of the field of view even if it is off-centre or out of view entirely. Note that the operations performed by this action can be configured in the plate solving tab of the SharpCap settings.
Sensor Analysis
This tool launches the SharpCap sensor analysis routine which can measure the characteristics of your camera sensor. Once measured, the sensor data is stored and can be used in future to provide SharpCap smart histogram functionality. See Sensor Analysis and Smart Histogram for more details. Note that Smart Histogram is a SharpCap Pro feature.
ADC Alignment
This tool helps find the optimum alignment settings for an ADC (Atmospheric Dispersion Corrector) by showing the offset between the red, green and blue channels in a colour image. See ADC Alignment for more details.
Pixel Value Readout
This tool allows you to read the brightness value of any pixel in the image by clicking on it. In addition to showing the brightness value of the pixel, the co-ordinates (X,Y) are shown along with the colour channel information for the pixel if the camera is in RAW mode. See Pixel Value Readout for more details.
Pixel Position Readout / Click to Recentre
This tool allows you to see the sky co-ordinates (RA/Dec, Alt/Az) for any pixel in the image, provided that an ASCOM GOTO mount has been connected to SharpCap and a plate solving operation has been performed recently.
In addition to showing the sky co-ordinates of any point in the image, the direction of the +/- RA, Dec, Altitude and Azimuth co-ordinates are indicated and you can get SharpCap to recentre the image about any point by double clicking on that point. This is very useful for framing an image. See Pixel Position Readout/Click to Recentre for more details.
Focus Assistant
The sub-options here allow the various Focusing tools to be selected.
Seeing Monitor
This launches the Seeing Monitor which can help you capture Lunar/Solar/Planetary images when the seeing is at its best.
Collimation (Experimental)
This launches the experimental Collimation assistant which may help with collimation of Newtonian telescopes.
Feature Tracking (Experimental)
This launches the experimental Feature Tracking tool, which can guide your mount during Lunar/Solar/Planetary imaging to keep the target from drifting out of view.
Sequencer
The Sequencer menu provides access to tools that enable SharpCap to perform automatic, unattended imaging.
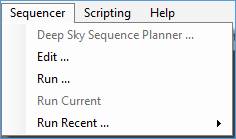
Deep Sky Sequence Planner
This menu option becomes enabled when a camera has been selected, and allows you to quickly build and then execute a sequence of imaging operations that includes the most common steps required for seep sky imaging. See Deep Sky Sequence Plannerfor more details.
Edit…
Selecting this option shows the full sequence editing tool – this is more flexible than the Deep Sky Sequence Planner and can be used to accomplish a much wider variety of imaging tasks, but is more complicated. See Sequence Editor for more details.
Run…
This option allows you to browse for a previously saved SharpCap Sequence (*.scs) and begin running it.
Run Current
This option will run the sequence that is currently loaded into the sequence editing tool.
Run Recent…
Choose a sequence that has been loaded and run recently – that sequence will be loaded and run.
Scripting
The Scripting menu item allows access to the Scripting Console and gives the ability to run existing scripts and write new scripts. The scripts are based on Python. The functionality of SharpCap can be extended by using scripting as a built-in programming language.
Scripting is an advanced topic and knowledge of it is not essential to be able to use SharpCap effectively.
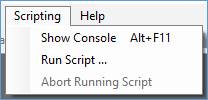
See Scripting for a full description.
Help
The Help menu item has the following options.
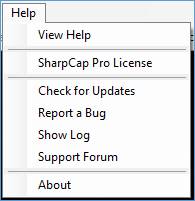
View Help
View Help will display a this documentation, in Windows help file format, installed as part of the of the SharpCap software.
SharpCap Pro License
Allows you to enter or check your SharpCap Pro license.
Check for Updates
Selecting Check for Updates will initiate a version check against the SharpCap website of the installed versus latest version. If no updates are available, the message below is displayed.
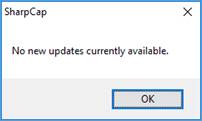
If an update is available, a download and installation is offered.
Note that there is a delay before new versions of SharpCap are made available via this auto-update mechanism. You may find new versions available for download on the downloads page even if this check shows that no new updates are available.
Report a Bug
This option provides direct link to the ‘Bug Reports’ area of the SharpCap forums. Before posting a new bug report in the forums, please check that you are using the most up-to-date version of SharpCap and also search the forums to see if the problem you are having has already been discussed – there may even already be a fix or workaround for the problem!
Show Log
SharpCap, in the background, is constantly logging events relating to the program.
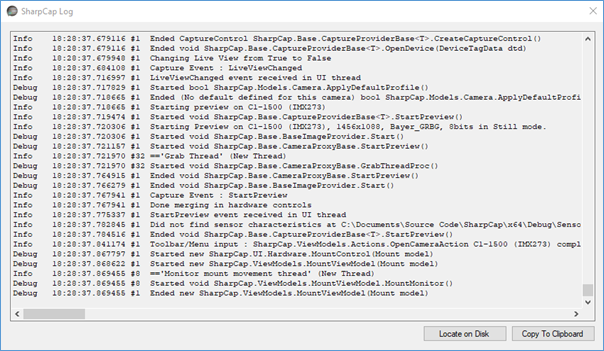
Click the Copy to Clipboard button to copy the contents of the log. By opening Notepad (or other text editor) the contents of the log can be pasted and a file saved. The information on how to send the log file can be found at http://forums.sharpcap.co.uk/ .
All SharpCap logs are saved to disk, which means that it is possible to locate the log files from a previous run of SharpCap if necessary. Log files are stored in the folder
%LOCALAPPDATA%\SharpCap\logs
which is a shortcut to the full name of the folder :
C:\Users\<your windows user name>\AppData\Local\SharpCap\logs
The easiest way to access the log folder is to press the Locate
on Disk button in the log window – this will open the log
folder in Windows Explorer.
Log files are named based on the time that SharpCap started, in the form
Log_YYYY-MM-DDTHH_MM_SS-XXXXX.log
with YYYY, MM, DD, HH, MM, SS representing the date and time that
SharpCap was started and XXXXX being a separate number.
The log files saved by SharpCap are simply plain text files, and can be opened with Windows Notepad (or another text editor).
Support Forum
This will launch the SharpCap forums in your web browser. You will find hints, tips, guides, and discussion of the use of SharpCap and general astronomy on the forums.
About
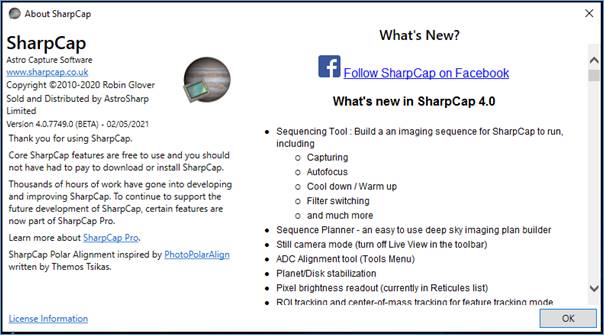
The About window provides:
· A link to the SharpCap website.
· A message informing an upgrade to a SharpCap Pro License is available.
· Acknowledgements.
· A link to License Information.
· A link to the SharpCap Facebook page.
· Version and Change history. The currently installed version shown here is 3.2.5725.