Deep Sky Sequence Planner
The Deep Sky Sequence Planner provides an easy-to-use way to plan and automatically execute a deep sky imaging session without needing to worry about the complexities of the SharpCap Sequence Editor. Most of the options you need for deep sky imaging are catered for by the planner, including:
· Camera setup
· Cool down and warm up of cooled cameras
· Target selection and framing
· Guiding and dithering
· Automatic focus
· Filter changing
Almost all of the actions that can be configured using the sequence planner can be tested individually using the Test buttons. Additionally you can run the entire plan sequence in either daytime or night-time Test Run mode. This ability to test gives you confidence that your sequence should execute as planned when you run it for real.
If you find that you cannot achieve the results you wish using the Deep Sky Sequence Planner, you may be able to achieve them using the SharpCap Sequence Editor, which has considerably more flexibility. You can even design the outline of a sequence in the Sequence Planner and then customize it further in the Sequence Editor by pressing the Advanced Edit button.
Note that you must have your camera selected in order to start the sequence planning process in SharpCap. Having the camera already selected allows SharpCap to tailor the options available to you to match the capabilities of your camera and any other hardware. It’s also good practice to have any ASCOM hardware (focuser, mount, filter wheel) connected while planning your imaging sequence. If you have ASCOM hardware selected but not connected then the Sequence Planner window will prompt you to connect it in order to enable hardware-related planning functionality such as autofocus and filter changes.
Note that the sequence planner will not be available for cameras that cannot run in still mode. Currently, this means that the following types of camera cannot be used with the deep sky sequence planner :
· Basler
· Celestron/Imaging Source
· iNova
· Point Grey/FLIR
· The SharpCap Folder Monitor Camera
· Any webcam or USB frame grabber used via direct show drivers.
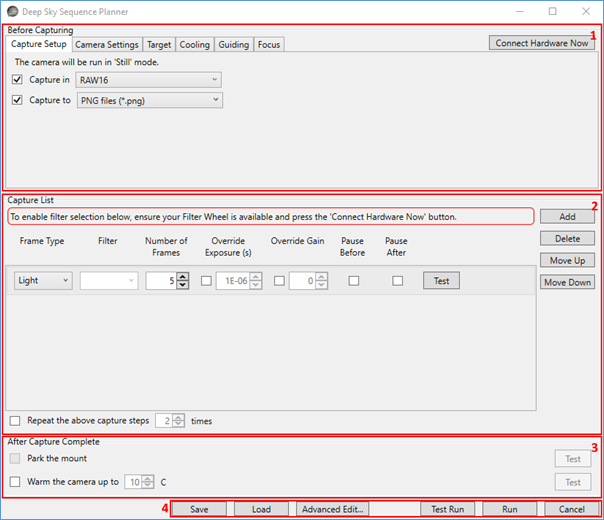
The Sequence Planner window can be divided into four distinct areas as highlighted in the screenshot below :
1. The Before Capturing section, in which you can specify camera parameters, information about the target that is to be imaged and make choices related to guiding, dithering, cooling etc.
2. The Capture List section. This section specifies all of the different captures that are to be carried out during the imaging session. These may include the capture of dark, flat and light frames and may also include filter changes, allowing LRGB or narrowband imaging to be sequenced.
3. The After Capture Complete section. This specifies actions to be taken after the images have been captured – for instance warming up the camera or parking the mount
4. The Action Buttons. The buttons here can be used to save or load or run your sequence. You can also carry out a test run and to transfer the planned sequence into the full sequence editor for further customization.
To build your deep sky capture sequence, first choose the options that you would like to enable in the Before Capturing section, then build up the capture list with the appropriate entries for dark frames, flat frames, light frames etc. Finally, that you wish to run after the capturing is complete. More detail can be found in the sections below.
Note that SharpCap will automatically save changes that you make to the sequence planner and restore the most recent settings the next time you open the sequence planner window. You can also save plans for future reuse.
Before Capturing Options
Each of the tabs in the Before Capturing area allows you to set up a particular aspect of your imaging session.
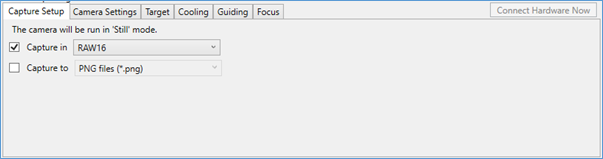
Capture Setup
In this section you can choose the camera colour space that will be used for all captures as well as the file format that saved images will be written to.
All captures during the sequence will be captured with the camera in still mode. Since the goal of the sequence is designed to be deep sky imaging, it is highly recommended that you use the highest bit depth available on your camera (i.e. RAW16, RAW14, RAW12 or MONO16, MONO14, MONO12).
The output format to save captured images to will depend upon your choice of software for processing those captured images, but in most cases choosing the FITS format would be best.
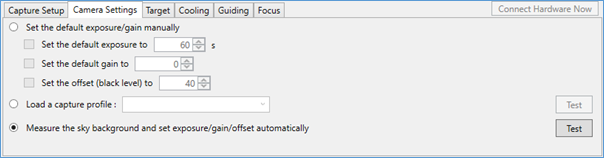
Camera Settings
In this section you can set up the most important camera settings such as exposure, gain and offset. Note that the default gain and default exposure set here will be used throughout the capture sequence except when they are overridden for a particular initialisation stage or capture step. The offset/brightness/black level chosen here is used throughout and cannot be overridden.
There are three ways that you can set up these parameters:
· Set each of the parameters manually
· Loading a previously saved capture profile that contains the desired camera settings (note that this approach can be used to set other camera settings beyond the exposure/gain/offset.
· Measuring the sky background and computing the most appropriate values based on upon the SharpCap Smart Histogram functionality. This is equivalent to using the Smart Histogram Brain functionality to measure the sky background and the settings that it recommends. This option will only be available if Sensor Analysis data is available for your camera.
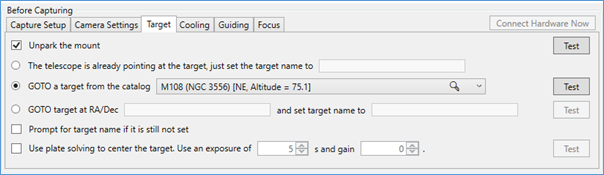
Target
In this section, you can set information about the target that you will be imaging. The range of options available here will depend on whether you have a GOTO mount configured and connected in SharpCap.
Without a GOTO mount, the only options available to you relate to setting the name of the target that will be used as part of the capture filenames created whilst the sequence is running.
If you have a GOTO mount configured in SharpCap but it is not connected, you will be prompted to press the Connect Hardware Now button to connect to the mount and enable the additional options.

With a GOTO mount available, the following additional options are available to you
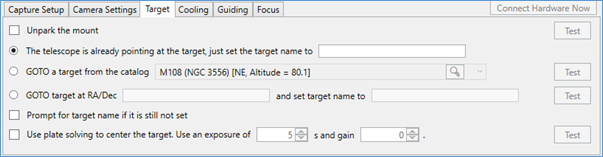
· Unpark the mount as the first step if necessary.
· Pick a target from SharpCap’s built in database of deep sky objects (currently this includes the Messier and Caldwell catalogues) and go to that target.
o Note that SharpCap shows not just the name of the target but also the current altitude and orientation of the target to enable easy selection of targets that are currently well clear of the horizon.
· Enter the coordinates and name of a target that you wish to image.
o The coordinates should be in RA/Dec notation and a wide variety of forms are accepted, for instance any of the following forms will be accepted as the co-ordinates of the Orion Nebula
|
05 35 17.3 -05 23 28 |
05 32 49.8 -05 25 21 |
|
RA 5h 35m 17s | Dec -5° 23′ 28″ |
5h 35m 17s -5° 23′ 28″ |
|
5h35m17.39s/Dec-5°23'28.24" |
RA= 5h 35.4m, Dec= -05° 27´ |
|
RA: 05h 35m 24.0s Dec: -05°27'00" |
5h RA, -5° DEC |
|
RA 05h 35.4m |Dec. -05° 27″ |
RA 05h 35.4m, dec. –05º 27’ |
|
{RA=05:35:16,Dec=-05:23:28} |
5.58805 -5.391 |
|
(05:35:20.556, -05:18:32.593) |
(83.84, -5.309) |
In all cases, RA co-ordinates are assumed to be in hours (not degrees) if the value is less than 24.
· Cause the sequence to prompt for the target name when executed if the name has not been set in some other way.
Finally, if you have a plate solving application configured as well as having a GOTO mount connected, you have the option of using the plate solving functionality to ensure that the target is centred in the field of view before starting to image. This is equivalent to using the Plate Solve and Resync tool.
Cooling
If your camera has a temperature controlled cooling system, you can choose to have the camera cool to a particular target temperature before the image capturing commences.

Guiding
If you wish to use guiding or dithering during your captures, you can configure it here. Before using this section, you should configure your guiding/dithering settings in the Guiding Settings.
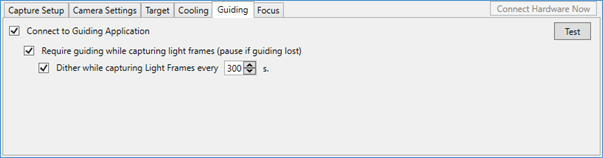
Note that if the ‘require guiding’ option is set then SharpCap will not only pause capture if guiding is lost, it will also actively try to restart guiding repeatedly to allow imaging to continue.
Dithering operations will occur at the end of the next frame to finish after the time interval expires. So, for example if dithering is set to occur every 300s with an exposure of 40s, dithering will occur after every 8th frame (7 frames take 280s, which will finish before the 300s dithering interval completes, so an 8th frame will start, which will finish after 320s).
Focus
If you have an ASCOM focuser connected then you have the option to configure SharpCap to perform an autofocus before imaging commences.

The autofocus procedure will use the Multi-Star FWHM Focus Measurement tool for best focus scanning, so you should make sure that you have tried that tool manually and configured any necessary settings before trying to use the autofocus option. The autofocus procedure is designed to bring the camera to best focus from a position that is already close to focus – it will not find focus if the camera starts a long way out of focus.
The following parameters can be set to configure the autofocus procedure:
· Focuser position range to scan – this is specified as an offset in each direction (+/-) from the current focuser position and should be large enough to ensure that the point of best focus is within the range.
· Exposure and gain to be used when capturing frames for focus. In general you will want to set a higher gain and shorter exposure to stop the focusing procedure from being exceptionally slow.
· The direction to scan in – this will also be the direction used for the focuser motion to the final best focus position.
· The number of measurement points to test the focus at between the minimum and maximum focuser position being scanned.
· A backlash allowance – this should be set to a value larger than the backlash amount of your focuser to ensure that backlash does not ruin the autofocus procedure. If you have configured backlash compensation then you can set this to a small value.
For instance, if your current focuser position is 13200 and you use the parameters shown below, SharpCap will scan between positions 12950 and 13550, measuring at 15 different positions (about 33 focuser steps between positions).
SharpCap will begin by moving to position 13550, then to 12750, then to 12950 before starting the scan – these moves clear any backlash on the focuser movement.
Finally, you can select the option to have the autofocus procedure repeated after any filter change. This may be considered as an alternative to defining focus offsets for the filters in your filter wheel.
The Capture List
A typical capture list is shown below – it specifies the type and ordering of image captures that SharpCap is to perform as part of the sequence. You can use the buttons on the right to Add, Delete and re-order the steps in the capture list to adjust it to match your imaging requirements.
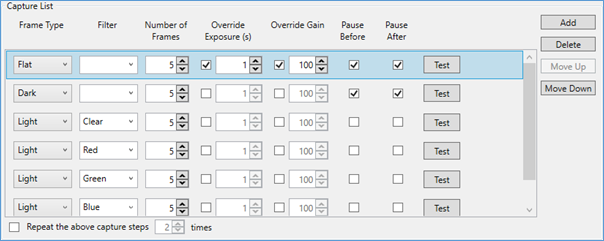
Each step in the capture list has the following properties which may be adjusted
· Frame Type – the frame type may be set to Light, Dark, Flat, Dark Flat, Bias or Other. The frame type is used to create the file names/directory names when saving the captured images – nothing else is changed when the frame type is altered.
· Filter – if you have a connected electronic filter wheel, you will be able to choose one of the filters in the wheel for each step. SharpCap will move the wheel to that position before capturing the frames for that step. Note that a blank entry in the filter column means that the filter wheel will not be moved before that step.
· Number of Frames – how many frames should be captured for that particular step
· Override Exposure – if the checkbox is ticked then the default exposure (set in the Camera Settings tab) will be changed to the specified value for this capture step. Following steps will not be affected by this change (they will use the default exposure unless they also set an exposure override).
· Override Gain – as for override exposure, ticking the checkbox and setting a value will set a different gain to be used for this capture step. Certain frame types (Flat, Dark Flat, Bias) will typically use override exposure and override gain as they are not captured with the same exposure/gain values as light and dark frames.
· Pause Before, Pause After – ticking one or both of these options will cause the sequence to pause before and/or after capturing the images in the step. During the pause, SharpCap will show a prompt – you will need to click ‘OK’ to continue the sequence. You can use the pause to set up flat frame illumination, cover the aperture for dark frames, etc. You can also adjust camera settings during the pause, which may be helpful to properly expose flat frames.
· Test – pressing the Test button will test the step – a test carries out all the actions associated with the step, but will only capture 1 frame, even if a larger Number of Frames is specified.
If you wish, you can configure the sequence to repeat all the capture steps in the sequence a number of times – this can be a useful option if you are unsure how much clear sky time you will have – instead of capturing 60 minutes with each filter, set up the capture steps for 15 minutes with each filter and repeat four times. If the clouds roll in after two hours, you still have data from each filter to work with.
After Capture Complete Options
These options are steps that can be taken after the capture steps have completed. You can choose to park the mount to the home position and (if you have a cooled camera) to warm it up at a gradual rate.

Testing and Running your Sequence
Testing individual steps
Automating your imaging using sequencing tools is a great way to improve your imaging productivity (or at the very least your comfort levels while the computer gets on with the imaging), but there is also a very real risk of wasting clear sky time if your imaging sequence doesn’t work properly and stops early because of an error.
Testing all parts of the sequence before running it for real is the best way of minimizing the chance of problems. The SharpCap sequence planner is designed to make testing of your sequence easy.
You can test individual setup or capture steps by using the Test buttons that you will find adjacent to many parts of the sequence planner options. Pressing one of these Test buttons will put together a shortened sequence that has the minimum amount of content needed to check the operation of the option you have chosen to test. Depending on the nature of the option being tested, it may be sufficient to test during daytime (for instance testing unparking of the mount or setting camera options), or it may require a clear view of the night sky (testing autofocus).
When you use the Test button for any of the individual steps, you will see the Sequencer progress window appear. SharpCap runs the test by creating a shortened sequence that contains only the steps that need testing (and any setup steps that are required in order to test them).
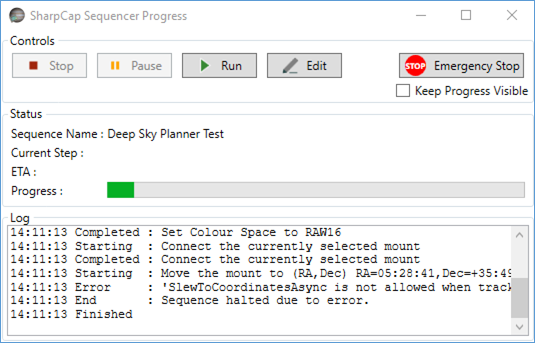
The test may take anything from a few seconds to a few minutes to complete. It’s a good idea to watch the progress of the test in the Log area of the progress window. If you see an ‘Error’ entry in the log then the test has failed – look at the message text that follows the ‘Error’ for information about the cause of the failure. In the screenshot shown above for instance, moving the mount to the target coordinates was being tested and it failed because the ASCOM mount would not allow the slow operation because the mount was not already tracking.
If the log shown in the progress window completes with no errors then the test is most likely successful, but it is still worthwhile checking – for instance if you are testing the autofocus procedure, check that the focus that it finds is really the best possible focus for the camera.
Testing the whole sequence
When you are happy that the individual steps are working correctly, it’s a good idea to test the whole sequence from beginning to end. You can do this by pressing the Test Run button.
![]()
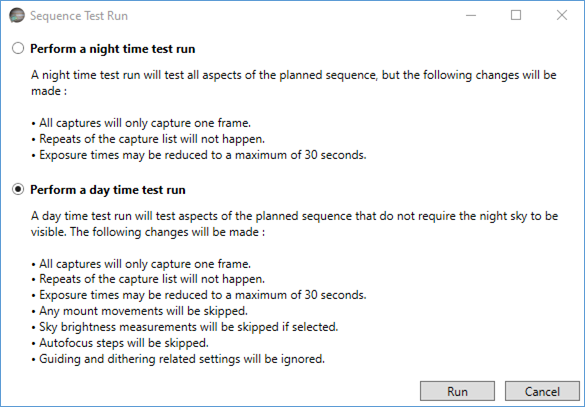
A test run is a quicker way to check all the steps in a sequence to make sure that they work without any problems. There are two types of test run that you can choose between:
· Night time test runs - these are the closest to the real execution of the sequence. The only changes are that exposure times are limited to 30 seconds, all captures are reduced to capturing only a single frame and any repeats of the capture steps are ignored. All set up and clean up steps will be executed – for example cooled down of the camera, focusing, moving the mount to point at the target, etc.
· Day time test runs - these are designed so that they can be performed without needing clear sky, and test as much of the sequence as possible subject to that limitation. All of the changes mentioned above for a Night time test run are applied along with the following extra changes to the full sequence:
o Mount movements and autofocus steps are ignored
o Sky brightness measurements will be skipped
o Guiding and dithering settings will be ignored
As with the testing of the individual steps, watch the output shown in the Log section of the Sequencer Progress Window during a test run to see if any problems occur. Also check the saved capture files afterwards (particularly for a night time test run) to make sure that they are in the correct format and contain image data of the quality that you would expect.
Running the Sequence
Running the sequence is very simple – simply press the Run button. This will start SharpCap’s sequencing engine running the steps that you have chosen and show the Sequencer Progress Window to allow you to follow the progress of the imaging sequence as it executes.
![]()
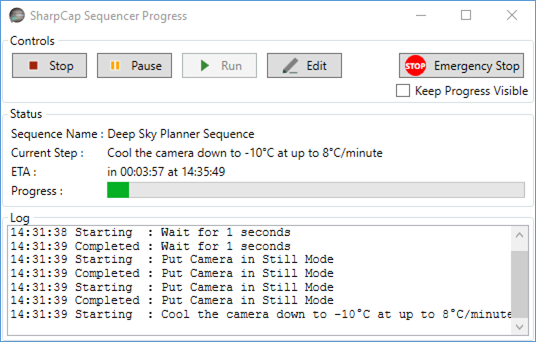
The Sequencer Progress Window
The Sequencer Progress Window is shown whenever a sequence is running (unless the main sequence editor is already visible). This window gives you the ability to monitor and control the sequence that is in progress, pause or cancel it if necessary and to perform an Emergency Stop if the situation requires it.
The Sequence Progress Window controls include the following :
· Stop - this will stop any sequence that is currently running. Note that the sequence may not stop immediately (depending on the action that is currently being carried out), but it should usually stop within a few seconds of the button impressed.
· Pause/Resume - this allows you to temporarily pause the sequence and to resume execution again after pausing. Pausing a sequence may take longer to take effect than stopping it. For instance if the sequence is currently capturing 60s exposure, stopping the sequence will cancel that exposure and stop fairly quickly. Pausing the sequence will wait until that exposure is completed before pausing.
· Run – this allows you to rerun a sequence from the start after it has finished or been stopped due to an error or manually.
· Edit - this will show the SharpCap Sequence Editor window, allowing you to make changes to the sequence that has been running.
· Emergency Stop – use this button if there is the risk of damage to equipment due to the commands being carried out by a running sequence. Pressing this button will not only stop the sequence as if the Stop button had been pressed, but will also send stop movement commands to any connected ASCOM mount or focuser.
· Keep Progress Visible - if this box is checked then the Sequencer Progress Window will remain visible above other applications even if SharpCap is minimised or another application is brought to the foreground.
The Status section of the progress window shows the following information:
· The name of the current sequence - this may be a file name if a sequence has been loaded from file or another descriptive name.
· The Current Step - this is the currently executing step in the sequence.
· The ETA - this section shows how long before the sequence is expected to complete and also the time at which completion is expected to occur. Note that this is just an estimate as some steps (for instance the measurement of sky brightness) may take a variable amount of time to complete. For some advanced sequences it may not be possible for SharpCap to calculate how long the sequence will take to run.
· Progress Bar - this is just a visible representation of how far much of the sequence has already been executed and how much is still to complete it.
The Log section of the progress window shows useful information for keeping track of the progress of the sequence. The beginning and end of every sequencer step are entered in the log, along with other information about the progress of certain steps and error information if an error occurs.
Note the information shown in the Sequencer Progress Log is also included in the main SharpCap log. A full list of the steps to be executed in any sequence that is run is also stored in the main SharpCap log to help with tracking down any problems that may arise.
Saving, Loading and Advanced Editing
Deep Sky Sequence Plans can be saved and reloaded later using the Save and Load buttons. Sequence plans are saved using the .ssp (SharpCap Sequence Plan) extension.
![]()
Note that while it is possible to load a plan that was previously saved for a different camera, care should be taken if the cameras have different capabilities as some of the settings in the saved plan may be ignored if they cannot be applied to the new camera.
Finally, it is possible to transfer the plan to the full SharpCap Sequence Editor for further refinement by pressing the Advanced Edit button. This will close the Sequence Planner window and open the Sequence Editor window with a representation of the plan loaded as the current sequence. The settings that you set up in the Sequence Planner window will be auto saved and restored the next time returned to the Sequence Planner.