The Tool Bar
The toolbar changes slightly depending on whether the camera is open in ‘Live View’ mode or in ‘Still Camera’ mode.
The left-hand half of the toolbar when a camera is open in ‘Still Camera’ mode:

The left-hand half of the toolbar when a camera is open in ‘Live View’ mode:

The right-hand half of the toolbar:

Live View
This button toggles the camera between ‘Live View’ (video) mode and ‘Still Camera’ mode. When the camera is in ‘Live View’ mode, the button is highlighted. Some cameras do not have the ability to work in Still Camera mode, in which case this button will be disabled.
Note that toggling this button to an appropriate state before opening a camera will set the mode in which the camera is opened. See Live Mode and Still Mode for more information on the differences between Live and Still modes.
Start Capture
The Start Capture button will start a video capture to a new file. The functionality is identical to choosing Capture > Start Capture from the menu. See Capturing Videos and Images for a full description.
Quick Capture
|
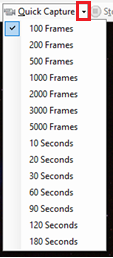
Clicking the Quick Capture button will initiate a video capture to a new file but use a pre-selected number of frames or seconds.
To modify the pre-selected value, click the down arrow and select a new value. This value will be ‘remembered’ for future quick captures.
|
|
<ALT> < Q> can be used as a hot key combination to initiate a Quick Capture.
Stop Capture
When a capture is in-progress, the Stop Capture button will be available and will stop the current capture.
Pause
When a capture is in-progress, the Pause button will be available and will pause capture. This is useful if a cloud is passing over the object of interest. Pausing capture only stops frames from being saved to file – the image shown on screen will continue to update.
Pause is not shown when a camera is in ‘Still Camera’ mode.
Snapshot
The Snapshot button will capture the current image as seen in the display area to a still image file, which can be in PNG, TIFF, JPG or FITS file. The location of the captured file appears in the Notification Bar below the Tool Bar, for example:
![]()
<ALT> <A> can be used as a hot key combination to initiate a Snapshot.
Framing Shot
This button, which is only visible when the camera is in ‘Still Camera’ mode, will cause the camera to capture an image and display it on screen. The image will not be saved.

The ‘Framing Shot Quick’ option will be available if the camera in use has an adjustable gain control. When this button is pressed, SharpCap will increase the gain, reduce the exposure to compensate, take and display an image and then restore the exposure and gain controls to their original values. This can be useful for checking framing or focus of a deep sky object.
Two Monitor View
This button will only appear on a PC with two or more monitors connected (the monitors must also be used to ‘Extend’ the display rather than ‘Mirror’ it). When pressed SharpCap will switch between the normal view on one monitor and a two-monitor view where the camera image is transferred to the second monitor and all controls remain on the initial monitor. This is particularly useful when Live Stacking as the live stacking controls can be allocated much more space on the first monitor.
Live Stack
This button initiates the Live Stack process. The functionality is identical to choosing Tools > Live Stack. See Live Stacking for a full description of the tool.
<ALT> < L> can be used as a hot key combination to initiate Live Stack.
Target Name
Selecting Target Name in the main toolbar allows a pre-defined object to be selected and used as part of the capture folder hierarchy.
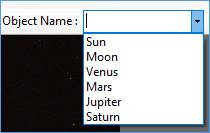
A new name can also be typed here to represent the current object of interest – such as M42 or Orion Nebula.
![]()
Subsequent captures would be saved in a sub-folder called M42 (or Orion Nebula) under the default capture folder. Targets added here will not persist across SharpCap restarts. To become permanent, the target must be added via File > SharpCap Settings > General tab.
This tool is convenient for self-documentation purposes (in the capture folder name hierarchy) during an imaging session. For example, names such as ‘M42 CLS filter’ and ‘M42 f6.3 reducer’ can be created to identify equipment used for a capture.
Frame Type
You can select the type of frame you are capturing here and the type will be substituted into the filename template for any saved files. Frame Types are also used by the Sequencer and Sequence Planner tools. Note that changing the frame type only affects saved file naming.
Preview FX (effects)
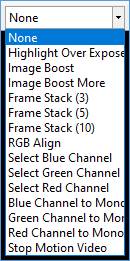
The Preview Effects, FX, dropdown contains the options shown below. Note that the effects applied to the image by the options shown here are only shown on screen – they do not affect images saved to file.
When certain FX options are chosen, the Selection tool from the tool bar becomes active.
![]()
|
A red rectangle, which can be dragged and re-sized, appears on the image. In this way, the special effect can be applied only to the selected area. |
|
Preview Effects (FX) will apply only to the display and not affect the captured data.
This tool can also be used with the Image Histogram, ADC Alignment and Calculate Focus Score tools to limit an action to a section of the image.
None
No effects are applied to the image.
Highlight Over Exposed
Any part of the image which is deemed to be over exposed is highlighted in red. In this graphic, notice the red highlighted areas.
This is a more extreme example using the moon – the camera exposure setting needs to be reduced to remove the red highlighted area.
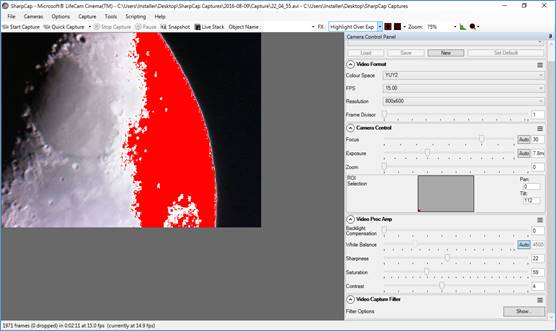
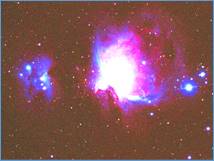
Image Boost
Image Boost is useful when trying to find fainter objects. The image will appear slightly grainy as noise is introduced. Note that using the display stretch in the mini-histogram provides a more flexible way of brightening faint objects in the image.
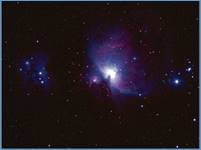
Image Boost More
Image Boost More applies a greater boost to the image, allowing even fainter objects to be revealed. An increase in graininess is to be expected.
Frame Stack (3)
With Frame Stack (3), 3 images are stacked. This effect can assist when looking for fainter objects. Stacking when this option is applied does not attempt to align new images with previous images in the stack.

Frame Stack (5)
With Frame Stack (5), 5 images are stacked. This provides a further boost to brightness when trying to locate faint objects.
Frame Stack (10)
With Frame Stack (10), 10 images are stacked.
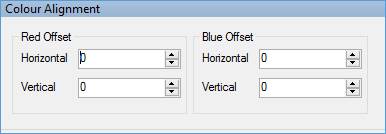
RGB Align
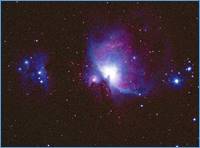
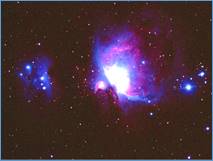
RGB Align can be used for planetary imaging when, due to atmospheric conditions, the object being imaged has colour distortion at the edge. In this extreme example, note the red on one side and the blue on the other, caused by the varying refraction of colours of light as they enter the atmosphere.
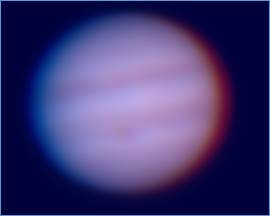
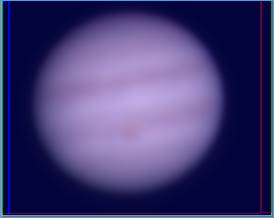
Use this option to adjust the red/blue values to obtain a good image on screen to ensure best focus when preparing to capture. The right-hand image shows the same view of Jupiter with the colour channels aligned.
RGB Align applies only to the previewed image, it does not affect the captured data. Other programs, such as Registax, allow re-alignment of RGB channels in the final captured images.
Since the RGB align only affects the image as displayed on screen, its main use is to correct for RGB misalignment to allow a better judge of focus quality to be obtained, or for live broadcasting of planetary imaging.
Select Red/Green/Blue Channel
These effects are available only for colour cameras. Selecting a particular channel will remove the other two colours from each image, leaving an image showing in shared of red, green or blue respectively.
Red/Green/Blue Channel to Mono
These effects are only available for colour cameras. Selecting one of these options will show the appropriate colour channel data as a monochrome image.
Stop Motion Video
This option will terminate an in-progress video capture. A basic tool to allow stop motion frames to be captured from any camera supported by SharpCap.
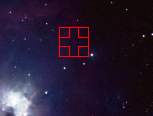
Selection Area
The Selection Area tool creates a red selection rectangle on the image which can be dragged and re-sized. This selected area is used when applying special effects (FX) or when using the Calculate Focus Score or Sensor Analysis tools.

The Selection Area tool can also be used to investigate the histogram of a reduced area when using the Image Histogram tool and specify the area of the image to be processed for other operations such as the sensor analysis tool.
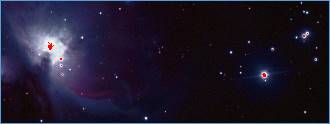
Note that if the selection area is very small, it may not be easily visible - to help find it, SharpCap will display two red arrows pointing towards it when it is very small:

If you wish to make a very small selection larger, either use the Zoom functionality to expand the view until the selection area can be adjusted or double-click anywhere in the image, which will reset the selection area to an area around the point where you double-click
Reticule Overlays
The Reticule Overlay tool has 4 options.
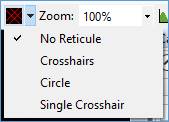
By repeatedly clicking the icon located in the Tool Bar, the display area will cycle through the reticule options. The reticule can be selected directly by using the drop-down menu to the right of the button.
· The reticule can be ‘grabbed’ by the mouse and moved around in the display area.
· When the reticule is displayed, the center point can be moved by clicking anywhere on the preview display.
· Dragging or clicking with the right mouse button instead will adjust the orientation or size of the reticule.
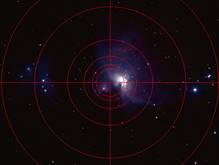
The rotation angle of each reticule is also shown near the center of the reticule. For the circle reticule, numbers are displayed near each circle which indicate the radius of that circle, in pixels.
Note that selecting Pixel Value Readout or Pixel Position/Click to Recenter will disable any currently selected reticule. Selecting a reticule will disable these two tools if they are currently selected.
No Reticule
The graphic is cleared from the image. This is the default.
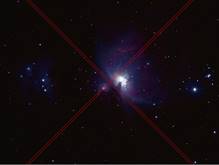
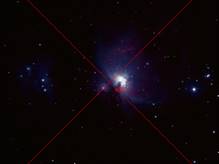
Crosshairs
A crosshair graphic is imposed over the image in the display area. This can be used to facilitate accurate mount alignment using a camera rather than an eyepiece.
Circle
A circular graphic is imposed over the image in the display area. This can be used to facilitate accurate mount alignment using a camera rather than an eyepiece. The rings can also be used to assist with collimation.
Single Crosshair
A simple single crosshair (one line only in each direction).
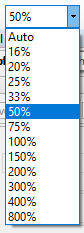
Zoom
The Zoom tool gives the ability to zoom in or out of the image in the Capture Display Area. You can also adjust the zoom by using the mouse wheel while holding the down the <CTRL> key. If you are using a laptop with a touch panel, you may also be able to adjust the zoom using ‘pinch’ gestures.
|
This feature can be used to: · Zoom in when searching for fainter objects. · Zoom in when trying to place the FX Selection Area over a single-star when using the Calculate Focus Score tool. · Zoom in when trying to accurately set the Black Level % when using the Calculate Focus Score tool. · Zoom out to reduce the image when Live Stack or Image Histogram are in use. · Zoom out to reduce the image size displayed when capturing at higher camera resolutions.
· Zoom has a range of 16% - 800%. · Auto zoom is a sensible working setting for most purposes – it will fit the image to the screen space available.
|
|
Note: limitations in the way that very large images are drawn on screen means that the maximum zoom level may be limited to a value below 800% for very high resolution cameras.
Image Histogram
A correctly shaped Histogram is a key requirement to producing quality images.
Clicking the Image Histogram icon in the Tool Bar:
![]()
will display the Image Histogram in the Work Area of the Main Screen.
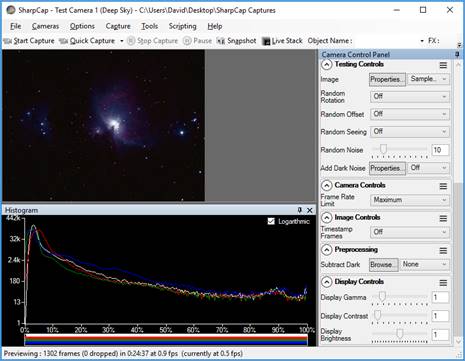
See The Histogram for a full description and examples including information on logarithmic versus linear scales and the impact of solar/lunar/planetary/deep sky/ROI on the shape of a histogram.
Calculate Focus Score
SharpCap has a several options to help acquire focus on targets (possibly one of the most challenging aspects of astrophotography). The tools are particularly powerful if an ASCOM focuser is configured in SharpCap.
Focus assistance is started by selecting the Calculate Focus Score icon from the Tool Bar.
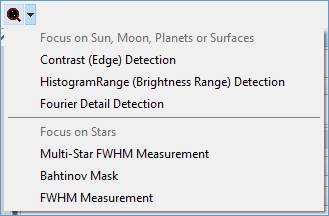
|
Focus tools for planetary or surface targets: · Contrast (Edge) Detection · Histogram Range (Brightness Range) Detection · Fourier Detail Detection |
Focus tools for stars or other point sources:
· Multi-Star FWHM Measurement · Bahtinov Mask · FWHM Measurement
|
See Focusing for a full description
including introductory materials and examples.