The capabilities and available controls of the
active camera are displayed in the Camera Control
Panel. The groups and
controls displayed can vary depending on:
·
The manufacturer of the attached camera.
·
The model of camera (even from the same
manufacturer)
See Camera
Controls for a full description. Common camera
controls are described first followed by descriptions of
manufacturer specific camera controls.
·
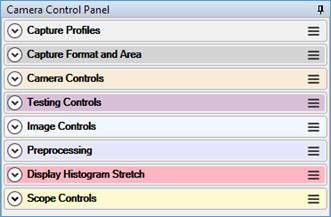
The controls are grouped logically and each group can be
expanded/closed as required. Each group has its own heading colour
which helps you quickly identify the correct group when looking for
a particular control.
·
The control groups can be grabbed with a mouse and the order
re-arranged to suit user preferences. To reset the order to
default, use Options > Reset Control
Order from the main menu.
·
The title bar of the panel can be used to drag the panel out of the
main SharpCap form, for example to place it on a second
monitor.
·
The pin icon can be used to Auto Hide the Camera Control Panel,
leaving it docked at the side.
·
A new value can be typed in for many
controls. Any camera controls showing a numeric value (gain,
exposure, brightness and many others) can be changed by typing a
new value into the display box and pressing <Enter> or
<Tab>. If a value typed in is out of range, the value
will be ignored.
The control panel
can be moved or hidden
If
you are running out of space on your screen, you can make the
SharpCap control panel auto-hide itself by clicking on the pin icon
to the left of its title. Once you have clicked the pin, the
control panel will hide itself when you move your mouse away from
it and reappear when you move the mouse back. Click the pin again
to go back to the default behaviour.
You
can also drag the control panel to the left hand side of the
SharpCap window or detach it from the window completely.
SharpCap can save
multiple Capture Profiles
Capture
Profiles allow you to save all the settings for a camera once you
have adjusted them to your satisfaction. You can save multiple
profiles and give them useful names (Moon, Jupiter, Saturn, etc).
SharpCap automatically adds the camera name to the name you enter
for each profile - after all, you may well need different settings
for the same target depending on which camera you are
using.
You'll
find capture profiles at the top of the control panel. To create
your first profile, get the camera settings adjusted as you want
them and then click the 'New...' button.
You
can also set a profile as default. Each camera can have its own
default profile. The default profile is loaded automatically when
the camera is started. This is a great way to set a default
exposure, gain, resolution etc. each time you open a particular
camera.
SharpCap starts
previewing images straight away
When
you select a camera in SharpCap (or SharpCap automatically selects
a camera when it is started), SharpCap starts grabbing and
displaying frames from that camera straight away. Don't worry -
SharpCap isn't saving these frames, just showing them on the
screen. SharpCap will only save images after you've used the 'Start
Capture' or 'Snapshot' buttons.
You
might think of the automatic preview as being a bit like looking
through the viewfinder of a camera.
SharpCap shows ASCOM
focuser positions on the Focus score graphs
If
you are using an ASCOM focuser from withing SharpCap and you use
one of the focus aids that displays a graph (FWHM or Contrast
detection), SharpCap will display a trace of the focuser position
overlaid on the focus score graph.
This
can be very helpful as you can see which position on the focuser
gave the best focus score. Remember that most focusers have some
degree of mechanical backlash, so always aim to approach the target
score from the same direction.
Live Stacking
Alignment requires at least 3 stars
If
you want to enable the alignment feature in Live Stacking, you need
to make sure that SharpCap can detect at least 3 stars on each
frame. SharpCap looks at the shapes of triangles it can create from
the stars it finds to work out how to align each frame onto the
stack.
To
adjust the star detection parameters, go to the 'Alignment' tab in
the Live Stacking window. You can make SharpCap highlight the stars
it is using (yellow box) and other stars it has found (red
box).
SharpCap has a Polar
Alignment feature
SharpCap
polar alignment works by plate solving two fields of stars near the
celestial pole and comparing the point that they rotate around with
the position of the pole. SharpCap will then guide you through
making the Alt/Az adjustments needed to correct any alignment
error.
Select
'Polar Align' from the Tools menu and follow the instructions. You
will need a field of view of bewteen 0.5 and 2.5 degrees (a guide
camera in a 200mm finder-guider works well) and a camera with
square pixels (the aspect ratio of the image on screen must not be
distorted).
You can now save raw
frames while using the Live Stacking feature
Just
tick the 'Save Individual Frames' checkbox. Each frame that is
added to the stack will be saved as a PNG file (for 8 bit frames)
or a FITS file (16 bit frames). Frames that are not added to the
stack due to filtering, frame rate or alignment issues will not be
saved.
SharpCap can show a
Focus Score vs Position graph if you use an ASCOM
focuser
Enable
any focus score method and then select the 'Graph' tab (shown to
the right of the main history chart). This shows how the focus
score changes with different focuser positions.
Green
upward pointing triangles show points where the focuser was last
moved in the +ve direction, red downward pointing triangles show
points where it was last moved in the -ve direction. Older points
are shown with paler colours. To get best focus, move the focuser
through a range of values in one direction to find the best score
achievable and the position for it, then go back to that point
making sure you arrive moving in the same direction to avoid
backlash problems.
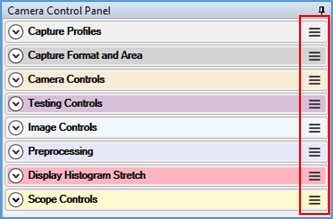
You can customize
the arrangement of the Camera Controls
As
well as collapsing any control groups that you don't often use, you
can also change the order of the control groups by dragging them
into a new order using the drag grip (three horizontal bars) to the
right of the group title.
SharpCap can help
you capture and organize and use Dark Frames
Use
'Capture Dark...' from the Capture menu to start capturing a dark
frame. You can choose the number of source frames to average and
SharpCap will do all the work for you. SharpCap will also file the
newly created dark frame in a folder structure split up according
to camera, resolution, exposure, gain and temperature, to help you
find the correct dark frame later on.
You
can apply a dark frame by selecting it using the 'Browse' button on
the 'Subtract Dark' control in the preprocessing group. When you
browse for a dark, SharpCap will automatically start you in the
most appropriate folder in your SharpCap dark library.
Using
dark frame subtraction will apply not only to the frames as
displayed on screen but also to the captured frames saved to file.
Note that for webcams and frame grabber devices you can apply a
dark frame in the Live Stacking options only (not in the main
camera controls).
Cameras
that you access using DirectShow (webcam) drivers have a rather odd
way of controlling exposure. Unfortunately there's not a lot
SharpCap can do to improve this as the way to control exposure was
designed by Microsoft when they created DirectShow many years
ago...
A
DirectShow exposure value is a whole number. Zero indicates a 1
second exposure, negative values (most common) are exposures of
less than one second, positive values (rare) are more than one
second. Every change of the value by 1 is a doublying or halving of
the exposure. That means that -4 is 1/16s and +4 is 16s; -6 is
1/64s and -8 is 1/256s.
Unfortunately,
some webcam driver writers got this wrong (Logitech even got it the
wrong way round in their drivers for several years), so some
cameras don't actually obey these rules.
SharpCap
can add a timestamp showing the date and time to captured frames
from many cameras. Supported cameras include ZWO, QHY, Altair and
iNova cameras, and DirectShow cameras when capturing in MONO8 or
RGB24 format.
DirectShow
cameras capturing in compressed formats (I420, MJPG, YUY2, etc) are
not supported as SharpCap would need to decompress, alter and then
recompress each frame.
If
you are running out of space on your screen, you can make the
SharpCap control panel auto-hide itself by clicking on the pin icon
to the left of its title. Once you have clicked the pin, the
control panel will hide itself when you move your mouse away from
it and reappear when you move the mouse back. Click the pin again
to go back to the default behaviour.
You
can also drag the control panel to the left hand side of the
SharpCap window or detach it from the window completely.
Capture
Profiles allow you to save all the settings for a camera once you
have adjusted them to your satisfaction. You can save multiple
profiles and give them useful names (Moon, Jupiter, Saturn, etc).
SharpCap automatically adds the camera name to the name you enter
for each profile - after all, you may well need different settings
for the same target depending on which camera you are
using.
You'll
find capture profiles at the top of the control panel. To create
your first profile, get the camera settings adjusted as you want
them and then click the 'New...' button.
You
can also set a profile as default. Each camera can have its own
default profile. The default profile is loaded automatically when
the camera is started. This is a great way to set a default
exposure, gain, resolution etc. each time you open a particular
camera.
When
you select a camera in SharpCap (or SharpCap automatically selects
a camera when it is started), SharpCap starts grabbing and
displaying frames from that camera straight away. Don't worry -
SharpCap isn't saving these frames, just showing them on the
screen. SharpCap will only save images after you've used the 'Start
Capture' or 'Snapshot' buttons.
You
might think of the automatic preview as being a bit like looking
through the viewfinder of a camera.
If
you are using an ASCOM focuser from withing SharpCap and you use
one of the focus aids that displays a graph (FWHM or Contrast
detection), SharpCap will display a trace of the focuser position
overlaid on the focus score graph.
This
can be very helpful as you can see which position on the focuser
gave the best focus score. Remember that most focusers have some
degree of mechanical backlash, so always aim to approach the target
score from the same direction.
If
you want to enable the alignment feature in Live Stacking, you need
to make sure that SharpCap can detect at least 3 stars on each
frame. SharpCap looks at the shapes of triangles it can create from
the stars it finds to work out how to align each frame onto the
stack.
To
adjust the star detection parameters, go to the 'Alignment' tab in
the Live Stacking window. You can make SharpCap highlight the stars
it is using (yellow box) and other stars it has found (red
box).
SharpCap
polar alignment works by plate solving two fields of stars near the
celestial pole and comparing the point that they rotate around with
the position of the pole. SharpCap will then guide you through
making the Alt/Az adjustments needed to correct any alignment
error.
Select
'Polar Align' from the Tools menu and follow the instructions. You
will need a field of view of bewteen 0.5 and 2.5 degrees (a guide
camera in a 200mm finder-guider works well) and a camera with
square pixels (the aspect ratio of the image on screen must not be
distorted).
Just
tick the 'Save Individual Frames' checkbox. Each frame that is
added to the stack will be saved as a PNG file (for 8 bit frames)
or a FITS file (16 bit frames). Frames that are not added to the
stack due to filtering, frame rate or alignment issues will not be
saved.
Enable
any focus score method and then select the 'Graph' tab (shown to
the right of the main history chart). This shows how the focus
score changes with different focuser positions.
Green
upward pointing triangles show points where the focuser was last
moved in the +ve direction, red downward pointing triangles show
points where it was last moved in the -ve direction. Older points
are shown with paler colours. To get best focus, move the focuser
through a range of values in one direction to find the best score
achievable and the position for it, then go back to that point
making sure you arrive moving in the same direction to avoid
backlash problems.
As
well as collapsing any control groups that you don't often use, you
can also change the order of the control groups by dragging them
into a new order using the drag grip (three horizontal bars) to the
right of the group title.
Use
'Capture Dark...' from the Capture menu to start capturing a dark
frame. You can choose the number of source frames to average and
SharpCap will do all the work for you. SharpCap will also file the
newly created dark frame in a folder structure split up according
to camera, resolution, exposure, gain and temperature, to help you
find the correct dark frame later on.
You
can apply a dark frame by selecting it using the 'Browse' button on
the 'Subtract Dark' control in the preprocessing group. When you
browse for a dark, SharpCap will automatically start you in the
most appropriate folder in your SharpCap dark library.
Using
dark frame subtraction will apply not only to the frames as
displayed on screen but also to the captured frames saved to file.
Note that for webcams and frame grabber devices you can apply a
dark frame in the Live Stacking options only (not in the main
camera controls).
A Capture Profile is a
collection of camera settings stored in a text file. Various
profiles can be loaded to have instant access to known collections
of settings for different targets and cameras.
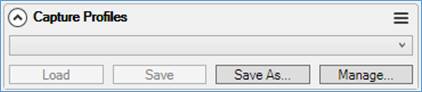
·
Load
– loads the values from the capture profile currently selected in
the drop down and applies them to the camera controls.
·
Save
– takes the current values of the camera controls and writes them
to the profile currently selected in the dropdown (overwrites the
profile).
·
Save
As – creates a new profile from the current camera
control values.
·
Manage – shows the
Capture Profile management screen, which allows you to rename,
delete and set capture profiles as default.
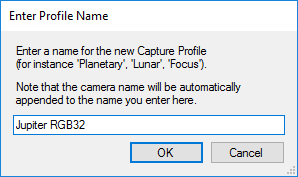
A new Capture Profile can
be created by clicking Save As, entering a
meaningful profile name, followed by OK.
The available
stored Capture Profiles
can be
accessed from the drop down:
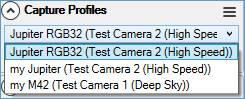
Note, changing the selected item in the drop
down of profile names doesn't do anything by itself, it just
changes the profile used if Save or
Load
is pressed.
If a default profile is set for a camera then
that profile is automatically loaded each time the camera is
opened.
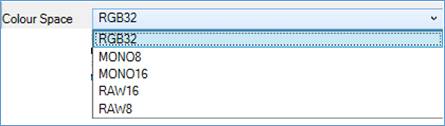
The controls in this section allow management
of the resolution, bit depth, colour space and binning of the
camera as well as the save format for any captured images.

An alternate Colour Space
can be chosen if required. When
using the FWHM or Contrast Detection focus score tools, be sure to
set the right black level, as this will ensure that you get
accurate readings.
You
should set the black level so that all of the sky background around
stars or planets is excluded from the calculation. The areas being
excluded are highlighted with stripes in preview. If you have set
the black level correctly then the FWHM will not change much if you
change the size of the ROI selection box and the contrast detection
score will not be including noise in the background.
When
the reticule is displayed you can move its center point by clicking
anywhere on the preview display. Clicking with the right mouse
button instead will adjust the orientation or size of the
reticule.
For
some cameras, 'Auto' output format selection will be chosen by
default. You can turn off auto selection and select an output
format manually or disable 'Auto' being the default in the
settings.
'Auto'
output format will typically pick the best output format for the
exposure and colour space selected. For short exposures (<5s) a
video format will be chosen, for longer exposures a still format
will be chosen.
'Auto'
will select basic output formats (avi, png) where they support the
colour space being used, otherwise it will pick advanced output
formats (ser, fits) - for raw capture or 16 bits per
pixel.
For
most cameras except Webcams and Basler Cameras, SharpCap now
supports a live stacking mode where many short frames can be added
together and faint images will appear in real time.
When
you select Live Stacking from the toolbar you will be able to see
details of your stack so far (number of frames, total exposure,
histogram) and you have the ability to clear and save the stack.
You can also adjust the white and black levels used when generating
the display image from the stack (these adjustments will not affect
the saved files).
Saved
stacks are always saved in .fits format and will be named using the
same rules as any other captured image.
SharpCap
will warn you if the frame rate is too fast for the live stacking
code to keep up.
For
all supported cameras (except DirectShow cameras), SharpCap
includes a 'Display Controls' group in the control panel. These
controls allow you to adjust the brightness, contrast and gamma
used to display images, allowing you to bring out faint detail
easily. They provide similar effect to the 'Image Boost' options in
the FX dropdown but with finer control.
Making
adjustments to the controls in the Display Controls section only
affects how the images are displayed on screen - it will not make
any changes to the images saved to any capture files.
Any
camera controls that show a numeric value (gain, exposure,
brightness and many others) can be changed by typing a new value
into the display box and pressing <Enter> or <Tab>. If
you type a value that is out of range, the value will be
ignored.
For
the exposure control, you can type a new exposure value with
appropriate units, i.e. 15ms or 10s (Sadly last bit this doesn't
work for most DirectShow cameras, which only accept exposures as
numbers like -3 or -5).
Cameras
that you access using DirectShow (webcam) drivers have a rather odd
way of controlling exposure. Unfortunately there's not a lot
SharpCap can do to improve this as the way to control exposure was
designed by Microsoft when they created DirectShow many years
ago...
A
DirectShow exposure value is a whole number. Zero indicates a 1
second exposure, negative values (most common) are exposures of
less than one second, positive values (rare) are more than one
second. Every change of the value by 1 is a doublying or halving of
the exposure. That means that -4 is 1/16s and +4 is 16s; -6 is
1/64s and -8 is 1/256s.
Unfortunately,
some webcam driver writers got this wrong (Logitech even got it the
wrong way round in their drivers for several years), so some
cameras don't actually obey these rules.
SharpCap
can add a timestamp showing the date and time to captured frames
from many cameras. Supported cameras include ZWO, QHY, Altair and
iNova cameras, and DirectShow cameras when capturing in MONO8 or
RGB24 format.
DirectShow
cameras capturing in compressed formats (I420, MJPG, YUY2, etc) are
not supported as SharpCap would need to decompress, alter and then
recompress each frame.
If
you are running out of space on your screen, you can make the
SharpCap control panel auto-hide itself by clicking on the pin icon
to the left of its title. Once you have clicked the pin, the
control panel will hide itself when you move your mouse away from
it and reappear when you move the mouse back. Click the pin again
to go back to the default behaviour.
You
can also drag the control panel to the left hand side of the
SharpCap window or detach it from the window completely.
Capture
Profiles allow you to save all the settings for a camera once you
have adjusted them to your satisfaction. You can save multiple
profiles and give them useful names (Moon, Jupiter, Saturn, etc).
SharpCap automatically adds the camera name to the name you enter
for each profile - after all, you may well need different settings
for the same target depending on which camera you are
using.
You'll
find capture profiles at the top of the control panel. To create
your first profile, get the camera settings adjusted as you want
them and then click the 'New...' button.
You
can also set a profile as default. Each camera can have its own
default profile. The default profile is loaded automatically when
the camera is started. This is a great way to set a default
exposure, gain, resolution etc. each time you open a particular
camera.
When
you select a camera in SharpCap (or SharpCap automatically selects
a camera when it is started), SharpCap starts grabbing and
displaying frames from that camera straight away. Don't worry -
SharpCap isn't saving these frames, just showing them on the
screen. SharpCap will only save images after you've used the 'Start
Capture' or 'Snapshot' buttons.
You
might think of the automatic preview as being a bit like looking
through the viewfinder of a camera.
If
you are using an ASCOM focuser from withing SharpCap and you use
one of the focus aids that displays a graph (FWHM or Contrast
detection), SharpCap will display a trace of the focuser position
overlaid on the focus score graph.
This
can be very helpful as you can see which position on the focuser
gave the best focus score. Remember that most focusers have some
degree of mechanical backlash, so always aim to approach the target
score from the same direction.
If
you want to enable the alignment feature in Live Stacking, you need
to make sure that SharpCap can detect at least 3 stars on each
frame. SharpCap looks at the shapes of triangles it can create from
the stars it finds to work out how to align each frame onto the
stack.
To
adjust the star detection parameters, go to the 'Alignment' tab in
the Live Stacking window. You can make SharpCap highlight the stars
it is using (yellow box) and other stars it has found (red
box).
SharpCap
polar alignment works by plate solving two fields of stars near the
celestial pole and comparing the point that they rotate around with
the position of the pole. SharpCap will then guide you through
making the Alt/Az adjustments needed to correct any alignment
error.
Select
'Polar Align' from the Tools menu and follow the instructions. You
will need a field of view of bewteen 0.5 and 2.5 degrees (a guide
camera in a 200mm finder-guider works well) and a camera with
square pixels (the aspect ratio of the image on screen must not be
distorted).
Just
tick the 'Save Individual Frames' checkbox. Each frame that is
added to the stack will be saved as a PNG file (for 8 bit frames)
or a FITS file (16 bit frames). Frames that are not added to the
stack due to filtering, frame rate or alignment issues will not be
saved.
Enable
any focus score method and then select the 'Graph' tab (shown to
the right of the main history chart). This shows how the focus
score changes with different focuser positions.
Green
upward pointing triangles show points where the focuser was last
moved in the +ve direction, red downward pointing triangles show
points where it was last moved in the -ve direction. Older points
are shown with paler colours. To get best focus, move the focuser
through a range of values in one direction to find the best score
achievable and the position for it, then go back to that point
making sure you arrive moving in the same direction to avoid
backlash problems.
As
well as collapsing any control groups that you don't often use, you
can also change the order of the control groups by dragging them
into a new order using the drag grip (three horizontal bars) to the
right of the group title.
Use
'Capture Dark...' from the Capture menu to start capturing a dark
frame. You can choose the number of source frames to average and
SharpCap will do all the work for you. SharpCap will also file the
newly created dark frame in a folder structure split up according
to camera, resolution, exposure, gain and temperature, to help you
find the correct dark frame later on.
You
can apply a dark frame by selecting it using the 'Browse' button on
the 'Subtract Dark' control in the preprocessing group. When you
browse for a dark, SharpCap will automatically start you in the
most appropriate folder in your SharpCap dark library.
Using
dark frame subtraction will apply not only to the frames as
displayed on screen but also to the captured frames saved to file.
Note that for webcams and frame grabber devices you can apply a
dark frame in the Live Stacking options only (not in the main
camera controls).
When the output format is set to
Auto, SharpCap will chose the most appropriate save format for
capture files depending on the colour mode chosen and the exposure
length.
- Exposures of less than 5s will be saved into a video
format.
- Exposures of 5s or more will be saved as individual
frames.
- RGB and Mono at 8 bits per pixel will be saved to AVI or
PNG.
- 16
bit per pixel or RAW modes will be saved to SER or
FITS.
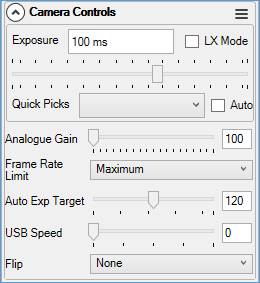
The controls in this section allow management
of the exposure, gain and other mostly hardware related features of
the camera.
The controls in this section allow application
of basic image processing such as brightness, gamma and contrast to
the images being captured by the camera. The range of
controls available is determined by the camera manufacturer/camera
driver author.
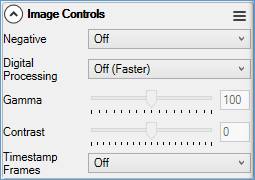
SharpCap can add a
timestamp showing the date and time to captured frames from many
cameras. Supported cameras include ZWO, QHY, Altair and iNova
cameras, and DirectShow cameras when capturing in MONO8 or RGB24
format.
Adding a timestamp to
DirectShow cameras capturing in compressed formats (such as I420,
MJPG, YUY2) is not currently supported as SharpCap would need to
decompress, alter and recompress each frame. The control panel can be moved or
hidden
·If you are running out of space on your screen, you
can make the SharpCap control panel auto-hide itself by clicking on
the pin icon to the left of its title. Once you have clicked the
pin, the control panel will hide itself when you move your mouse
away from it and reappear when you move the mouse back. Click the
pin again to go back to the default behaviour.
·You can also drag the control panel to the left
hand side of the SharpCap window or detach it from the window
completely.
·Capture Profiles allow you to save all the settings
for a camera once you have adjusted them to your satisfaction. You
can save multiple profiles and give them useful names (Moon,
Jupiter, Saturn, etc). SharpCap automatically adds the camera name
to the name you enter for each profile - after all, you may well
need different settings for the same target depending on which
camera you are using.
·You'll find capture profiles at the top of the
control panel. To create your first profile, get the camera
settings adjusted as you want them and then click the 'New...'
button.
·You can also set a profile as default. Each camera
can have its own default profile. The default profile is loaded
automatically when the camera is started. This is a great way to
set a default exposure, gain, resolution etc. each time you open a
particular camera.
·When you select a camera in SharpCap (or SharpCap
automatically selects a camera when it is started), SharpCap starts
grabbing and displaying frames from that camera straight away.
Don't worry - SharpCap isn't saving these frames, just showing them
on the screen. SharpCap will only save images after you've used the
'Start Capture' or 'Snapshot' buttons.
·You might think of the automatic preview as being a
bit like looking through the viewfinder of a camera.
·If you are using an ASCOM focuser from withing
SharpCap and you use one of the focus aids that displays a graph
(FWHM or Contrast detection), SharpCap will display a trace of the
focuser position overlaid on the focus score graph.
·This can be very helpful as you can see which
position on the focuser gave the best focus score. Remember that
most focusers have some degree of mechanical backlash, so always
aim to approach the target score from the same
direction.
·If you want to enable the alignment feature in Live
Stacking, you need to make sure that SharpCap can detect at least 3
stars on each frame. SharpCap looks at the shapes of triangles it
can create from the stars it finds to work out how to align each
frame onto the stack.
·To adjust the star detection parameters, go to the
'Alignment' tab in the Live Stacking window. You can make SharpCap
highlight the stars it is using (yellow box) and other stars it has
found (red box).
·SharpCap polar alignment works by plate solving two
fields of stars near the celestial pole and comparing the point
that they rotate around with the position of the pole. SharpCap
will then guide you through making the Alt/Az adjustments needed to
correct any alignment error.
·Select 'Polar Align' from the Tools menu and follow
the instructions. You will need a field of view of bewteen 0.5 and
2.5 degrees (a guide camera in a 200mm finder-guider works well)
and a camera with square pixels (the aspect ratio of the image on
screen must not be distorted).
·Just tick the 'Save Individual Frames' checkbox.
Each frame that is added to the stack will be saved as a PNG file
(for 8 bit frames) or a FITS file (16 bit frames). Frames that are
not added to the stack due to filtering, frame rate or alignment
issues will not be saved.
·Enable any focus score method and then select the
'Graph' tab (shown to the right of the main history chart). This
shows how the focus score changes with different focuser
positions.
·Green upward pointing triangles show points where
the focuser was last moved in the +ve direction, red downward
pointing triangles show points where it was last moved in the -ve
direction. Older points are shown with paler colours. To get best
focus, move the focuser through a range of values in one direction
to find the best score achievable and the position for it, then go
back to that point making sure you arrive moving in the same
direction to avoid backlash problems.
·As well as collapsing any control groups that you
don't often use, you can also change the order of the control
groups by dragging them into a new order using the drag grip (three
horizontal bars) to the right of the group title.
·Use 'Capture Dark...' from the Capture menu to
start capturing a dark frame. You can choose the number of source
frames to average and SharpCap will do all the work for you.
SharpCap will also file the newly created dark frame in a folder
structure split up according to camera, resolution, exposure, gain
and temperature, to help you find the correct dark frame later
on.
·You can apply a dark frame by selecting it using
the 'Browse' button on the 'Subtract Dark' control in the
preprocessing group. When you browse for a dark, SharpCap will
automatically start you in the most appropriate folder in your
SharpCap dark library.
·Using dark frame subtraction will apply not only to
the frames as displayed on screen but also to the captured frames
saved to file. Note that for webcams and frame grabber devices you
can apply a dark frame in the Live Stacking options only (not in
the main camera controls).
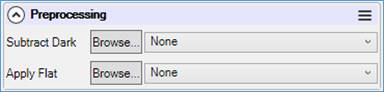
You can configure dark
subtraction and flat frame correction here. SharpCap’s flat frame
correction code has been designed to allow it to process images at
high speed from USB3 cameras, allowing the live removal of
artifacts such as dust shadows will capturing lunar/solar/planetary
imaging videos. See Capturing
and Using Dark Frames and Capturing and Using
Flat Frames for more details.
This control shows an
always-on mini histogram of the current image and allows the image
displayed on screen to be ‘stretched’ without affecting the data
saved to file when capturing. Stretching the displayed image means
that the brightness and/or contrast can be enhanced, or faint
detail can be brightened easily. The stretch function
provides similar effects to the Image Boost options
in the FX dropdown but with finer control.
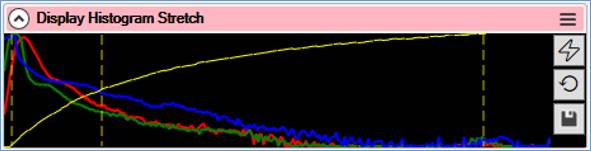
See Mini Histogram and
Display Stretch for more details.
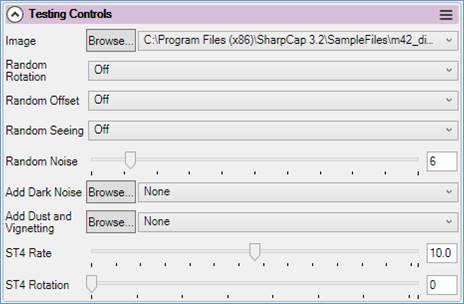
The testing Controls group is specific to the
two test cameras included with SharpCap. The controls allow
for the simulation of atmospheric conditions, addition of simulated
dark noise or dust specks and a simulated ST4 guiding port.
These are manufacturer dependent, examples
include:
·
Telescope controls.
·
Thermal controls such as fan on/off.
·
GPS settings.