Controlling the Displayed Image
SharpCap provides a number of ways that you can adjust the image displayed on screen without actually making changes to the image data captured to file. These features are very useful for locating faint targets, seeing small details, checking focus, etc.
Zooming and Scrolling the Image
The most basic manipulation of the image is to adjust the zoom level of the image to change its size when displayed on-screen in SharpCap.
The zoom level can be adjusted in a number of ways:
· Using the Zoom dropdown in the toolbar, which offers a range of standard zoom levels that can be selected.
· Scrolling using the mouse wheel while the <CTRL> key is held down. Scrolling up will zoom in, scrolling down will zoom out.
· Using the keyboard shortcut <CTRL+0> (that’s a zero, not an O). This will set the zoom to ‘Auto’ to fit the image into the available space.
· Using the keyboard shortcut <CTRL+1>. This will set the zoom to 100%, so that one pixel on the image corresponds to one pixel on screen.
· For advanced use, via the Sequencer or Scripting.
When the zoom level is high, individual pixels in the image are enlarged enough to be clearly visible on the display. A maximum zoom level of 2000% (20 times natural size) can be reached using the <CTRL> and mouse wheel approach.
If the zoom level is low, or the image being captured from the camera is a relatively low resolution, the whole of the image may fit in the space available in the SharpCap window. However, at higher zooms or for high resolution captured images, the available space will only be large enough to display part of the image. In this case, scrollbars become available to the right of and below the image to allow you to the viewed area around in the full image.
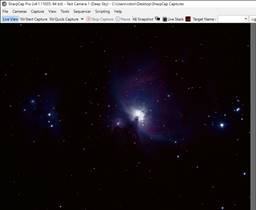
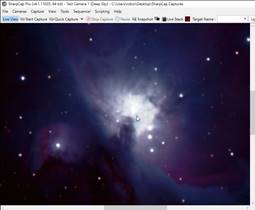
Whole image visible (left) and part of image visible with scrollbars (right)
You can also move around the image when zoomed-in in the following ways:
· Use the mouse scroll wheel to scroll vertically.
· Use the mouse scroll wheel with <SHIFT> held down to scroll horizontally.
· Click and hold anywhere in the image – the mouse cursor will change to a grabbing hand cursor. You can now drag the image around by moving the mouse with the button still held down.
· Click on the image, then use the keyboard arrow keys (left, right, up, down) to move around the image. You can also use the Page Up and Page Down keys to move up and down one screen height at a time.
Note that when the Zoom is set to Auto, changes in the size of the display area – for instance due to changing the size of the SharpCap window or due to showing a tool in the work area – will cause the zoom level to update automatically to fit the image into the new available space.
Display Stretch
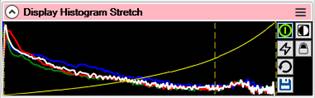
This control shows an always-on mini histogram of the current image and allows the image displayed on screen to be ‘stretched’ without affecting the data saved to file when capturing. Stretching the displayed image means that the brightness and/or contrast can be enhanced, or faint detail can be brightened easily. The stretch function provides similar effects to the Image Boost options in the FX dropdown but with finer control.
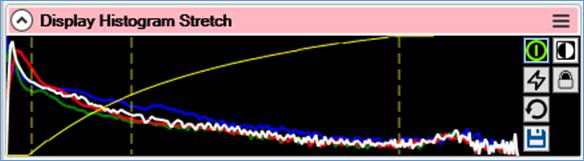
Adjusting the Display Histogram Stretch
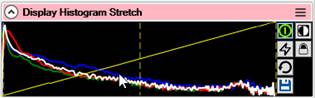
Basic operation of the stretch adjustments involves dragging the position of the three vertical dashed yellow lines using the mouse. These three lines represent the histogram levels that will be displayed as black, mid grey and white respectively.
It is usually most useful to adjust the black and mid-level lines. Adjusting the mid-level line so that it is no-longer half way between the black and white level lines will create a transfer curve, shown as a yellow curve on the histogram that controls how the image pixel values are converted to displayed screen brightness.
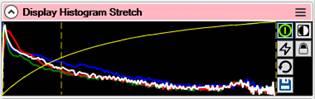
Moving the mid-level line to the left will create a curve that initially rises rapidly then flattens out. This will have the effect of boosting the brightness of the darker areas of the image, making it easier to see faint detail. Moving the mid-level line to the right will create a curve that is initially relatively flat before rising more sharply near the white level. This has the effect of darkening the brighter areas of the image, perhaps making more detail visible in those regions.
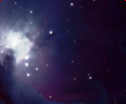
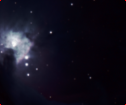
The default settings of the Display Histogram Stretch (image displayed without adjustment):
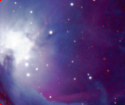
The mid-level line moved to the left, enhancing the brightness of faint detail:
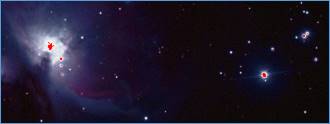
The mid-level line moved to the right, enhancing contrast in bright areas of the image:
Moving the black-level line to the right will effectively darken the whole image. This can be useful to give a blacker background – making background noise and light pollution less noticeable.
Display Histogram Stretch Buttons
![]() The power button is a master on/off switch for the
display stretch functions. When the stretch is enabled, the power
button is green (as shown on the left). Clicking on the power
button toggles the stretch between on and off – when the stretch is
turned off, the power button changes to red.
The power button is a master on/off switch for the
display stretch functions. When the stretch is enabled, the power
button is green (as shown on the left). Clicking on the power
button toggles the stretch between on and off – when the stretch is
turned off, the power button changes to red.
![]() The lightning bolt button will perform an auto-stretch
designed to pull out faint detail in the current image. This will
adjust the black, mid and white level lines automatically based on
an analysis of the brightness levels in the image. You can adjust
how strong a stretch will be applied when using this button in the
General
Tab of the SharpCap settings. Using the auto-stretch
feature requires a SharpCap Pro license.
The lightning bolt button will perform an auto-stretch
designed to pull out faint detail in the current image. This will
adjust the black, mid and white level lines automatically based on
an analysis of the brightness levels in the image. You can adjust
how strong a stretch will be applied when using this button in the
General
Tab of the SharpCap settings. Using the auto-stretch
feature requires a SharpCap Pro license.
![]() The circular arrow button will reset the black, mid and
white level lines back to their default positions, removing any
display stretch currently in effect.
The circular arrow button will reset the black, mid and
white level lines back to their default positions, removing any
display stretch currently in effect.
![]() The save button will save the current image exactly as
seen onscreen as a PNG file. Unlike the normal SharpCap image
saving functionality, this saved file will include the
effects of any display stretch currently in effect. Note that the
saved image file will have a bit depth of 8 bits regardless of the
bit depth setting of the current camera.
The save button will save the current image exactly as
seen onscreen as a PNG file. Unlike the normal SharpCap image
saving functionality, this saved file will include the
effects of any display stretch currently in effect. Note that the
saved image file will have a bit depth of 8 bits regardless of the
bit depth setting of the current camera.
![]() The negative button will invert the image when it is
toggled on – that is white areas will become black, black areas
white, etc. Sometimes viewing the image as a negative can help spot
faint features as dark smudges against a white background when they
are hard to see against a dark background.
The negative button will invert the image when it is
toggled on – that is white areas will become black, black areas
white, etc. Sometimes viewing the image as a negative can help spot
faint features as dark smudges against a white background when they
are hard to see against a dark background.
![]() The locked stretch button can be toggled on to cause
SharpCap to continually apply the Auto Stretch calculations
every few frames. In this mode, the stretch will automatically
adapt to changes in the image brightness. Locked Stretch can
be turned off again by clicking this button a second time.
The locked stretch button can be toggled on to cause
SharpCap to continually apply the Auto Stretch calculations
every few frames. In this mode, the stretch will automatically
adapt to changes in the image brightness. Locked Stretch can
be turned off again by clicking this button a second time.
Any changes made in the Display Histogram Stretch section only affect how the images are displayed on screen – there will not be any changes made to the images saved to capture files (except those saved using the ‘Save Exactly as Seen’ button in the display histogram stretch control (or the equivalent ‘Save Exactly as Seen’ option when saving from Live Stacking).
Display Effects (FX)
Various effects can be added to the displayed image if required – note that these do not affect the images saved to file when using the various capture buttons, again with the exception of the Save Exactly as Seen. Depending on the colour space of the image being viewed, some of the options listed below may not be available.
None
No effects are applied to the image.
Highlight Over Exposed
Any part of the image which is deemed to be over exposed is highlighted, flashing to either red or black every few frames. In this graphic, notice the red highlighted areas.
This is a more extreme example using the moon – the camera exposure or gain settings may need to be reduced to remove the red highlighted area if they are any more than a few of the brightest stars. For instance, the image of Jupiter below is overexposed in the brighter cloud regions, which is highlighted.

Image Boost
Image Boost is useful when trying to find fainter objects. The image will appear slightly grainy as noise is introduced. Note that using the display stretch in the mini-histogram provides a more flexible way of brightening faint objects in the image.
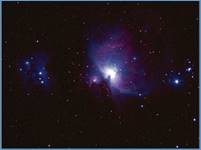
Image Boost More
Image Boost More applies a greater boost to the image, allowing even fainter objects to be revealed. An increase in graininess is to be expected.

Frame Stack (3, 5, 10, 30)
With Frame Stack, images are stacked – 3, 5,10 or 30 depending on the selected option. This effect can assist when looking for fainter objects. Stacking when this option is applied does not attempt to align new images with previous images in the stack. Note that the image will update less frequently when this option is being used – for instance when Frame Stack 10 is selected, SharpCap will collect 10 frames from the camera and then update the image with the result, then start collecting another 10 frames for the next image update.
RGB Align
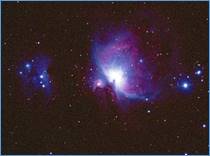
RGB Align can be used for planetary imaging when, due to atmospheric conditions, the object being imaged has colour distortion at the edge. In this extreme example, note the red on one side and the blue on the other, caused by the varying refraction of colours of light as they enter the atmosphere.
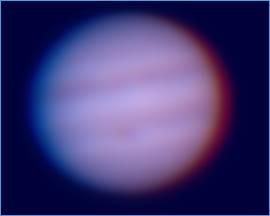
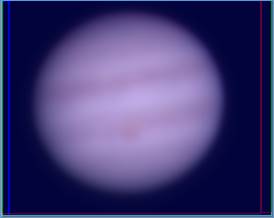
Use this option to adjust the red/blue values to obtain a good image on screen to ensure best focus when preparing to capture. The right-hand image shows the same view of Jupiter with the colour channels aligned.
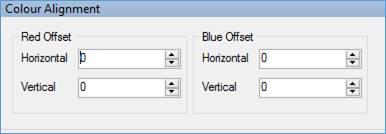
RGB Align applies only to the previewed image, it does not affect the captured data. Other programs, such as Registax, allow re-alignment of RGB channels in the final captured images.
Since the RGB align only affects the image as displayed on screen, its main use is to correct for RGB misalignment to allow a better judge of focus quality to be obtained, or for live broadcasting of planetary imaging.
Select Red/Green/Blue Channel
These effects are available only for colour cameras. Selecting a particular channel will remove the other two colours from each image, leaving an image showing in shared of red, green or blue respectively.
Red/Green/Blue Channel to Mono
These effects are only available for colour cameras. Selecting one of these options will show the appropriate colour channel data as a monochrome image.
Reduce Noise (Median Blur 3x3)
This option applies a simple median blur to the image (for every 3 by 3 block of pixels, it takes the middle value out of the 9 values when placed in ascending order as the new value for the central pixel). This significantly reduces noise in the displayed image.
Apply Threshold
This effect can be used to threshold the image from the camera – making all pixels darker than the Threshold Level value turn to black. Pixels brighter than the threshold level can either take their original values or be set to white (giving a purely black and white image displayed on screen).
This option can be particularly useful when looking for faint targets against a bright background – for instance the thin crescent moon against a blue sky. By setting the threshold correctly, the blue sky can be changed to black (below the threshold), while the slightly brighter moon will remain white.
There are a number of options that can be adjusted:
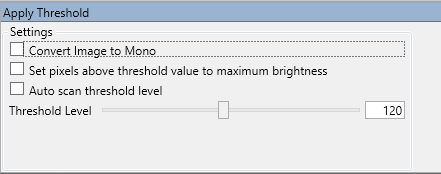
Convert Image to Mono – this is useful when using colour cameras, otherwise an odd colour effect can occur with different colour channels being set to black in different areas.
Set pixels above threshold value to maximum brightness – when this is selected, pixels above the threshold level will be set to maximum brightness (white), giving a pure monochrome image.
Auto scan threshold level – when set, the threshold value will be gradually increased by SharpCap, running through a range covering from the darkest pixels in the image to the brightest over about 30 seconds and then repeating. This can be helpful to spot features in the image when the automatic threshold adjustment takes the threshold to just the right value.
Threshold Level – this slider allows the threshold level to be adjusted (unless auto scan is in progress).
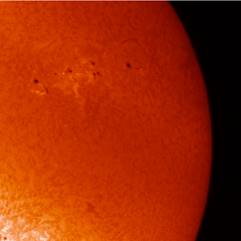
Solar Colorization
This effect is only available for monochrome cameras and applies a colour scheme typically used for solar images to the monochrome image from the camera, giving a more interesting image. Since this is only applied to the image displayed on-screen, it is primarily useful for outreach or live broadcast of imaging sessions.
The colour scheme applied approximates the one described by John W. O’Neal, II on his web page describing the technique (https://www.photographingspace.com/colorize-solar-images/).