Advanced Topics
Command Line Arguments
SharpCap can be launched with a selection of command line arguments to customize its behaviour and deal with unusual situations:
|
/language |
Run SharpCap in a language other than the default Windows language. Specify the language code for a language that SharpCap supports, for example ‘fr’, ‘zh-CN’, ‘de’, ‘jp’. Example : /language fr |
|
/camera |
Open the specified camera when starting SharpCap. If the camera name contains spaces, enclose the camera name in double quotes. Example: /camera "ASCOM Camera Driver for DSLR" |
|
/softwarerendering |
Force SharpCap to use software rendering rather than an accelerated graphics card driver for certain parts of the UI. Use this option if you are running SharpCap via remote access software and parts of the SharpCap window are blank. |
|
/nohighdpi |
If this option is specified then SharpCap will not enable high DPI awareness mode. If you use SharpCap on a high DPI monitor and sizes of windows, text or other items is incorrect, it may be worth trying this option. Text may appear blurry on high DPI monitors with this option, but correct sizes of items should be restored. |
|
/runscript |
Run the specified python script file after SharpCap finishes loading. See Scripting for more details. Example: /runscript d:\files\test.py |
|
/runsequence |
Run the specified SharpCap sequence file after SharpCap finishes loading. See the SharpCap Sequence Editor for more details. Note that this needs to be an SCS file from the sequence editor, not an SSP or SSV file from the Deep Sky or Solar System Sequence Planners. Example: /runsequence d:\files\allskycamera.scs |
|
/dump |
Create a crash dump minidump file on the desktop if SharpCap encounters a fatal error. Use this option if SharpCap crashes and does not offer the opportunity to submit a bug report. The minidump file will be saved on the desktop and called SharpCap.dmp. Please send minidump files to technical support via the forums. Note that this option is not supported by the 64-bit version of SharpCap. |
|
/instance |
Run SharpCap with an alternative configuration. Specify a configuration instance number in the range 2-9. Example: /instance 2 When you first use an instance number, all your SharpCap settings will be copied from the default configuration. From that point onwards, settings changes made in the default instance will not affect the new instance (and settings changes in the new instance will not affect the default instance). This approach allows you to set up two or more configurations for SharpCap, perhaps if you have multiple sets of imaging equipment attached to the same computer. Note that the following items are shared between instances : · SharpCap Pro licenses · Capture Profiles, including the ‘auto save’ profiles used to restore previous camera settings automatically · Auto-saved sequence editor and sequence planner configuration |
|
/translate |
Use this option to start translating SharpCap to a new language. See this thread on the forums for details of how to create a new translation of SharpCap. Please consider contributing your translation to the official version of SharpCap so that it can benefit other SharpCap users. |
|
/resetsettings |
Reset all SharpCap settings during startup. This may help if SharpCap crashes on startup, particularly if it begins doing this after one or more settings have been adjusted. |
|
/debuglaunch |
Provides debugging information about the very early phases of SharpCap startup. If SharpCap crashes before showing the main window then running with this option may produce extra information allowing you to report the issue on the forums. |
Keyboard and other Shortcuts
The following keyboard shortcuts can be used to control SharpCap
|
<CTRL> while opening SharpCap |
Do not open a camera at start-up, do not run start-up scripts or sequences |
|
<SHIFT> while opening SharpCap |
Show SharpCap log immediately |
|
<CTRL> while opening a camera |
Do not load any saved default capture profile for the camera, also do not restore previously used camera settings |
|
<SHIFT> while adjusting histogram stretch levels |
Move the histogram stretch level 10 times more slowly than mouse movement for fine control |
|
<CTRL> when using the Auto Stretch buttons |
Apply a stronger than normal auto stretch |
|
<SHIFT> when using the Auto Stretch buttons |
Apply a weaker than normal auto stretch |
|
<CTRL> + Mouse Wheel over image |
Zoom in/out |
|
Mouse Wheel over image |
Scroll up/down |
|
<SHIFT> + Mouse Wheel over Image |
Scroll left/right |
|
<CTRL> + <PLUS KEY> |
Zoom In |
|
<CTRL> + <MINUS KEY> |
Zoom Out |
|
<CTRL> + 1 |
Zoom to 100% |
|
<CTRL> + 0 |
Set Zoom to Auto (fit image to available space) |
|
F1 |
Reduce Exposure |
|
F2 |
Increase Exposure |
|
F3 |
Reduce Gain |
|
F4 |
Increase Gain |
|
F5 |
Reduce Black Level/Offset/Brightness |
|
F6 |
Increase Black Level/Offset/Brightness |
|
F7 |
Move focuser in negative direction |
|
F8 |
Move focuser in positive direction |
|
F9 |
Adjust Exposure/Gain shift by -1 for shorter exposures, higher gain |
|
F10 |
Adjust Exposure/Gain shift by +1 for longer exposures, lower gain |
|
<ALT+F11> |
Show Scripting Console |
|
F11 |
Toggle full screen mode |
|
F12 |
Toggle night mode |
|
<CTRL>+F12 |
Toggle two monitor mode |
|
<ALT>+S |
Start Capture |
|
<ALT>+Q |
Quick Capture (most recently used length) |
|
<ALT>+T or <ESCAPE> while Capturing |
Stop Capture |
|
<ALT>+A |
Snapshot single frame |
|
<ALT>+L |
Activate Live Stacking |
|
<ALT>+F4 |
Exit SharpCap |
|
<CTRL>+J, <CTRL>+NUMPAD 4 |
Move mount left |
|
<CTRL>+L, <CTRL>+NUMPAD 6 |
Move mount right |
|
<CTRL>+I, <CTRL>+NUMPAD 2 |
Move mount up |
|
<CTRL>+K, <CTRL>+NUMPAD 8 |
Move mount down |
|
<ESCAPE> (while capturing) |
Stop Capture |
|
<CTRL>+<SHIFT>+C |
Connect or disconnect all hardware |
|
<CTRL>+<SHIFT>+H |
Show Histogram |
|
<CTRL>+<SHIFT>+L |
Enable Live Stacking |
|
<CTRL>+<SHIFT>+R |
Run an automatic refocus |
|
<CTRL>+<SHIFT>+A |
Activate Deep Sky Image Annotation |
|
<CTRL>+<SHIFT>+F1 to F12 |
Change to filters 1 to 12 |
Note that the mount movement keys are equivalent to the left/right/up/down direction buttons in the Mount Control – the mount will continue moving while the key is held down.
Scripting
SharpCap has a scripting language built in that allows simple programs to be written that can perform just about any action that can be performed when controlling SharpCap with the keyboard and mouse. The scripting language is based on a language called IronPython which is a Microsoft port of the Python Programming Language to the .NET framework.
Note that Python Scripting is a SharpCap Profeature.
The Scripting Console
The Scripting console can be shown by selecting Show Console from the scripting menu. The scripting console is an Integrated Development Environment (IDE). This allows for the creation, execution and debugging of code using the IronPython programming language and its integration into SharpCap.
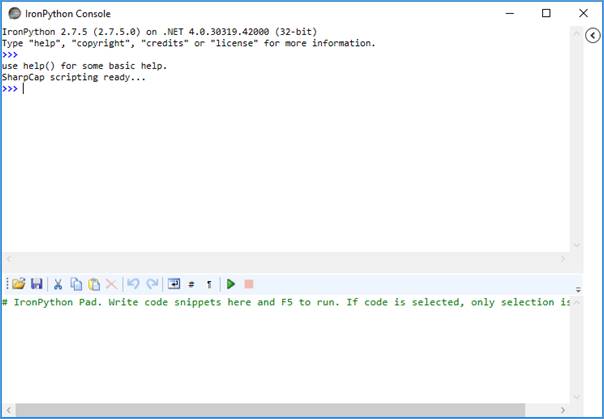
Typing help() and <ENTER> into the IronPython Console window gives the following basic help output:
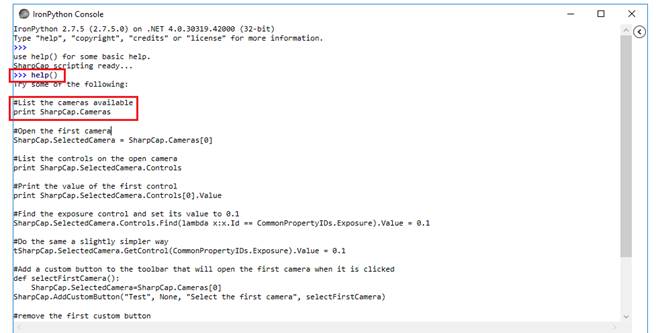
Some examples are displayed. One of these is code to list the cameras available to SharpCap.
#List the cameras
available
print SharpCap.Cameras
Lines beginning with # are comment lines, meaning they are ignored by the computer.
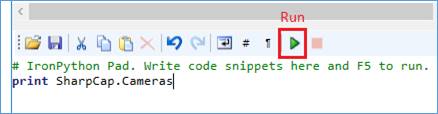
Code can be typed directly into the console or pasted into the IronPython Pad in the lower part of the console window. If code is typed into the upper part of the window, it will be run when the <Enter> key is pressed. Longer sections of code should be typed into the lower editor area where they are not run until the ‘Run’ button is pressed.
Controlling SharpCap is handled using the SharpCap object which is automatically loaded into each script session. Some simple commands would be...
SharpCap.SelectedCamera = None # Close the camera that is currently active
SharpCap.SelectedCamera = SharpCap.Cameras[0] # Open the first camera in the Cameras menu and start previewing it
Once a camera is running, adjust its properties like this
SharpCap.SelectedCamera.Controls.Exposure.Value = 1000 # Set the exposure to 1000ms (1s)
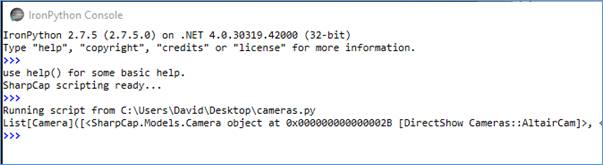
In the IronPython Pad, type in the code print SharpCap.Cameras and press the Run button.
The following output appears in the IronPython Console.
![]()
Click the floppy disk icon and save the file as cameras.py for use in the Run Script menu item below.
Exploring the API
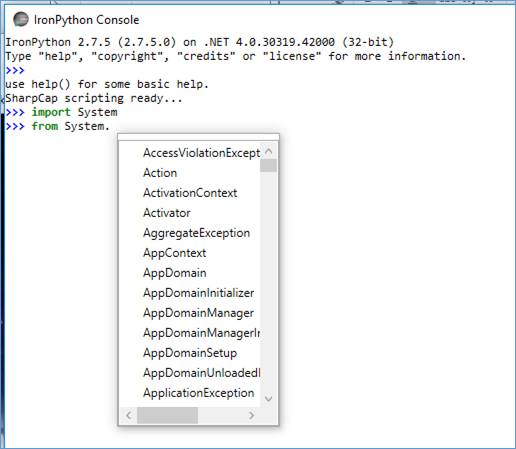
The editor automatically shows the possible methods and properties for an object upon typing the '.' – this helps explore the available API.
In the IronPython Console, type the following two lines (the case of the text matters and the ‘.’ matters):
import System
from System.
As soon as the ‘.’ is typed, a list appears allowing selection. This trick can be applied to many parts of the SharpCap API to allow discovery of the methods available and what parameters they require.
You can also explore the methods and properties available on any object by using the help command - for instance
help(SharpCap)
help(SharpCap.SelectedCamera)
Note: The API available for use in scripts in SharpCap is subject to change in future versions. While every effort will be made to retain compatibility with existing scripts, this is not always possible – sometimes scripts may need modification to continue working correctly in an updated version of SharpCap.
Run a Script
The Run Script menu item opens a File Explorer window to allow selection of a previously created Python script.
Scripts (programs) can also be created from within Windows using any text editor. The scripts must be saved with a .py extension.
From the Menu select
Scripting >
Run Script.
Browse to the file something.py and click the Open button. The script should execute.
Example
1.
From the Menu select Scripting > Show
Console.
2.
Drag the Iron Python Console to one side using the mouse.
3.
From the Menu select
Scripting >
Run Script.
4.
Navigate to
the file cameras.py,
created in the
previous section, and select it.
5.
The script
executes and the result (the available cameras) is shown in the
IronPython Console.
The above example has no practical use but serves to demonstrate how to use SharpCap functionality.
Note: A number of methods available on the SharpCap scripting API return a Task object – these methods run asynchronously (i.e. they start a process and return before the process has finished). Often, there will be an alternative method that does not involve the asynchronous behaviour, and that alternative should be preferred when writing scripts. For example (from the ‘help’ for SharpCap.SelectedCamera):
| RunCapture(...)
| RunCapture(self: Camera)
|
| RunCaptureAsync(...)
| RunCaptureAsync(self: Camera, cancellationToken: CancellationToken) -> Task
Where possible, use the non-async version of the method – for
instance RunCapture rather than RunCaptureAsync. If you need to use
an Async method from Python scripting, you can use .Wait() or
.Result to wait for completion or access the result (return value)
of the asynchronous method.
Scripting Tutorial
Create a Script
This section shows how to:
· Create a simple script using the IronPython Console.
· Save the script.
· Run the script from within the console.
· Run the saved script directly from the Run Script menu option.
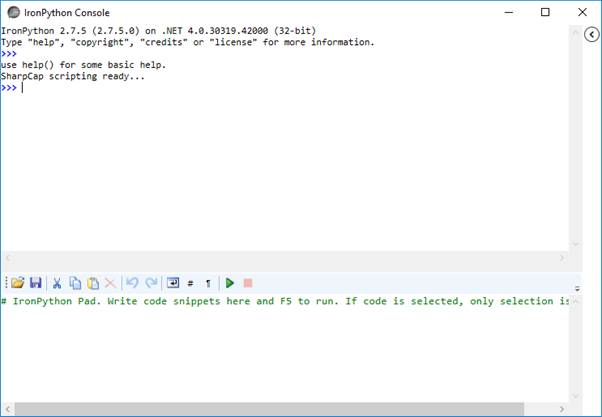
Upon selecting Show Console, an Integrated Development Environment (IDE) is displayed. This allows for the creation, execution and debugging of code using the IronPython programming language.
The code below will capture a single PNG image and save it to a file. The destination d:\capture.png will need to be changed to somewhere convenient on the computer being used.
SharpCap.SelectedCamera.CaptureSingleFrameTo("d:\capture.png")
Complete the following steps to test the scripting functionality:
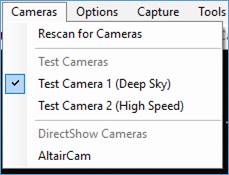
1.
Start SharpCap and from the Menu select
Cameras >
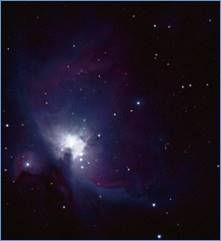
Test Camera 1 (Deep Sky).
The M42 image should be shown in the Capture Display Area.
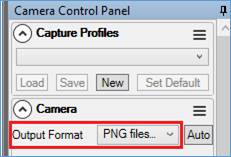
2.
In the Camera
Control Panel, change the Output Format to be
PNG
files…
3.
From the Menu select
Scripting >
Show Console.
The IronPython Console will open.
4.
Copy the following code:
SharpCap.SelectedCamera.CaptureSingleFrameTo("d:\capture.png")
and paste it with CTRL (or type directly) into the IronPython
Pad (bottom part of the IronPython Console). Edit the
destination (underlined in red) to be something appropriate on the
PC in use.

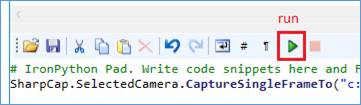
5.
Press the Run icon (or F5).
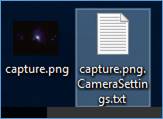
6.
Check the destination which, all being well, should now contain 2
new files called capture.png and
capture.png.CameraSettings.txt.
7.
Edit the code to change the capture file name to be
capture2.png.
![]()
8.
Click on the floppy disk icon and a file explorer window
opens.

Save the file as capture2.py (the
.py extension is
important).
9. Close the IronPython Console.
[Note: Of course, the point of scripting is to automate the use of SharpCap, and all of the above steps could be automated by a more complex script – for example:
SharpCap.SelectedCamera = SharpCap.Cameras.Find( lambda x:x.DeviceName == "Test Camera 1 (Deep Sky)")
SharpCap.SelectedCamera.Controls.OutputFormat.Value = "PNG Files (*.png)"
SharpCap.SelectedCamera.CaptureSingleFrameTo("d:\capture.png")
SharpCap Scripting Object Model Reference
The major objects available to control the application are:
|
SharpCap |
The main application object, all other objects are accessed via this object. |
|
SharpCap.Cameras |
A collection of available cameras (as shown in the Cameras menu) |
|
SharpCap.SelectedCamera |
The camera that is currently open (or 'None' if no camera open) |
|
SharpCap.SelectedCamera.Controls |
The controls available on the currently open camera. Many common controls can be access directly, but others will need a check of each item in the array to find the control needed. |
|
SharpCap.Focusers |
A collection of (ASCOM) focusers detected by SharpCap. SharpCap.Focusers.SelectedFocuser can be used to connect to a specific focuser and then access it via the SelectedCamera.Controls collection. |
|
SharpCap.Mounts, SharpCap.Wheels, SharpCap.Rotators, SharpCap.SwitchDevices |
Collections of ASCOM mounts, filter wheels, rotators and switch devices, work in the same way as Focusers. |
|
SharpCap.Transforms |
A collection of frame transforms that can be applied to the preview window by setting the SharpCap.Transforms.SelectedTransform property (buggy at the moment) |
|
SharpCap.MainWindow |
The main application window of SharpCap. Take care changing properties or calling methods on this as it may break things. |
|
SharpCap.Reticules |
Collection of reticule overlays that may be selected for drawing on the screen (like the transforms, also currently buggy) |
|
SharpCap.Settings |
Selected application settings, alter with care and call 'Save()' after any changes to make them take effect |
|
SharpCap.Sequencer |
Access the sequencer, allowing sequences to be run from Python scripts |
|
SharpCap.DisplayStretch |
Access the display stretch settings |
|
SharpCap.LiveStacking |
Access key information and actions related to live stacking |
|
SharpCap.ZoomPercent |
Adjust the display zoom level |
|
|
|
In general, the most used objects will be SharpCap.SelectCamera and SharpCap.SelectCamera.Controls.
The Camera Object
The most important methods and properties on the SelectedCamera object are (informational properties will work on other non-selected cameras):
|
CanCapture, CanStillCapture |
Indicate whether the camera can capture video and still frames, respectively |
|
CanPause |
Can the camera pause a video capture without stopping it? |
|
CaptureConfig |
Settings controlling the type of capture to be performed, including frame limit, etc |
|
PrepareToCapture() |
Must be called to set up a video capture before calling RunCapture() |
|
RunCapture() |
Begins a prepared video capture. The capture will run until any limit is reached or StopCapture() is called. The output file(s) will be named according to the selected naming scheme. |
|
CancelCapture() |
Cancel a capture that has been prepared (instead of running it using RunCapture). |
|
CaptureSingleFrame() |
Capture a single frame snapshot (the output file will be named according to the selected naming scheme |
|
CaptureSingleFrameTo(string filePath) |
Capture a single frame and save it to the specified output file name. The path will need to be a full path and the extension specified should match that selected in SharpCap.SelectedCameras.Controls.OutputFormat.Value |
|
Name |
The name of the camera used in the application UI |
|
VideoDeviceId |
In internal identifier for the camera (may be empty or rather geeky) |
|
StartPreview(), StopPreview() |
Start and Stop previewing frames on the camera respectively |
|
RestartPreview() |
Stop then re-start previewing frames on the camera |
|
GetStatus(boolean allStats) |
Returns an object describing the status of the camera including frames captured, average frame rate, etc. |
|
IsOpen, IsPreviewing, CanCountFrames, Capturing |
Informational properties, as named |
|
CapturedFrameCount |
The number of frames processed by the camera (including preview frames) since the last time preview was started or capture was started or stopped. |
|
ApplySelectedTransform() |
Reserved, internal use only |
The following controls may be available directly on the Controls object for the SelectedCamera:
Binning, ColourSpace, Exposure, FilterWheel, Focus, Gain, OutputFormat, Resolution
Other controls are likely to be available within the Controls collection and must be searched for by name, for example:
cooler = SharpCap.SelectedCamera.Controls.FindByName("Cooler")
Note that the available controls vary from camera to camera, and only ColourSpace, Exposure, Resolution and OutputFormat are always available.
The Control Object
The following properties are available on each Control:
|
Available |
True if the control is actually available to read or write values. |
||||||||||||
|
ReadOnly |
True if the control can only be read from (for instance a sensor temperature readout) |
||||||||||||
|
AutoAvailable |
True if the control can be set into Auto mode |
||||||||||||
|
Auto |
Switch the control between Auto and Manual mode |
||||||||||||
|
Name |
The name of the control as displayed in the UI |
||||||||||||
|
Id |
An enumeration of common property types, currently including: Other, Exposure, FrameRate, Pan, Tilt, Resolution, ColourSpace, OutputFormat, Focus, FilterWheel, Binning, Gain |
||||||||||||
|
Minimum, Maximum |
Retrieve the minimum and maximum values of numeric controls |
||||||||||||
|
Step |
Integer controls may have a step value defined - they can only be changed in multiples of this value. This is very rarely encountered. |
||||||||||||
|
Value |
The value of the control, which can be retrieved and (if not ReadOnly) changed. |
||||||||||||
|
Type |
The type of value that the control has.
|
||||||||||||
|
AvailableValues |
In the case of a MultipleChoice control, a list of the choices available. |
Direct Access to ASCOM Hardware
For each type of ASCOM hardware, SharpCap provides direct access to the ASCOM driver object, allowing scripting code to talk directly to the hardware if required.
SharpCap.Mounts.SelectedMount.AscomMount
SharpCap.Focusers.SelectedFocuser.AscomFocuser
SharpCap.Wheels.SelectedWheel.AscomWheel
SharpCap.Rotators.SelectedRotator.AscomRotator
SharpCap.SwitchDevices.SelectedSwitchDevice.AscomSwitchDevice
Note that these properties will not be valid in the following situations:
· The hardware settings for that type of hardware are set to None
· The hardware settings for that type of hardware are set to a non-ASCOM device – i.e. a mount controlled via ST4, a manual or directly controlled ZWO filter wheel, etc.
· The ASCOM hardware is not connected.
Care needs to be taken when using these properties to directly talk to the ASCOM hardware as this communication happens ‘behind SharpCap’s back’ – the SharpCap UI may not update correctly to reflect changes made in this way, or in some cases errors may occur if changes are made to the hardware that SharpCap is not expecting.
Scripting Samples
Examples of scripting tasks are shown below.
Periodic Capture and Timestamp Image
The code below will capture a single PNG image approximately every 15 seconds and write a timestamp into the image itself before saving it. It would be simple to modify the code to save each timestamped image under a different filename or to remove the timestamping step.
The code relies on a camera already being selected and previewing and that the camera can output to PNG files (i.e. will not work if the camera is in a 12/16-bit mode).
import time
clr.AddReference("System.Drawing")
import System.Drawing
SharpCap.SelectedCamera.Controls.OutputFormat.Value = 'PNG files (*.png)'
if (SharpCap.SelectedCamera.Controls.Exposure.AutoAvailable):
SharpCap.SelectedCamera.Controls.Exposure.Automatic = True
while True:
SharpCap.SelectedCamera.CaptureSingleFrameTo("d:\capture.png")
time.sleep(1)
bm = System.Drawing.Bitmap("d:\capture.png")
g = System.Drawing.Graphics.FromImage(bm)
f = System.Drawing.Font("Arial", 12)
g.DrawString(System.DateTime.Now.ToString(), f, System.Drawing.Brushes.Red, System.Drawing.Point(0,0))
g.Dispose()
f.Dispose()
bm.Save("d:\\timestamped.png")
bm.Dispose()
# do more with png file here
time.sleep(15)
Controlling the Selection Rectangle
Before starting this example, select either a suitable Focus Score method or the Image Histogram to enable the Selection Area generated by the program to be shown. The Selection Area needs to be turned off via its Tool Bar icon
From Scripting > Show Console, type the following code into the IronPython Console. Do not copy and paste as this negates the purpose of the exercise. At certain places, when ‘.’ is typed a dropdown will appear showing possible methods and properties. Select the appropriate text.
import clr
clr.AddReference("System.Drawing")
from System.Drawing import Rectangle
SharpCap.Transforms.AreaSelection = True # turn
on selection area
SharpCap.Transforms.SelectionRect =
Rectangle(100,200,300,400) # adjust selection rectangle,
parameters are (x, y, width, height)
The typed in code should look like this. When run, nothing will appear to happen except an additional >>> will appear in the console. No errors messages is a good sign.

This enables use of the .NET type System.Drawing.Rectangle which is required to specify the selection area - the first 3 lines, which allow access to the .NET type, are the important ones here as they can be used for other .NET types too.
Example Task to Script
Consider the following non-trivial task.
· Control a USB filter wheel containing LRGB filters
· Capture 10x5 minute exposures using L filter
· Switch to R filter
· Capture 10x5 minute exposures using R filter
· Switch to G filter
· Capture 10x5 minute exposures using G filter
· Switch to B filter
· Capture 10x5 minute exposures using B filter
Total capture time = 3h 20m but no intervention is needed if the capture is managed by a script.