Installation and Getting Started
Requirements
In order to use SharpCap, you need a suitable computer running Microsoft Windows and a supported camera. SharpCap can also help control other astronomy hardware such as focusers, GOTO mounts, filter wheels, etc via the ASCOM platform.
Supported Cameras
SharpCap supports a wide range of cameras. These can be divided into 3 basic categories:
1. Cameras supported directly by SharpCap – these include many brands of dedicated astronomy cameras including models by Altair, AstCamPan, AstroAsis, Atik, Basler, Celestron, Imaging Source, Moravian Instruments, Player One, Point Grey, QHY, SVBony, StarlightXpress and ZWO.
2. Cameras supported via a Windows Webcam driver – includes most webcams (modified and unmodified), USB frame grabbers and is also an option for many specialised cameras where the manufacturer provides a webcam driver (sometimes called a WDM or DirectShow driver).
3. Cameras supported via an ASCOM driver – many astronomy camera manufacturers provide ASCOM drivers for their products and SharpCap can use these to communicate with the camera. This category also includes cameras that can be controlled using the ‘ASCOM Alpaca’ remote control system.
Sometimes a camera can be accessed by two (or even all three) of the options above. If that happens, it is usually best to prefer to use the direct support for the camera as this will give the most control over the camera’s functionality. The direct support will always be the entry for the camera that is nearest to the top of the menu.
Altair Cameras
A UK based supplier of a wide range of CMOS cameras for guiding, solar, planetary, lunar and deep sky imaging. Altair cameras can also be purchased from a range of dealers in the UK and other countries. Altair’s website can be found at https://www.altairastro.com/ .
AstcamPan Cameras
AstcamPan sell a range of CMOS cameras. The cameras can be purchased direct from the manufacturer and via various online marketplaces. Their website can be found at https://www.astronomy-camera.com/.
AstroAsis Cameras
AstroAsis sell a steadily growing range of CMOS cameras. Their website can be found at https://www.astroasis.com/en/.
Atik Cameras
A UK based supplier of CCD and CMOS cameras for all aspects of Astro-imaging. Atik cameras can also be purchased from a range of dealers in the UK and other countries. Atik’s website can be found at https://www.atik-cameras.com/.
Basler Cameras
A German manufacturer of a wide range of industrial cameras, some of which are suitable for astro imaging. SharpCap supports Basler cameras, including those with Gigabit Ethernet connectivity. On some models of Basler cameras, SharpCap is capable of supporting exposures longer than the camera's normal maximum limit by clever software control of the camera's manual exposure triggers. Basler’s website can be found at http://www.baslerweb.com/en .
Celestron/Imaging Source Cameras
The Imaging Source provide a wide range of industrial cameras which have been used for astro imaging for some time. Imaging Source manufactured cameras are now sold under the Celestron brand. SharpCap should be able to control the full range of The Imaging Source and Celestron cameras, although testing has covered the more common USB cameras only. The Imaging Source’s website can be found at https://www.theimagingsource.com/ .
iNova Cameras
iNova cameras are no longer supported by SharpCap 4.1. Please continue to use SharpCap 4.0 or earlier versions to control iNova cameras.
Moravian Instruments Cameras
Moravian Instruments sell a wide range of CMOS and CCD cameras for Astro-imaging. SharpCap supports the CMOS cameras and may also work with the CCD models. The Moravian Instruments web site can be found at https://www.gxccd.com/.
Player One Cameras
Player One sell a range of CMOS cameras currently aimed at Lunar/Solar/Planetary imaging. Their website can be found at https://player-one-astronomy.com/. Cameras can be purchased direct through their web site and via a number of dealers.
Point Grey Cameras (now FLIR)
Point Grey (now owned by FLIR) sell a wide range of industrial cameras that can also be used for astro imaging and scientific imaging. SharpCap supports most Point Grey cameras and provides full control over their functionality. More details on Point Grey cameras can be found at https://www.flir.com/iis/machine-vision/.
QHY Cameras
QHY sell a wide range of CCD and CMOS cameras with sensor sizes ranging from webcam size to full frame SLR and beyond. These cameras are primarily designed for the astro imaging and Scientific markets. SharpCap supports the full range of QHY cameras and includes support for advanced features such as built-in filter wheels, GPS timing modules and Peltier cooler control. QHY’s website can be found at http://www.qhyccd.com/ .
StarlightXpress Cameras
StarlightXpress produce a range of CCD based cameras designed specifically for astronomy use. SharpCap can control the full range of StarlightXpress cameras including the popular Lodestar family of highly sensitive guiding cameras. More details of StarlightXpress cameras can be found at https://www.sxccd.com/ .
SVBony Cameras
SVBony produce a range of CMOS Astro-imaging cameras. The SV305 and SV305Pro cameras are supported directly by SharpCap, while other models (SV105 and SV205) are only available via their webcam driver. SVBony cameras can be purchased directly from their website : https://www.svbony.com/categories/astronomy-camera/ .
ZWO Cameras
ZWO sell a range of CMOS cameras with low noise, high sensitivity sensors, ranging from webcam size to full frame SLR. Their cameras are primarily designed for the astro imaging market, including useful features such as built in USB hubs on some models. SharpCap supports the full range of ZWO cameras including control of advanced features such as Peltier cooler control and USB bandwidth adjustment. ZWO’s website can be found at https://astronomy-imaging-camera.com/ .
ASCOM Cameras
Many astro cameras have ASCOM drivers and SharpCap can use these drivers to control such cameras. This can be a good fall back option when SharpCap does not have direct support for a camera. The ASCOM Standards website can be found at
http://www.ascom-standards.org/Downloads/CameraDrivers.htm .
Note that many popular DSLR cameras can be used in SharpCap via the ASCOM DSLR driver, which can be found here : https://github.com/FearL0rd/ASCOM.DSLR/. These cameras should generally be used with SharpCap in Still Mode.
DirectShow Cameras (Webcams)
Microsoft DirectShow is an architecture for streaming media on the Microsoft Windows platform. There are a vast number of webcams and frame grabbers on the market. The controls available in SharpCap are determined by the driver – SharpCap just shows the controls the driver makes available.
Virtual Camera
SharpCap supports a ‘Virtual’ camera. This works by reading image files from a selected folder and treating the images as if they were frames received from a camera. SharpCap will read all existing images in the folder in date order and then wait for any new images that are created. You can use the virtual camera to use SharpCap features such as live stacking with previously captured images or with an unsupported camera if you have a program that will capture images from the camera and save them to disk.
Testing Cameras
SharpCap includes two testing cameras that can display an image from file (or the contents of an SER video in the case of the ‘High Speed’ test camera). These cameras can be used to try out features of SharpCap when clear skies are not available. Most SharpCap Pro features do not require a license when used with one of the testing cameras.
Choosing Between ASCOM and DirectShow
If a camera appears as ASCOM and DirectShow – which should be chosen?
If a camera not directly supported by SharpCap is to be used, there may be two options when connecting to it – ASCOM drivers or DirectShow drivers. Each have their pros and cons.
|
ASCOM |
DirectShow |
|
Pros: · Direct control of exposure (continuously variable) in the SharpCap panel. · Binning may be available. · ROI may be available. · Bit depths of greater than 8 bits and RAW modes may be available. · Long exposures likely to be available.
Cons: · Few other controls in the SharpCap panel as ASCOM doesn't allow for many except exposure and gain. · ASCOM is relatively slow, so frame rates will be slower. · ASCOM can be unreliable because each manufacturer interprets the standard in their own way, which can lead to some ASCOM drivers being incompatible with SharpCap.
|
Pros: · A better selection of camera controls available in the panel (gamma, brightness, contrast, etc.). · Long exposures may be available (i.e. 1s, 2s, 4s, 8s, 16s, etc.). · Region of Interest (ROI) may be available. · Extra controls may be available in the camera's DirectShow config dialog. · High frame rates possible. · Less likely to have compatibility issues than ASCOM.
Cons: · Exposure only changeable in multiples of 2. · Bit depths limited to 8 bits and RAW modes unlikely to be available. · Using an astro camera via DirectShow isn't as good as using it directly (less controls, less control over exposure), but it is better than nothing.
|
Software
SharpCap runs on Microsoft Windows. The minimum version requirement is:
· SharpCap 3.0 – Windows Vista, 7, 8, 8.1, 10
· SharpCap 3.1, 3.2, 4.0 and 4.1 – Windows 7 with SP1, 8.1, 10, 11
SharpCap is available in both 32-bit and 64-bit versions. The 32-bit version will install and run on both the 32-bit and 64-bit versions of Windows, while the 64-bit version requires 64-bit Windows.
In general, the 64-bit version of SharpCap is now recommended if you have a 64-bit version of Windows and at least 8Gb of memory. If you have 32-bit Windows or 4Gb or less memory then the 32-bit version of SharpCap should be used.
Note some ASCOM drivers also do not have 64-bit support, although you may be able to work around this by using the ASCOM Device Hub.
Multiple major versions can co-exist, for example 3.2, 4.0 and 4.1 can be installed together on the same machine. Only one minor version of each can be installed, for example only one of 3.2.6480 and 3.2.6482 can be installed at any one time.
Note: There is no specific version of SharpCap for Microsoft Windows running on ARM processors. You may be able to run the normal SharpCap on Windows for ARM using the emulation built into Windows, but performance may be slow.
Hardware
The minimum hardware requirement is dependent on the type of camera being used. When purchasing a camera, look closely at the manufacturer/vendor recommended minimum PC specification.
The following areas need to be considered to achieve the best frame rates:
· Processor, i5 or i7 is better.
· Memory, 3Gb maximum for 32-bit Windows, 64-bit needs at least 4Gb.
· Disk, SSD is faster than conventional drive.
· USB, USB3 (5Gb/s) is 10x faster than USB2 (480Mb/s).
· Windows 32/64-bit, 64-bit supports more than 3Gb memory.
SharpCap is designed to take advantage of the multiple CPU cores available on most modern computers and will perform better for fast cameras if more than one CPU core is available.
Consider the hardware demands when purchasing high frame rate or very high resolution cameras.
Minimum Hardware Specification
A 640x480 resolution webcam will work well on a low specification PC. A ThinkPad X61 (used to produce the examples in this manual) satisfies this requirement. The following specification can achieve 30fps at 640 x 480 with a USB2 webcam.
· Core 2Duo 1.86Ghz processor
· 4Gb (3Gb usable with 32-bit Windows)
· 120Gb SATA2 drive
· Windows 10 32-bit
Recommended Hardware Specification
A dedicated astronomy camera capable of 3000x2000 pixels at 50fps will require a fast processor, more memory, an SSD and a USB3 port to achieve maximum performance.
If intending to use high resolution cameras (10 Megapixels or more), ensure the capture PC/laptop has:
· A minimum of i5 processor or equivalent.
· A large capacity hard drive (500Gb or more) with SSD preferred.
· At least 8Gb (preferably 16Gb or more) of memory.
· A 64-bit version of the Windows operating system.
This configuration allows SharpCap to access more memory, thus reducing the likelihood of memory exhaustion while capturing. This applies when working in RGB mode or at bit depths of 12 or 16 bits per pixel.
SharpCap Pro
A number of the more advanced features of SharpCap now require the purchase of a SharpCap Pro license. SharpCap Pro licenses are reasonably priced, can be purchased for a 1 year term and are available from http://store.astrosharp.co.uk/ .
Installing SharpCap Pro
You do not need to install a separate version of SharpCap if you wish to use SharpCap Pro features – the SharpCap Pro features are already in the normal installed version of SharpCap – they become available to you when you enter a SharpCap Pro license key.
Trying out SharpCap Pro
You can try out most SharpCap Pro features before purchasing a license. If you decide to try out one or more SharpCap Pro features without entering a license then SharpCap enters an evaluation mode where you cannot save any images until you close and then re-start the application. Evaluation mode allows you to see the effects of SharpCap Pro features on screen but not save the resulting images.
When you try to use a SharpCap Pro feature without a license installed you will see a message like this
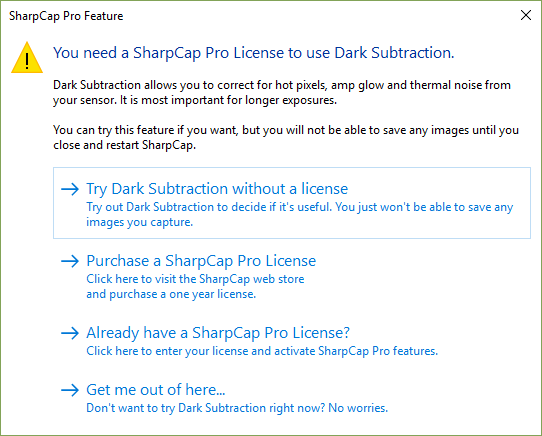
At this point, you can choose whether to use the feature in evaluation mode, purchase a new license or enter an already purchased one or, finally, you can choose not to use the feature after all.
Choosing the various options has the following effects:
· Try <Feature Name> without a license – you will be able to use the feature and other SharpCap Pro features in trial mode. In trial mode you are normally blocked from saving any images to video or image files, meaning that you can see the results on screen but cannot save the results.
· Purchase a SharpCap Pro License – clicking this link will take you to a web site where you can buy a SharpCap Pro license.
· Already have a SharpCap Pro License? – if you already have a SharpCap Pro license but haven’t entered it yet, choose this option to launch the SharpCap license window and enter your license key.
· Get me out of here… - If you aren’t interested in trying out the SharpCap Pro feature then choose this option. SharpCap will not activate the feature and you will not end up in trial mode – you can just carry on using the free features in SharpCap as usual.
Note that some SharpCap Pro features have different restrictions on evaluation – for instance using the Sequencer or Sequence Planner tool in evaluation mode limits the length of the sequence being run to 5 minutes.
SharpCap Pro Features
The table below shows the list of features that require a SharpCap Pro license. These features are also highlighted with the text ‘[PRO]’ where they are mentioned in the remainder of this user guide.
|
Feature |
What it does… |
Notes |
|
Assistance aligning an ADC by detecting offsets in detail in lunar/solar images |
ADC alignment using centre-of-brightness does not require a license. |
|
|
Automatic focus scans via ASCOM focuser require a license |
|
|
|
Fully automatic refocus for deep sky or solar system imaging |
|
|
|
Remove a constant or varying background level in deep sky images |
|
|
|
Helps remove horizontal banding visible in some CMOS camera images when stretched |
|
|
|
Framing assistance for deep sky images using GOTO mount |
|
|
|
Add your own custom objects to SharpCap’s Deep Sky Annotation and GOTO target catalogs |
|
|
|
Subtract dark frames in real time, also includes hot and cold pixel removal without dark frames |
|
|
|
Track a point on a lunar or solar image using a GOTO mount |
|
|
|
Read existing image files and process them as if they had come from a camera |
|
|
|
Apply flat frame correction in real time (solar system and deep sky) |
|
|
|
Automate dithering during Live Stacking via PHD2 or an MGEN3 |
|
|
|
Unsharp mask sharpening, Weiner deconvolution sharpening, bilateral filter noise reduction and colour noise reduction |
|
|
|
Advanced stacking mode that helps ignore spurious data like satellite trails |
|
|
|
Live stack on a comet, allowing stars to trail |
|
|
|
Automatically set image stretch parameters to bring out faint details |
Manual adjustment of the image stretch does not require a license, but the use of the ‘Auto Stretch’ button does. |
|
|
Adjust the colour balance of images while live stacking |
|
|
|
Digitally centre a planet image in the middle of each frame |
|
|
|
Easy to use and accurate polar alignment using your guide camera and guidescope (or similar field of view from other equipment). Requires view of the celestial pole. |
You can measure your polar alignment error without needing a license. Guidance on adjusting to correct any error requires a license. |
|
|
Assistance in moving a manual (non-GOTO) mount to a target via automatic plate solving |
|
|
|
Write complex extensions and customizations to SharpCap using Python |
|
|
|
Detect and remove satellite trails from captured deep sky images in real time |
|
|
|
Monitor image quality on a solar/lunar/planetary image and capture automatically when quality is at its best |
Seeing Triggered capture and Seeing Filtered capture can only be activated with a license. |
|
|
Sequencer, Deep Sky Sequence Planner and Solar System Sequence Planner |
Easy to use automated imaging tools. |
Can save images while evaluating, but sequences will be stopped after a maximum of 5 minutes for deep sky and a limit on frames is applied for video captures |
|
Customized guidance on exposure and gain settings for deep sky imaging |
|
|
|
Automate capture of Solar and Lunar mosaics using a GOTO mount |
|
|
|
Assistance re-framing a solar or lunar image using a GOTO mount |
|
|
|
See estimated peak and total brightness for detected stars |
|
|
|
Show the current image full-screen on a second monitor while the SharpCap main window remains on the first |
Image view on second monitor is watermarked if you do not have a license |
Buying a SharpCap Pro License
SharpCap Pro licenses can be bought by visiting https://store.astrosharp.co.uk . Payment is accepted via Credit and Debit cards, PayPal and digital wallets such as Google Pay, Apple Pay and WeChat Pay.
Once you have paid, your license will be sent to your email address - please take care to enter it correctly. If you pay using PayPal, the email address of your PayPal account will be used, so please make sure that it is correct. Sometimes license emails can get caught in your ‘Junk’ email folder so be sure to check if the license email does not arrive promptly. You will also see your new license in your web browser – just let your browser return automatically to the AstroSharp website after completing your payment.
Installing your SharpCap Pro License
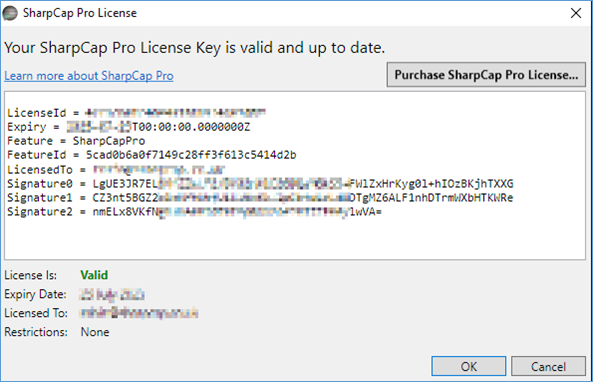
To install your new SharpCap Pro license, run SharpCap, go to the 'Help' menu and select 'SharpCap Pro License'. Copy the license text from your web browser or email and paste it into the license box. Be careful to include all of the license text.
Once entered, your license should look like the example shown below (without the blurring!). Every line of text should start with a field name (like LicenseId or Expiry), followed by an equals sign ('=') followed by the field value. Don't include any other text and make sure you include all the lines shown.
If your license is entered correctly then you will see the license status change to ‘Valid’ below the license entry box.
License Expiry and Renewal
SharpCap Pro licenses are sold on a subscription basis – that means that if you buy a one-year license, it will allow you to use SharpCap Pro features for one year from the date of purchase. If your license has expired then you will no longer be able to access SharpCap Pro features (but you will be able to continue using the many non-Pro features in SharpCap). Subscription based licensing allows the annual cost to be kept very low.
You should receive two reminder emails in the weeks before your SharpCap Pro license expires to let you know that will soon be time to renew your license. You will also see notifications inside SharpCap itself warning you when your license will expire soon.
If you choose to renew your SharpCap Pro license then you will receive a new license key. You will need to replace the existing license key in SharpCap with the new key, following the steps in Installing your SharpCap Pro License. The new key will be valid immediately, so there is no need to wait until your old key expires before making the change. Don’t forget to delete the text of your old license key from the SharpCap License box before installing the new one.
Some common questions and answers and relating to SharpCap Pro Licenses
I didn't receive my license email - what can I do?
Firstly, check your Spam folder or any other junk mail folder, also be aware that this sort of email sometimes gets classed as 'bulk' email and delayed in transfer.
If you still haven't received your email you can get it re-sent to you by visiting the Recover License page. Just enter the email address you used to purchase the license and (optionally) the time from your PayPal receipt. We will automatically resend your license email to you (and show it in the browser if you can enter your PayPal receipt time too).
It says my license is not valid - what have I done wrong?
Make sure that the license text looks like this screenshot:
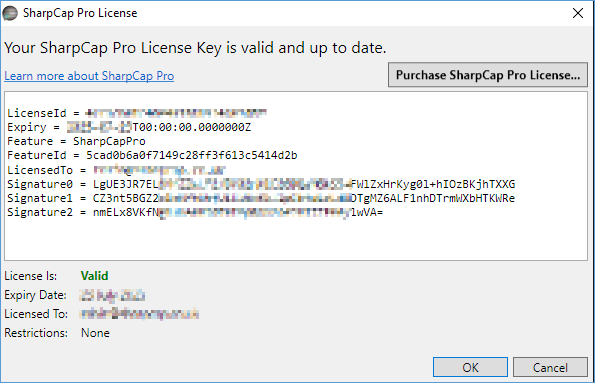
Every line of text should have an start with a field name (like LicenseId or Expiry), followed by an equals sign ('=') followed by the field value. Don't include any other text and make sure you include all the lines shown.
Some email applications seem to add extra line breaks to the license text - you may need to remove these manually. Do not allow any automatic translation software to try to translate the text of the license – that will cause it not to work.
Does my license include upgrades?
Yes it does - you can use any version of SharpCap with your license and update whenever new versions are available.
I use SharpCap on more than one computer - do I need to buy more than one license?
Provided you have bought SharpCap for your personal use then the license is for you rather than a particular computer, so you can use the same license on different PCs that you own.
In more detail, rules are as follows:
· If you are a private individual who has purchased SharpCap : You may use the license on any PC that you own and on one additional PC that does not belong to you as long as you are the primary user of that additional PC (this allows you to use SharpCap on a laptop provided by your employer).
· If you are a not a private individual (i.e. you purchased SharpCap on behalf of a business, government department, education establishment, club or society etc) : You must purchase a SharpCap license for every PC that you install SharpCap on.
I've renewed my license but it hasn't updated in SharpCap - what do I do?
When you renew your license you will receive a new license key by email. You need to put this new key into SharpCap, replacing your existing key. You can start using your new key straight away.
I've lost my license - what can I do?
You can get it re-sent to you by visiting the Recover License page.
Just enter the email address you used to purchase the license and (optionally) the time from your PayPal receipt. We will automatically resend your license email to you (and show it in the browser if you can enter your PayPal receipt time too).
Claiming a SharpCap Pro license bundled with a new Camera
Some cameras are sold with an offer of a 1-year SharpCap Pro license included with the camera. If you have purchased one of these cameras then follow the steps below to claim the license.
· Install any drivers necessary to allow your PC to detect the camera properly (for Altair cameras, this means you must install AltairCapture, even if you do not intend to use it)
· Install the latest version of SharpCap
· Ensure you are connected to the internet – the license claim procedure requires a working internet connection.
· Plug in your camera to a suitable USB port
· Run SharpCap. If you do not have a SharpCap Pro license already, then a notification should appear at the top of the screen soon after SharpCap starts.

· Click on the ‘Claim License Now’ button
· In the license claim window, enter your email address. Take care to enter your email address correctly, as you will receive a copy of your license by email. You can choose to share your email address with the camera manufacturer to receive updates and special offers if you want (this is entirely optional – if you choose not to share your email address with the manufacturer then your email address will only be used to send you your licence key and remind you when it is about to expire).
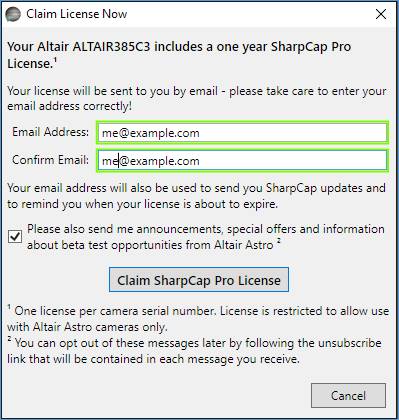
· Press the Claim SharpCap Pro License button – after a few moments your claim will be processed and you should see a message confirming the license claim has been successful. Your license email should usually arrive within a few minutes.
Note: Licenses included with purchases cameras are only valid for use with the specific brand of camera they were claimed against.
Note: If you have purchased your camera second-hand then the previous owner may have already claimed the license for that camera – in that case you will not be able to claim a SharpCap Pro license and will see this message if you do try to claim:

SharpCap Quick Start
This section describes getting started quickly and is intended for the experienced or impatient user.
1.
Download the latest camera driver from the camera manufacturer’s
website.
2.
Install the camera driver – there may be a need to approve an
administrator prompt or run the installer as administrator.
3.
Restart the PC/laptop.
4.
Attach the camera.
5.
Download the latest SharpCap from https://www.sharpcap.co.uk/sharpcap/downloads
.
6.
Install SharpCap – there may be a need to approve an administrator
prompt or run the installer as administrator.
7.
Go to the camera menu and select the camera from the list of
devices.
8.
If the camera is attached to a telescope or lens, a picture from
the camera should be seen in the display area. If you have not
attached the camera to a telescope or lens and the cover is still
on the camera you will see a black image – look in the left hand
bottom corner to make sure that the frame count is increasing and
remove the cover briefly which should cause the image to
brighten.
![]()
9.
Use the Camera
Control Panel at the right-hand side of the screen to
control settings such as exposure and gain. The image should
change in response to the controls being adjusted.
10.
Use the Start
Capture (or Quick Capture)
buttons to start a video capture to a new file or the
Snapshot button to
capture a single frame to a file.
![]()
Once the capture has completed, a Notification Bar
will appear directly below the Tool Bar.
Click the highlighted link to go directly to the folder holding the
captured image.

11. The installation and basic testing of SharpCap is now complete.
Step-by-Step: Installation and First Capture
This section is a step by step getting started guide.
Installing the Camera Driver
Do not connect a camera until its drivers have been installed. Drivers are best installed from a Windows user account which has administrative privileges. The drivers can be obtained in three ways, depending on the camera:
1. Drivers delivered on a CD-ROM provided with the camera. These might not be the latest version, so consider option 2.
2. Links to camera manufacturers’ websites can be found at http://www.sharpcap.co.uk/ , in the Supported Devices section or in Camera Controls in this document under the appropriate manufacturer.
3. Microsoft supported webcams (which work with DirectShow) may download a driver automatically once the camera is plugged in.
Once the camera drivers are installed, restart Windows, plug in the camera and check via Control Panel > Devices to see if the device (camera) is working properly.
Installing SharpCap
The download and installation of SharpCap is described here.
1. Download SharpCap from http://www.sharpcap.co.uk/downloads .
2. Navigate to the folder where SharpCap has been downloaded. Double click on the file SharpCapInstall-<version-number>.exe to install.
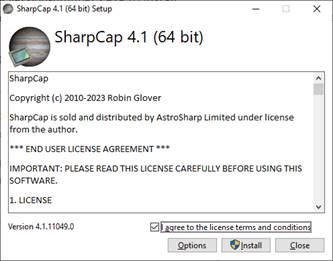
3.
Tick the box to agree to the license terms and conditions and press
the Install button.
4.
Supply an administrator account name and password if requested.
5.
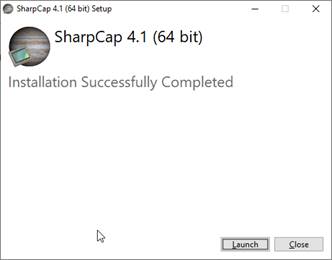
When the Installation Successfully
Completed message appears, click Close to close the
installer or Launch to run SharpCap straight away.
6. SharpCap is now installed.
Testing SharpCap
Consider carrying out the initial testing from inside with the telescope and camera pointing at an object such as a tree, chimney, lamp or mast. Choose a large object.
7.
Connect the camera to the telescope.
8.
Connect the camera to the PC.
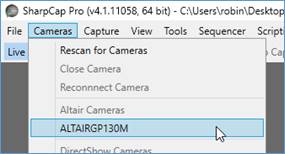
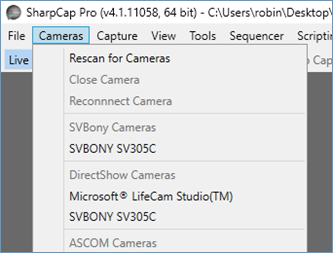
9. Start SharpCap. From the main menu, select Cameras. Ensure the camera is selected (ticked) – in this example, the camera is a SVBONY SV305. If the camera name appears twice, select the one furthest up the list.
10.
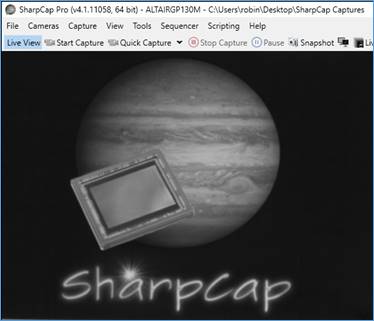
This is SharpCap’s Main Screen.
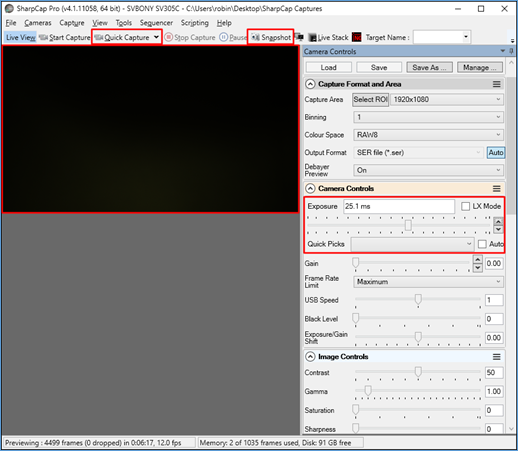
Key areas are:
Capture Display Area
– the image the camera sees is displayed here.
Quick Capture Button
– will start a video capture to a new file.
Snapshot Button –
will capture a single frame to a PNG file.
Exposure – controls
the camera exposure.
Check that the image changes in response to changing light levels – for instance shine a light into the telescope or onto the camera sensor and check that the image becomes brighter. Alternatively, cover the telescope/sensor and check that the image becomes darker.
If focusing of the telescope cannot be reached, try removing
diagonals or adding extensions.
11.
Try the Snapshot
button. A Notification Bar
will appear directly below the Tool Bar.
Click the highlighted link to go directly to the folder holding the
captured image.

12.
SharpCap will create this folder (SharpCap
Captures\YYY-MM-DD) which is on the desktop and will
contain 2 files. One is the image, the other is a text file
containing the camera settings.

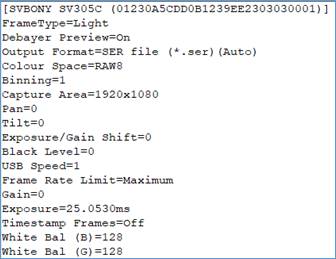
13.
The camera settings file looks like this:
14.
Try the Quick
Capture button. At the bottom-right of the main
screen, a progress bar should appear.
![]()
15.
When this video capture has completed, click the link in the
Notification
Bar. The capture folder should contain a video
file and a camera settings file. Double click the video to
play it.
16. If all the above has worked, the SharpCap and camera installation has been successfully tested.
Removing SharpCap
This section describes the complete removal of SharpCap and all its ancillary settings. This action might be required to perform a clean install with all old settings removed. This work is best carried out with an account with administrator privileges
Uninstall SharpCap – either from Control Panel or via the Start button, go to Programs and Features, highlight SharpCap and Uninstall. [Note: there may be multiple versions to choose from.]
Note: Uninstalling and then re-installing SharpCap will not reset all SharpCap settings to default - see Saving, Restoring and Resetting the SharpCap Settings for information on how to reset all settings to defaults.