The SharpCap User Interface
This section describes the SharpCap user interface and gives a brief explanation of the various tools and controls available to you. These are then explained in greater depth in the following sections of this user manual.
Introduction to the SharpCap User Interface
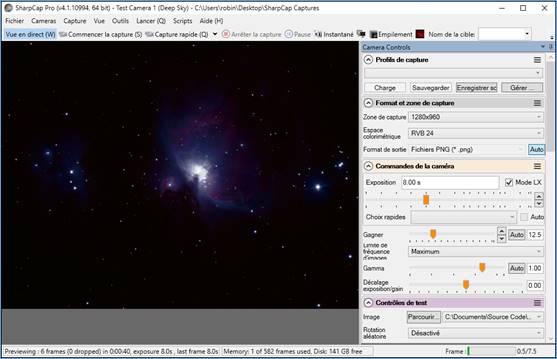
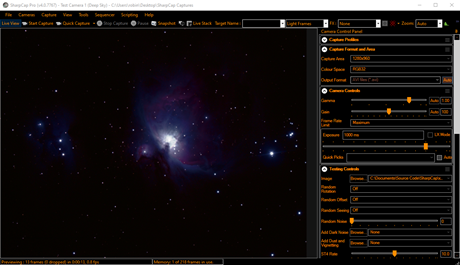
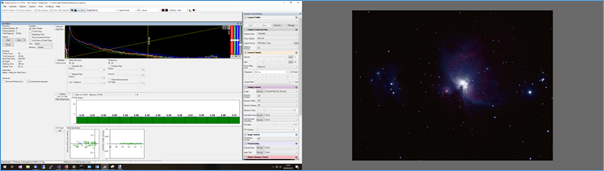
Upon starting SharpCap, dismissing any Tip of the Day message and opening a camera, a screen similar to the following appears:
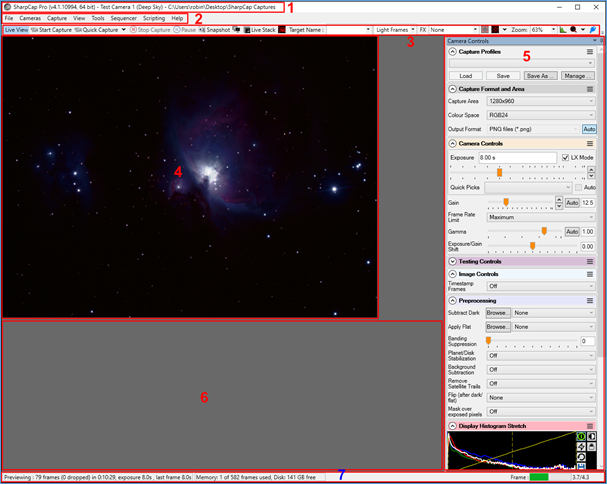
The SharpCap main screen consists of seven permanent areas and one temporary area.
The permanent areas are:
1. Title Bar – shows the SharpCap version, the selected (active) camera (if any) and the default capture folder.
2. Menu Bar – gives access to SharpCap functions.
3. Tool Bar – gives quick access to tools frequently used for image capture. When an image capture has completed a Notification Bar, giving save details, will appear below the Tool Bar.
4. Image Display Area – shows the image currently being captured by the selected camera.
5. Camera Control Panel – gives access to all available controls for the selected camera. Items displayed in this panel will vary depending on the type, model and level of support of the connected camera.
6. Work Area – used as a display area by tools such as Image Histogram, Calculate Focus Score and Live Stack.
7. Status Bar – gives ongoing information about frames captured/dropped and frame rate. During a capture, a progress bar will appear at the right-hand end of the status bar.
The temporary area is:
1.
 |
Notification Bar – appears below the Tool Bar upon completion of a Capture or Snapshot and provides a clickable link to go directly to the folder where the file has been saved or to open the file directly. Click on the file name to open the file itself or the folder name to open the folder. The notification bar is also used to provide other information – a green notification bar indicates success; a yellow bar indicates a warning and an orange bar indicates an error has occurred.
Title Bar
The Title Bar shows the selected (active) camera and the default folder for saving image captures.
![]()
Once an image or video has been captured, the full name of the last captured image/video will be shown instead of the default capture folder.
If no camera is active, only the default folder for saving image captures is shown.
![]()
Note that the title bar also shows the version of SharpCap that you are using and whether you have the 64-bit version of SharpCap or not.
Menu Bar
The Menu Bar gives structured access to many aspects of SharpCap functionality.
![]()
Tool Bar
The Tool Bar gives easy access to a collection of facilities commonly used when performing an image capture.
The left-hand half of the toolbar when a camera is open in ‘Still Camera’ mode:

The left-hand half of the toolbar when a camera is open in ‘Live View’ mode:

The right-hand half of the toolbar:

From left to right, these are:
1. Live View – toggle the camera between live (video) and still mode
2. Start Capture – start capturing images via the ‘Start Capture’ window
3. Quick Capture – start capturing images with no prompt
4. Stop Capture – stop any capture currently in progress
5. Pause – pause a video capture currently in progress (only in live video mode)
6. Snapshot – capture a single frame to an image file
7. Framing Shot – capture and display a single frame, but do not save it (only in still mode)
8. Two Monitor Mode – toggle between single monitor and two monitor mode
9. Live Stack – turn live stacking on or off
10. Deep Sky Image Annotation – turn annotation of deep sky objects on or off
11. Target Name – set the name of the target being imaged – used in filenames
12. Frame Type – set the frame type being captured – used in filenames
13. Preview Effects (FX) – choose a special effect to apply to the image as it is displayed
14. Selection Area – toggle a selection rectangle on or off for use with some tools
15. Reticule Overlays – select one of a range of reticules to draw over the image
16. Zoom – alter the zoom used when displaying the image
17. Image Histogram – toggle showing the histogram of the image
18. Calculate Focus Score – select and activate one of the focus assistance tools
19. Toggle Hardware – connect or disconnect all ASCOM hardware
If the SharpCap window is not wide enough to accommodate all the tool icons, the Tool Bar will look like this with a downward pointing arrow at the right-hand end:
![]()
Click the arrow to access the rest of the toolbar icons:

Image Display Area
The Capture Display Area shows the view currently being seen by the active camera.
When a camera is selected in SharpCap (or SharpCap automatically selects a camera when it is started), SharpCap will start grabbing and displaying frames straight away if the camera is in Live View mode. SharpCap isn't saving these frames, just showing them on the screen. Depending on the exposure length being used, the image may update many times per second or only once every few seconds (or even less frequently). SharpCap will only save images after use of the Start Capture or Snapshot buttons.
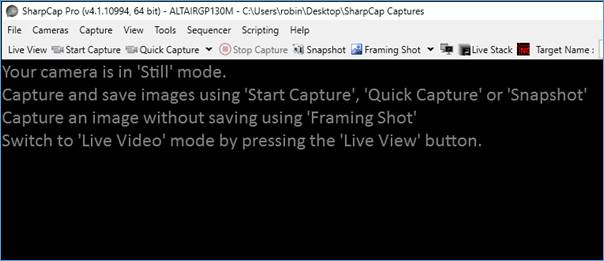
If the camera is opened in Still Mode, SharpCap will not take any images unless you use one of the Capture buttons. SharpCap will initially display a message explaining what to do to capture images – this will be replaced by the image from the camera after the first image has been captured.
You can move around the image in the following ways:
· Adjust the zoom level of the image using the Zoom dropdown in the toolbar
· Adjust the zoom level of the image by holding down the <CTRL> key and using the mouse scroll wheel with the mouse located over the image
· Zoom in on a particular point in the image by putting the mouse cursor over the point, holding down <CTRL> and using the mouse scroll wheel. Once the image fills the available area, the point in the image under the mouse cursor will remain the same as you zoom in/out.
· If you are zoomed to a level that means you cannot see the whole image, you can move around the image using any of the following options
o The horizontal and vertical scrollbars (shown below)
o The mouse wheel for vertical motion and the mouse wheel with <SHIFT> held down for horizontal motion
o Dragging the image with the mouse
Camera Control Panel
The capabilities and available controls of the active camera are displayed in the Camera Control Panel. These controls are used to adjust camera settings such as exposure, resolution, colour balance and others. The groups and controls displayed can vary depending on:
· The manufacturer of the attached camera.
· The model of camera (even from the same manufacturer)
See Camera Controls for a full
description. The controls are grouped logically and
each group can be expanded/closed as required.
Click on the down arrow button to the left of the group name to expand a ground. Use the ‘hamburger’ icon on the right to drag the groups around to change their order – this allows you to put the controls that you use the most at the top of the list.
Work Area
The Work Area is by default below the image display area and is used to show various tools including:
· Histogram
· Live Stack
· Polar Align
· Focus Score
|
|
|
|
|
|
|
|
For each tool, the title bar of the panel can be used to drag the panel out of the main SharpCap form, for example to place it on a second monitor.
Status Bar
The Status bar at the bottom of the screen gives a constantly updated report on:
· Frames captured
· Frames dropped
· Duration of capture
· Capture speed, frames per second (fps)
· Memory available and in use along with free disk space
· Disk space remaining for saving capture files
· Cooler Status (for cooled cameras)
· GPS Status (for GPS enabled cameras)
![]()
Frame Progress
When the exposure is set to 1s or longer, a progress bar will show on the right giving the progress of each frame
![]()
The numbers to the right of the progress bar are the time elapsed so far in the frame and the time left to go in the frame (both in MM:SS).
Some cameras take a considerable time to download a completed frame to the computer – while the download is happening, the time remaining in the frame may show a negative value. A negative value may also show if the camera has stopped responding properly and SharpCap is stuck waiting for a frame that has not arrived.
Capture Progress
When an image capture has been initiated, a progress bar is displayed at the right showing:
· Frames completed
· Frames remaining
· Estimated finishing time
![]()
SharpCap in your language
SharpCap has partial translations into a small number of non-English languages:
|
Language |
Status |
Language Code |
|
Japanese |
Menus, toolbars, camera controls translated. Additionally, the settings window, start capture window and the About SharpCap windows are translated.
The rest of the program shows in English.
Additionally, the installer has a Japanese translation only. |
ja |
|
Simplified Chinese |
zh-CN |
|
|
French |
fr |
|
|
German |
de |
|
|
Polish |
pl |
|
|
Italian |
it |
|
|
Russian |
ru |
|
|
Spanish |
es |
If you use one of the languages listed above as your Windows display language, SharpCap will automatically use its translation.
You can force SharpCap to display in English by applying the ‘Always show SharpCap in English’ setting. You can force SharpCap to display in another supported language by using the /language command line argument.
The Menu Bar in Detail
File
The File menu item has the following options.
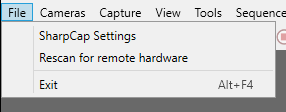
SharpCap Settings
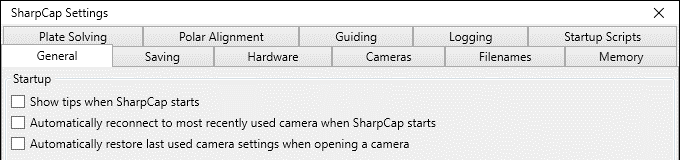
The SharpCap Settings defaults have been chosen to enable ease of use of the application with minimal configuration required after installation, however adjustment to the settings can be made here when necessary.
See Configuring SharpCap for a detailed description of the various settings available.
Rescan for remote hardware
SharpCap can control certain types of hardware (cameras, focusers, mounts, etc) via a network connection. If you have turned on the remote computer or device after starting SharpCap, you may need to tell SharpCap to rescan for remote hardware before the new devices are detected. See Remote Hardware Control and the sections on Basler and Point Grey/FLiR cameras.
Exit
Selecting Exit or Alt+F4 will perform an orderly shutdown of SharpCap. Note that depending on your choices in the settings, you may be prompted to confirm shutdown if you have a camera open or are capturing or live stacking.
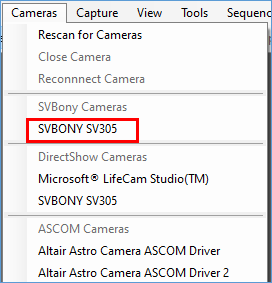
Cameras
The Cameras menu item allows selection and de-selection of attached imaging devices. These may be CMOS or CCD cameras connected over USB or network connections or video capture devices (frame grabbers).
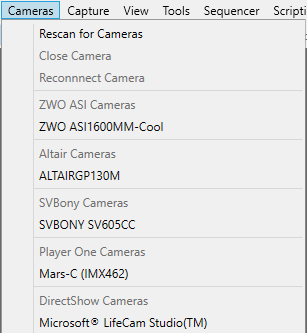
Different types of cameras are grouped into different sections of the menu – each section is headed by the description of the type of camera in that section – i.e. ‘Altair Cameras’, ‘DirectShow Cameras’, ‘ZWO Cameras’, etc.
Normally a new camera will be detected automatically when you plug it into your computer, but in some cases you may need to use the Rescan for Cameras option to detect a newly added camera.
Two ‘built-in’ cameras are provided:
1. Test Camera 1 (Deep Sky), a simulation of a capture of the M42 Nebula in the Constellation of Orion.
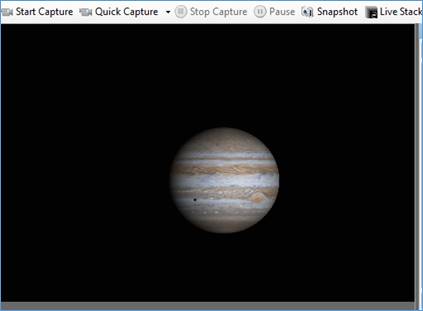
2. Test Camera 2 (High Speed), a simulation of a capture of Jupiter (the dark spot to the lower left being the shadow of a moon).
These two test cameras can be used to learn and experiment with the functionality of SharpCap without requiring a telescope or camera or clear skies for that matter.
The ‘Virtual’ Folder Monitor Camera will also be shown. This camera allows SharpCap to automatically load image files that are already saved (or are being saved) in a folder to allow them to be processed. If you have a camera that SharpCap cannot detect, but have other software that can take images using this camera and save them to a folder, you can use this choice to allow SharpCap to work with those images.
[Note: some cameras (particularly ASCOM and DirectShow cameras) may show in the device list even when they are not connected to the computer – selecting one of these cameras that is not currently connected will give an error message.]
Rescan for Cameras
If a camera connection is lost or a camera plugged in while SharpCap is open, use the Rescan option to find the device.
SharpCap automatically rescans after a USB device is added to or removed from the computer. The rescan button is mainly useful to detect network connected cameras (i.e. Basler or Point Grey Gig-E cameras) as SharpCap cannot detect these being added to the network.
Close Camera
This will close the currently open camera. A camera can also be closed by selecting the active camera a second time in the Cameras menu. Cameras are also closed automatically if a different camera is selected or SharpCap detects that the currently selected camera has been disconnected from the computer.
Reconnect Camera
This will stop then restart the currently connected camera. Under some circumstances this may help recover correct operation if a camera has become stuck or is not responding. If reconnecting the camera does not cure the problem then you may need to close and re-open SharpCap or disconnect and re-connect the camera’s USB cable.
Available Cameras
Select the camera to use from the dropdown list.
There may be occasion when a camera appears twice in the available cameras list. If in doubt which one to select, use the one highest in the list (because SharpCap tries to put the cameras it has the best control over at the top of the list). See the SVBony SV305 in the graphic below.
Sometimes it is useful to close the camera currently in use without opening a different camera. This can be achieved by returning to the Cameras menu and choosing the selected camera from the menu again or using the Close Camera menu item.
Capture
The Capture menu item has the following options.
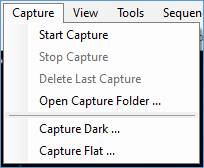
Capture allows control of:
· The capture process.
· The production of dark frames.
· The creation of flat frames.
See Capturing Videos and Images for a detailed description of these menu items.
View
The View menu item has the following items.
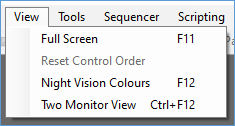
Full Screen
The Full Screen option forces SharpCap to switch to full screen mode. This leaves only the Capture Display Area and Camera Control Panel visible – there are no menu or tool bars available. To reverse this situation, move the mouse pointer to the top of the screen and the menu will appear. The Full Screen option can be unchecked. You can also switch in/out of full-screen view by pressing the F11 key.
Reset Control Order
In the Camera Control Panel, each control group has a handle at the top right corner. This handle can be grabbed with a mouse and the control moved elsewhere in the Camera Control Panel to suit individual preferences. By choosing Reset Control Order, the control groups can be returned to their default order.
Night Vision Colours
Selecting this menu option will toggle SharpCap between the standard colour scheme and a night-vision friendly dark colour scheme. You can also use the F12 key to switch between the two colour schemes.
Two Monitor View
Selecting this option will toggle SharpCap between the standard single monitor view and a two monitor view mode which shows the main image from the camera on a second monitor. Note that two monitor mode is a SharpCap Pro feature.
Tools
The Tools menu item provides access to specific functions which can assist in capturing images or ensuring alignment of the telescope.
Note that the tools only become available to select once a camera has been selected. Some tools also require hardware such as a GOTO mount or electronic focuser to be configured before they can be used.

Histogram
This option provides access to the main SharpCap histogram functionality. See The Histogram for a full description of this tool.
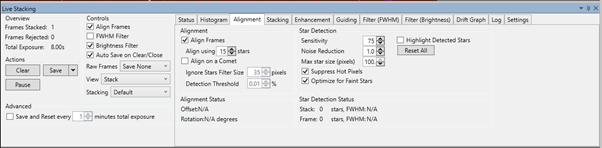
Live Stack
This option provides the same functionality as the Live Stack button located on the Tool Bar. See Live Stacking for a full description of the tool.
<ALT> <L> can be used as a hot key combination to initiate Live Stack.
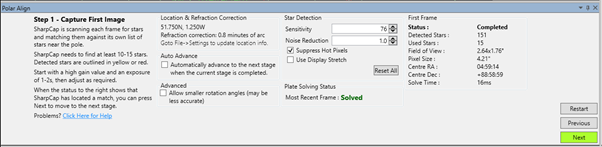
Polar Align
Selecting Polar Align will produce a set of screens to manage the alignment process. See Polar Alignment for a detailed description.
Sensor Analysis
This tool launches the SharpCap sensor analysis routine which can measure the characteristics of your camera sensor. Once measured, the sensor data is stored and can be used in future to provide SharpCap smart histogram functionality. See Sensor Analysis and Smart Histogram for more details. Note that Smart Histogram is a SharpCap Pro feature.
ADC Alignment
This tool helps find the optimum alignment settings for an ADC (Atmospheric Dispersion Corrector) by showing the offset between the red, green and blue channels in a colour image. The tool can detect offsets in planetary images and also for views showing detail on the surface of the moon or sun. See ADC Alignment for more details.
Pixel Value Readout
This tool allows you to read the brightness value of any pixel in the image by clicking on it. In addition to showing the brightness value of the pixel, the co-ordinates (X,Y) are shown along with the colour channel information for the pixel if the camera is in RAW mode. See Pixel Value Readout for more details.
Plate Solve (Solve Only)
This tool initiates a “blind” plate solving search to determine the celestial co-ordinates of the current image. The option will only be enabled if a compatible plate solving tool has been auto-detected or configured in the SharpCap settings. The progress and result of the plate solve operation will be shown in the notification bar. See Plate Solving Settings for more details on compatible plate solving tools and configuration. Note that if an ASCOM mount is connected, SharpCap will use the current co-ordinates from the mount as the search starting point, potentially speeding up the operation.
Plate Solve and Resync
This tool will perform a plate solve on the current image, re-synchronize the mount’s location to the plate solve result and will then re-GOTO the original target co-ordinates. This has the effect of putting the target into the centre of the field of view even if it is off-centre or out of view entirely. Note that the operations performed by this action can be configured in the plate solving tab of the SharpCap settings.
Pixel Position Readout / Click to Recentre
This tool allows you to see the sky co-ordinates (RA/Dec, Alt/Az) for any pixel in the image, provided that an ASCOM GOTO mount has been connected to SharpCap and a plate solving operation has been performed recently.
In addition to showing the sky co-ordinates of any point in the image, the direction of the +/- RA, Dec, Altitude and Azimuth co-ordinates are indicated and you can get SharpCap to recentre the image about any point by double clicking on that point. This is very useful for framing an image. See Pixel Position Readout/Click to Recenter for more details.
Deep Sky Image Annotation
The Deep Sky Image Annotation tool uses plate solving information along with a catalog of brighter deep-sky objects to automatically identify objects within your own images. You can even add your own custom catalogs to the annotation database. See Deep Sky Image Annotation for more details.
Ghosted Image Alignment
This tool provides assistance with re-aligning an image with a previous capture or with creating a mosaic. You can select any previously saved image (of the same resolution) and display it overlaid with the current image, helping make small adjustments to line the current image up perfectly with the previous image. You can also offset the previous image up, down, left or right to help with mosaic alignment. See Ghosted Image Alignment for more details.
Goto Image
Another tool to help you return to a previously imaged target – this is an automated version that uses plate solving to determine the co-ordinates of a previous image and will then use your GOTO mount (and rotator if you have one) to point your camera at the same target. See Goto Image for more details.
Goto Catalog Target/Co-ordinates
Select a target from SharpCap’s built in catalog of deep sky and solar system objects. You can select an object name, or if you aren’t sure you can filter by object type, brightness, altitude, etc to find a good target to view. You can also enter co-ordinates for less common targets. SharpCap will take care of moving the telescope to the new target, plate solving, centering the target, even saving an existing live stack and starting a new one automatically if you want. See Goto Catalog Target/Co-ordinates for more details.
Push-To Assistant
If you are using a non-GOTO mount, SharpCap can help you find targets too. You get the same abilities for searching or filtering for a target as the GOTO Target tool, but after the target is chosen, SharpCap will repeatedly plate solve frames from the camera, giving instructions on which direction and how far to move the telescope with each new frame. See Push-To Assistant for more details.
Focus Assistant
The sub-options here allow the various Focusing tools to be selected, allowing for focus measurements, scanning for best focus and autofocus.
Seeing Monitor
This launches the Seeing Monitor which can help you capture Lunar/Solar/Planetary images when the seeing is at its best.
Feature Tracking
This launches the experimental Feature Tracking tool, which can guide your mount during Lunar/Solar/Planetary imaging to keep the target from drifting out of view.
Collimation (Experimental)
This launches the experimental Collimation assistant which may help with collimation of Newtonian telescopes.
Solar/Lunar Framing Assistant (Experimental)
Getting the right part of the moon or the sun in view can be tricky, even with a GOTO mount. You move the mount upwards, but the image moves down and to the left, and then you scratch your head wondering which way will get the image to move right. Fortunately SharpCap can handle that for you – a brief alignment procedure lets SharpCap work out which way to move the mount for each image direction, then you can simply drag the image around. See Solar/Lunar Framing Assistant for more details.
Stellar Photometry Estimation (Experimental)
This tool builds on SharpCap’s star detection capabilities, displaying information about the peak and total brightness of selected stars displayed in the image. If your camera has sensor analysis data available, the brightness will be calculated in electrons as well as ADU. See Stellar Photometry Estimation for more details.
Sequencer
The Sequencer menu provides access to tools that enable SharpCap to perform automatic, unattended imaging.

Deep Sky Sequence Planner
This menu option becomes enabled when a camera has been selected, and allows you to quickly build and then execute a sequence of imaging operations that includes the most common steps required for seep sky imaging. See Deep Sky Sequence Plannerfor more details.
Solar System Sequence Planner
The Solar System Sequence Planner allows you to quickly design and execute sequences for solar system imaging, particularly for capturing targets in a range of filters with minimal delay between the captures. As with the Deep Sky planner, you must have the camera you intend to use already selected to enable this option.
Lunar Mosaic Planner
This option becomes enabled when a camera is selected and a GOTO mount is configured and connected. The Lunar Mosaic Planner will help you plan and capture a lunar mosaic automatically – SharpCap will take care of working out how many panels are needed and how they should be arranged as well as moving the telescope from one panel to the next and capturing images. See Mosaic Planning for more details.
Solar Mosaic Planner
An equivalent to the Lunar mosaic planner above but for capturing solar mosaic images. See Mosaic Planning for more details.
Edit…
Selecting this option shows the full sequence editing tool – this is more flexible than the Deep Sky Sequence Planner and can be used to accomplish a much wider variety of imaging tasks, but is more complicated. See Sequence Editor for more details.
Run…
This option allows you to browse for a previously saved SharpCap Sequence (*.scs) and begin running it.
Run Current
This option will run the sequence that is currently loaded into the sequence editing tool.
Run Recent…
Choose a sequence that has been loaded and run recently – that sequence will be loaded and run.
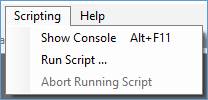
Scripting
The Scripting menu item allows access to the Scripting Console and gives the ability to run existing scripts and write new scripts. The scripts are based on Python. The functionality of SharpCap can be extended by using scripting as a built-in programming language.
Scripting is an advanced topic and knowledge of it is not essential to be able to use SharpCap effectively.
See Scripting for a full description.
Help
The Help menu item has the following options.
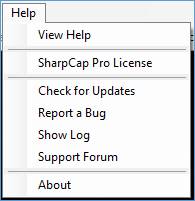
View Help
View Help will display this documentation, in Windows help file format, installed as part of the of the SharpCap software.
SharpCap Pro License
Allows you to enter or check your SharpCap Pro license.
Check for Updates
Selecting Check for Updates will initiate a version check against the SharpCap website of the installed versus latest version. If no updates are available, the message below is displayed.
If an update is available, a download and installation is offered.
Note that there is a delay before new versions of SharpCap are made available via this auto-update mechanism. You may find new versions available for download on the downloads page even if this check shows that no new updates are available.
Under some circumstances the auto-update may fail to install correctly. If that happens, the easiest thing to do is to download the new version manually from the downloads page and install it.
Report a Bug
This option provides direct link to the ‘Bug Reports’ area of the SharpCap forums. Before posting a new bug report in the forums, please check that you are using the most up-to-date version of SharpCap and also search the forums to see if the problem you are having has already been discussed – there may even already be a fix or workaround for the problem!
Show Log
SharpCap, in the background, is constantly logging events relating to the program. Choosing this menu item will show the log window displaying this information. New lines of information will be added to the log window as you take actions in SharpCap. See the SharpCap Log for more information.
Support Forum
This will launch the SharpCap forums in your web browser. You will find hints, tips, guides, and discussion of the use of SharpCap and general astronomy on the forums.
About
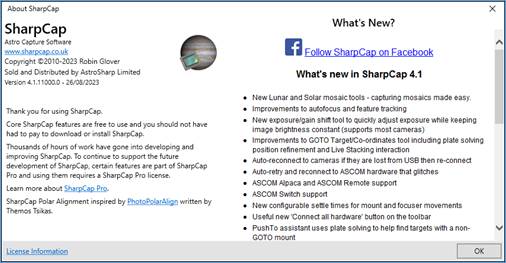
Selecting this menu item will show the ‘About SharpCap’ window.
The About window provides:
· A link to the SharpCap website.
· A message informing an upgrade to a SharpCap Pro License is available.
· Acknowledgements.
· A link to License Information.
· A link to the SharpCap Facebook page.
· Version and Change history.
The Tool Bar in Detail
The toolbar changes slightly depending on whether the camera is open in ‘Live View’ mode or in ‘Still Camera’ mode. Some items listed below are only visible in ‘live view’ mode or only visible in ‘still camera’ mode.
Live View
This button toggles the camera between ‘Live View’ (video) mode and ‘Still Camera’ mode.
![]()
When the camera is in ‘Live View’ mode, the button is highlighted, as shown above. Some cameras do not have the ability to work in Still Camera mode, in which case this button will be disabled.
Note that toggling this button to an appropriate state before opening a camera will set the mode in which the camera is opened. See Live Mode and Still Mode for more information on the differences between Live and Still modes.
Start Capture
The Start Capture button will start a video capture to a new file.
![]()
The functionality is identical to choosing Capture > Start Capture from the menu. See Capturing Videos and Images for a full description.
Quick Capture
|
Clicking the Quick Capture button will initiate a video capture to a new file but use a pre-selected number of frames or seconds.
To modify the pre-selected value, click the down arrow and select a new value. This value will be ‘remembered’ for future quick captures.
|
|

<ALT> <Q> can be used as a hot key combination to initiate a Quick Capture.
Stop Capture
When a capture is in-progress, the Stop Capture button will be available and will stop the current capture.
![]()
You can also press the <Esc> key to stop the current capture. When no capture is in progress, Stop Capture will be disabled, as shown above.
Pause
When a capture is in-progress, the Pause button will be available and will pause capture. This is useful if a cloud is passing over the object of interest. Pausing capture only stops frames from being saved to file – the image shown on screen will continue to update.
![]()
Pause is not shown when a camera is in ‘Still Camera’ mode.
Snapshot
The Snapshot button will capture the current image as seen in the display area to a still image file, which can be in PNG, TIFF, JPG or FITS file.
![]()
The location of the captured file appears in the Notification Bar below the Tool Bar, for example:
![]()
<ALT> <A> can be used as a hot key combination to initiate a Snapshot.
Framing Shot
This button, which is only visible when the camera is in ‘Still Camera’ mode, will cause the camera to capture an image and display it on screen. The image will not be saved.

The ‘Framing Shot Quick’ option will be available if the camera in use has an adjustable gain control. When this button is pressed, SharpCap will increase the gain, reduce the exposure to compensate, take and display an image and then restore the exposure and gain controls to their original values. This can be useful for checking framing or focus of a deep sky object.
Two Monitor View
This button will only appear on a PC with two or more monitors connected (the monitors must also be used to ‘Extend’ the display rather than ‘Mirror’ it).
![]()
When pressed SharpCap will switch between the normal view on one monitor and a two-monitor view where the camera image is transferred to the second monitor and all controls remain on the initial monitor. This is particularly useful when Live Stacking as the live stacking controls can be allocated much more space on the first monitor.
Note that Two Monitor View is a SharpCap Profeature. If you use it without a SharpCap Pro license then a watermark will be shown on the second monitor image.
Live Stack
This button initiates the Live Stack process. The functionality is identical to choosing Tools > Live Stack. See Live Stacking for a full description of the tool.
![]()
<ALT> <L> can be used as a hot key combination to initiate Live Stack.
Deep Sky Image Annotation
This button toggles the Deep Sky Image Annotation function on or off.
![]()
This functionality requires plate solving, so will not be available unless you have installed a plate solving application and configured SharpCap to use it.
Target Name
Selecting Target Name in the main toolbar allows a pre-defined object to be selected and used as part of the capture folder hierarchy.
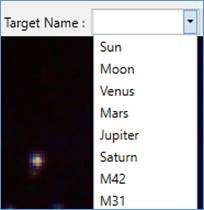
A new name can also be typed here to represent the current object of interest – such as NGC7000 or North American Nebula.
![]()
Subsequent captures would be saved in a sub-folder called NGC7000 (or North American Nebula) under the default capture folder. Targets added here will not persist across SharpCap restarts. To become permanent, the target must be added via File > SharpCap Settings > General tab.
This tool is convenient for self-documentation purposes (in the capture folder name hierarchy) during an imaging session. For example, names such as ‘M42 CLS filter’ and ‘M42 f6.3 reducer’ can be created to identify equipment used for a capture.
Note that when you use some other features in SharpCap (such as the GOTO Target tool or the Sequencer), the Target Name may be set automatically based on choices you make in those other features.
Frame Type
You can select the type of frame you are capturing here and the type will be substituted into the filename template for any saved files.
![]()
Frame Types are also used by the Sequencer and Sequence Planner tools. Note that changing the frame type only affects saved file naming. To capture actual dark frames you need to cover the telescope as well as selecting dark frames in this dropdown.
Display FX (effects)
The Display Effects, FX, dropdown contains the options shown below. Note that the effects applied to the image by the options shown here are only shown on screen – they do not affect images saved to file.
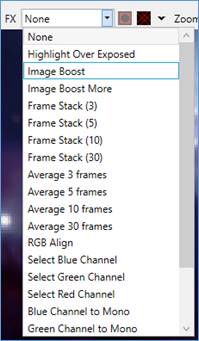
When certain FX options are chosen, the Selection Area tool from the tool bar becomes active, allowing you to restrict the operation of the effect to the selected area.
See Display Effects for more information on each of the available effects.
Selection Area
The Selection Area tool creates a red selection rectangle on the image which can be dragged and re-sized.
![]()
This selected area is used when applying display effects (FX) or when using the Calculate Focus Score, Sensor Analysis or some other tools.
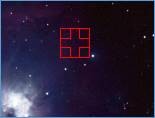
The Selection Area tool can also be used to investigate the histogram of a reduced area when using the Image Histogram tool and specify the area of the image to be processed for other operations such as the sensor analysis tool.
Note that if the selection area is very small, it may not be easily visible - to help find it, SharpCap will display two red arrows pointing towards it when it is very small:

If you wish to make a very small selection larger, either use the Zoom functionality to expand the view until the selection area can be adjusted or double-click anywhere in the image, which will reset the selection area to an area around the point where you double-click
Reticule Overlays
The Reticule Overlay tool has 5 options.
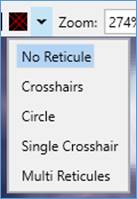
By repeatedly clicking the icon located in the Tool Bar, the display area will cycle through the reticule options. The reticule can also be selected directly by using the drop-down menu to the right of the button. See Reticules for more information on each reticule and how to adjust them.
Zoom
The Zoom tool gives the ability to zoom in or out of the image in the Capture Display Area. You can also adjust the zoom by using the mouse wheel while holding the down the <CTRL> key. If you are using a laptop with a touch panel, you may also be able to adjust the zoom using ‘pinch’ gestures.
|
This feature can be used to: · Zoom in when searching for fainter objects. · Zoom in when trying to place the FX Selection Area over a single-star when using the Calculate Focus Score tool. · Zoom in when trying to accurately set the Black Level % when using the Calculate Focus Score tool. · Zoom out to reduce the image when Live Stack or Image Histogram are in use. · Zoom out to reduce the image size displayed when capturing at higher camera resolutions.
· The Zoom dropdown has a range of 16% - 800%, but a wider range from 5% to 2000% is available using CTRL + Mouse Wheel adjustments · Auto zoom is a sensible working setting for most purposes – it will fit the image to the screen space available.
|
|
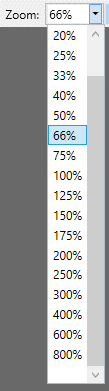
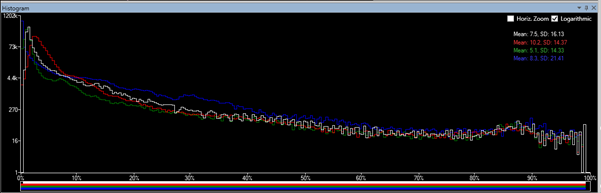
Image Histogram
A correctly shaped Histogram is a key requirement to producing quality images.
Clicking the Image Histogram icon in the Tool Bar:
![]()
will display the Image Histogram in the Work Area of the Main Screen.
See The Histogram for a full description and examples including information on logarithmic versus linear scales and the impact of solar/lunar/planetary/deep sky/ROI on the shape of a histogram.
Calculate Focus Score
SharpCap has a several options to help acquire focus on targets (possibly one of the most challenging aspects of astrophotography). The tools are particularly powerful if an ASCOM focuser is configured in SharpCap.
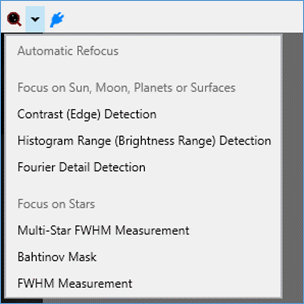
Focus assistance is started by selecting the Calculate Focus Score icon from the Tool Bar, then choosing one of the available focus tools. If you have an electronic focuser configured and have previously made a successful focus scan, the ‘Automatic Refocus’ button gives you a one-click way to repeat that procedure to refocus.
|
Focus tools for planetary or surface targets: · Contrast (Edge) Detection · Histogram Range (Brightness Range) Detection · Fourier Detail Detection |
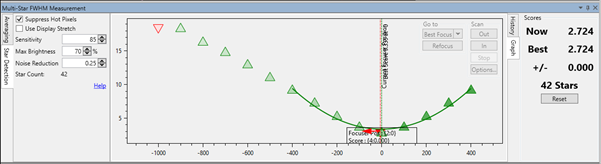
Focus tools for stars or other point sources:
· Multi-Star FWHM Measurement · Bahtinov Mask · FWHM Measurement
|
See Focusing for a full description including introductory materials and examples.
Connect/Disconnect Hardware
Pressing the connect/disconnect hardware button will quickly connect or disconnect all ASCOM hardware with a single click.
![]()
![]()
If all configured hardware (Focuser, Filter Wheel, Mount, Rotator, Switch) is currently connected, then this button will be highlighted, as shown on the right, and pressing it will disconnect all hardware.
Conversely, if any hardware is currently not connected then this button will not be highlighted, as shown on the left, and pressing it will connect all hardware.
The Camera Control Panel
The capabilities and available controls of the active camera are displayed in the Camera Control Panel. The groups and controls displayed can vary depending on:
· The manufacturer of the attached camera.
· The model of camera (even from the same manufacturer)
See Camera Controls for a full description of what each control does – this section describes how to arrange, adjust and use the various types of controls and gives an overview of what to expect in each group.
Adjusting the Panel
You can change the width of the camera control panel to either allow more space for the controls or to allow more space for the main image. To change the width, place the mouse over the vertical line separating the control panel from the image area. The mouse will change to a left and right arrow when in the right position (⇔). Once you see the double arrow mouse cursor, click and drag to either the left or right to change the width
It's also possible to make the camera controls panel automatically hide itself against the right-hand side of the window when not in use. To do this, click the ‘auto hide’ pin on the right-hand side of the ‘Camera Controls’ title area.

Clicking the pin will cause the Camera Controls to collapse against the right side of the window, with just the title visible.
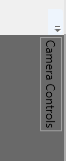
To access the controls, move your mouse over the title area, which will cause the entire control panel to reappear. You can then change controls as needed. When you move your mouse out of the controls area, it will return automatically to the collapsed state.
To turn off the auto-hide behaviour, simply make the camera controls appear and then click on the pin again (now labelled ‘restore’).

Finally, you can move the entire Camera Control are out of the SharpCap window by dragging on the title bar. You can then place it somewhere else on the screen – perhaps on a second monitor. The controls can be returned to their default position by dragging them back into the main SharpCap window are and selecting one of the ‘docking’ drop points.
Note that SharpCap will automatically remember the width of the camera control panel and whether it is set to auto hide, and re-use those settings the next time you start SharpCap. Dragging the controls to a custom position is not remembered and will need to be repeated each time SharpCap is started.
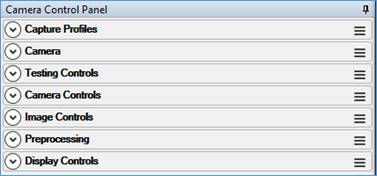
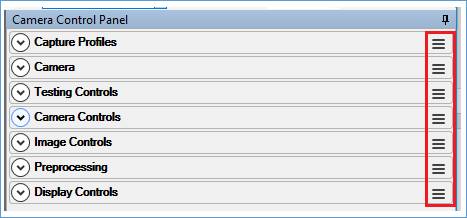
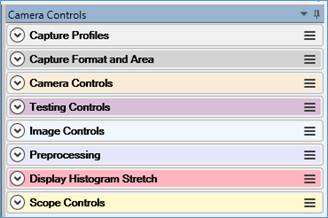
Working with Control Groups
Controls are grouped logically and each group can be expanded/closed as required. Each group has its own heading colour which helps you quickly identify the correct group when looking for a particular control.
Press the down arrow to the left of the group
name to expand the group and show the controls inside it. When the
group is expanded, the down arrow changes to an up arrow, which you
can press to collapse the group again.
When you expand a group of controls, you will be able to see and adjust the individual controls within the group
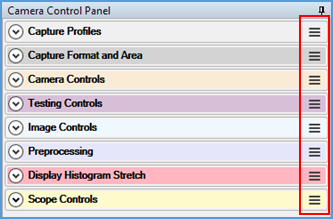
The control groups can be grabbed with a mouse and dragged to
re-arrange their order to suit user preferences. To reset the
order to default, use Options > Reset Control
Order from the main menu. Grab the group using the
three horizontal bars shown to the right of the group name to
reorder.
Working with Controls
Most controls fall into one of two categories – slider controls and dropdown controls.
Slider Controls
Slider controls allow you to adjust the control by setting a numeric value. The position of the slider and the numeric readout shown on the right display the current value of the control. This control shows that Gamma is currently set to a value of 1.00.
![]()
You can adjust slider controls in the following ways
· Drag the slider to the left or the right. The new value will depend on the final position of the slider.
· Click on the slider to the left or right of the current position – this will move the slider position by a fixed step, usually the distance between the tick marks below the slider
· Type a value into the value box on the right and press either <ENTER> or <TAB> to confirm
Some slider controls have an option of being set automatically. If this is the case then an ‘Auto’ button will be shown between the slider itself and the value. Click this button to toggle between auto and manual mode – when auto mode is enabled the button will be highlighted and you will be unable to move the slider manually.
![]()
In many cases, the value of a control in ‘Auto’ mode will update every few seconds to show the current automatically set value of that control.
The ‘Gain’ or ‘Analogue Gain’ control has additional up and down adjustment buttons to the right of the slider than make small changes to the gain. Pressing these button makes a change of approximately 2% to the value, or 1 unit, whichever is the smaller.
![]()
Some slider controls are read-only – they only display the current value rather than allowing it to be adjusted.
![]()
Dropdown Controls
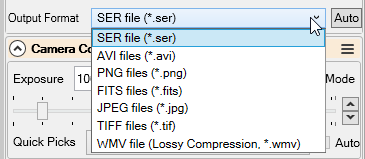
Dropdown controls allow you to choose one of a range of options. The displayed value is the currently selected option, so this control shows that captured images will currently be saved to SER file.
![]()
To change the value of a dropdown option, click on the current value to display the list of available options, then click on the new option that you wish to select.
As for slider controls, some dropdown controls will have an ‘Auto’ option which can be enabled or disabled. When ‘Auto’ is enabled, you cannot change the control manually.
Other Controls
Some controls display a button that either takes an action or shows an additional window of settings or adjustments
![]()
![]()
Controls which specify a file (for example dark subtraction or flat frame correction) have a ‘Browse…’ button to allow a file to be selected
![]()
The Exposure control has additional options to make choosing the right exposure easier
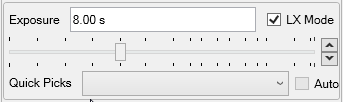
These include a ‘Quick Picks’ dropdown to select commonly used exposure times, up and down adjustment buttons and an ‘LX Mode’ toggle which switches the exposure slider between ‘short’ and ‘long’ exposure settings.
There are also various specialist controls to allow other hardware (such as filter wheels, focusers, mounts, etc.) to be adjusted.
Control Groups Overview
This section gives a brief overview of the control groups that you are likely to see when using a camera, along with the types of controls you can expect to find in each group.
Capture Profiles
The Capture Profiles group allows you to load, save and manage Capture Profiles.
A Capture Profile is a collection of camera settings stored in a text file. Various profiles can be loaded to have instant access to known collections of settings for different targets and cameras.
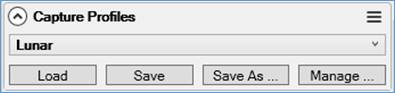
· Load – loads the values from the capture profile currently selected in the drop down and applies them to the camera controls.
· Save – takes the current values of the camera controls and writes them to the profile currently selected in the dropdown (overwrites the profile).
· Save As – creates a new profile from the current camera control values.
· Manage – shows the Capture Profile management screen, which allows you to rename, delete and set capture profiles as default.
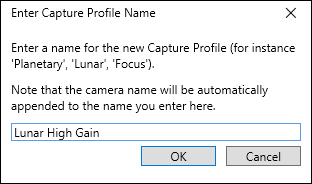
A new Capture Profile can be created by clicking Save As, entering a meaningful profile name, followed by OK.
The available stored Capture Profiles can be accessed from the drop down:
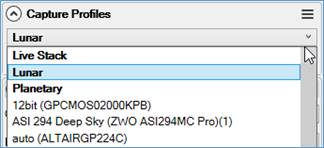
Profiles that were created using the currently selected camera are shown in bold text. Profiles that were created using other cameras are shown with the name of the camera in brackets after the profile name. You can attempt to load a profile created for a different camera if you wish – but the results may be incorrect.
Note, changing the selected item in the drop down of profile names doesn't do anything by itself, it just changes the profile used if Save or Load is pressed.
If a default profile is set for a camera then that profile is automatically loaded each time the camera is opened.
Capture Profile Management
You can manage your capture profiles by pressing the Manage… button in the capture profile area. This shows the capture profile management area.
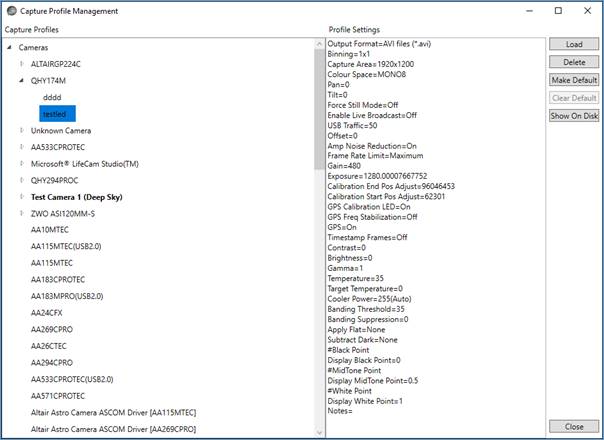
Existing capture profiles are shown, grouped by camera, on the left hand side. Clicking on a capture profile will show the settings that it contains. You can use the buttons on the right to help manage your capture profiles:
· Load – loads the selected capture profile, applying the settings to the currently open camera
· Delete – deletes the currently selected capture profile. Note that there is no way to undo the deletion of a capture profile
· Make Default – make the currently selected profile the default profile for the camera it was created for. The default profile is loaded each time the camera is opened.
· Clear Default – available if the currently selected profile is the default profile for a camera – removes the default flag for that profile.
· Show on Disk – launches Windows Explorer, with the file that contains the selected profile highlighted. You can use this functionality to (for example) transfer profiles to another computer or edit them manually or rename them.
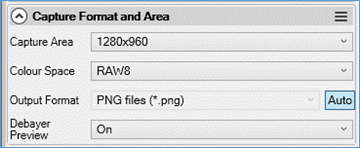
Capture Format and Area
The controls in this section allow management of the resolution, bit depth, colour space and binning of the camera as well as the save format for any captured images.
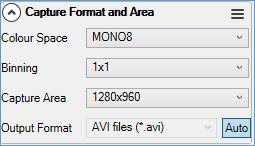
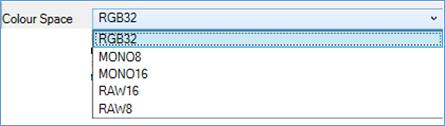
An alternate Colour Space can be chosen if required. This determines the bit depth and mode in which the camera captures images. In general, select an 8-bit mode for solar system or terrestrial imaging and a higher bit depth (12,14,16) for deep sky imaging. See Colour Spaces Explained for more details.
When the output format is set to Auto, SharpCap will chose the most appropriate save format for capture files depending on the colour mode chosen and the exposure length.
- Exposures of less than 5s will be saved into a video format.
- Exposures of 5s or more will be saved as individual frames.
- SharpCap will try to obey the preferred video and still image file formats specified in the Saving Settings.
- RAW images will never be saved as JPG as this format is ‘lossy’ and would severely damage the bayer pattern data in the RAW image. RAW8 images may be saved as WMV, but SharpCap will automatically debayer the images before saving to WMV.
- 16-bit images will never be saved to AVI, WMV or JPG as these formats do not support high bit depths.
Camera Controls
The controls in this section allow management of the exposure, gain and other mostly hardware related features of the camera. These controls (along with setting the correct Colour Space) are generally the most important for setting up the camera to take good quality images.
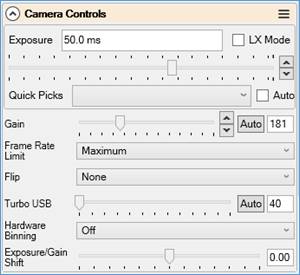
Image Controls
The controls in this section allow application of basic image processing such as brightness, gamma and contrast to the images being captured by the camera. The range of controls available is determined by the camera manufacturer/camera driver author.
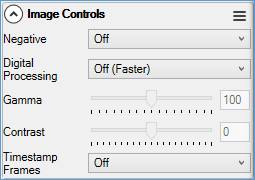
SharpCap can add a timestamp showing the date and time to captured frames from all cameras except the Virtual Folder Monitor camera. Note that the time used for the timestamp is based on the time that SharpCap receives the frame – this will be after the frame finished being captured. The time difference between the frame being captured and SharpCap receiving it depends on the model of camera in use and the camera settings.
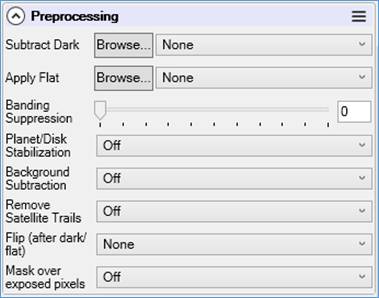
Pre-processing
You can configure dark subtraction and flat frame correction here, along other forms of pre-processing to improve image quality. Adjustments made here will affect both the image as displayed on screen and image data saved to file (except for saving ‘raw’ unprocessed frames during live stacking, which are saved without these adjustments). See the section on Image Processing in SharpCap for more details.
SharpCap’s flat frame correction code has been designed to allow it to process images at high speed from USB3 cameras, allowing the live removal of artifacts such as dust shadows will capturing lunar/solar/planetary imaging videos. See Capturing and Using Dark Frames and Capturing and Using Flat Frames for more details.
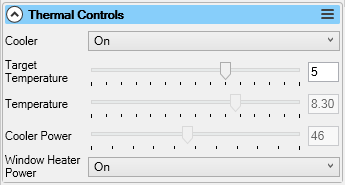
Thermal Controls
For cameras with coolers, there will be a Thermal Controls section, allowing you to turn the cooler on or off and adjust either the cooler target temperature, or the cooling power, or possibly both. There will usually be a readout of the current camera temperature in this section, which will update regularly. For cameras with a temperature sensor, but no active cooling device, the temperature readout control will be in the Camera Controls group.
Mini Histogram and Display Stretch
This control shows an always-on mini histogram of the current image and allows the image displayed on screen to be ‘stretched’ without affecting the data saved to file when capturing. Stretching the displayed image means that the brightness and/or contrast can be enhanced, or faint detail can be brightened easily. The stretch function provides similar effects to the Image Boost options in the FX dropdown but with finer control.
Adjustments to the display brightness made here do not affect save files (except for files saved using the ‘Save’ icon within the mini histogram area, which are saved to look exactly as they do on screen).
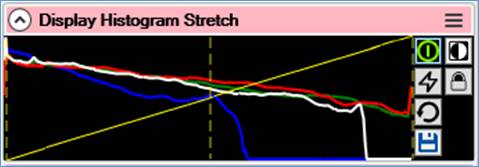
See Mini Histogram and Display Stretch for more details.
Scope Controls
The Scope Controls section contains controls that allow you to operate imaging hardware such as GOTO mounts, electronic focusers, filter wheels, rotators and more. These options will only appear if you have configured SharpCap to use these devices in the Hardware Settings.
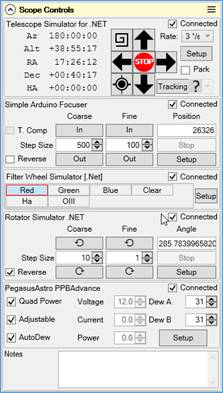
More details on how these controls work can be found in the Telescope Hardware Control section.
This section also contains a Notes field – you can type any text you want into the Notes field and it will be included in the CaptureSettings.txt files that are saved alongside captured images and videos.
Note that CaptureSettings.txt files are saved at the beginning of a capture, so changes made to the Notes field after a capture has started will not be reflected in the CaptureSettings.txt file for that capture.
Testing Controls
The testing Controls group is specific to the two test cameras included with SharpCap. The controls allow for the simulation of atmospheric conditions, addition of simulated dark noise or dust specks and other functions. These controls can often be used to test other functions in SharpCap such as dark and flat correction, satellite trail removal, etc.

Other Controls
These are manufacturer dependent; examples include:
· GPS settings
· USB related settings which control how fast the camera tries to pump data over the USB connection
· White Balance